Yamaha MO6 Owner's Manual - Page 51
Changing the sounds, Function sets assigned to the Knobs
 |
UPC - 086792837703
View all Yamaha MO6 manuals
Add to My Manuals
Save this manual to your list of manuals |
Page 51 highlights
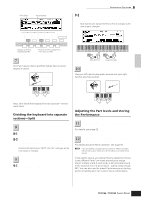
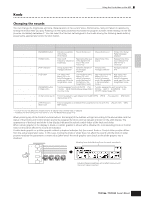
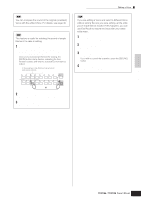
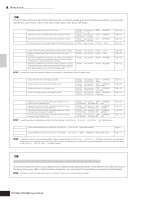
Playing the MO Quick Guide Knob Using the Controllers on the MO Changing the sounds You can change the brightness and tone characteristics of the current Voice, Performance, Song or Pattern in realtime by turning the knobs while you play. Rotating it to the right (clockwise) increases the program number, while rotating it to the left (counter-clockwise) decreases it. You can select the function set assigned to the knobs among the following seven sets by pressing the appropriate Control function button. Function sets assigned to the Knobs Operation When pressing the [PAN/ SEND] button Button of which the lamp is turned on [PAN/SEND] button When pressing the [TONE] [TONE] button button When pressing the [ARP FX] button When pressing the [EQ] button [ARP FX] button [EQ] button When pressing the [PAN/ SEND] button and the [TONE] button simultaneously When pressing the [TONE] button and the [ARP FX] button simultaneously** When pressing the [ARP FX] button and the [EQ] button simultaneously [PAN/SEND] button [TONE] button All the buttons are off [ARP FX] button [EQ] button Functions controlled by each Knob KN1 (Knob 1) KN2 (Knob 2) KN3 (Knob 3) KN4 (Knob 4) Pan (stereo position) of the Voice/ Performance Reverb Send Level Chorus Send Level Tempo of the Song/ Pattern/Arpeggio playback Filter Cutoff Frequency (degree of brightness) Resonance (the level of the signal in the area of the cutoff frequency) Attack Time of the sound Release Time of the sound (decay time after the key is released)* Swing degree of the Arpeggio playback Gate time (length) of the Arpeggio playback Velocity of the Arpeggio playback Arpeggio playback time Low band of the Master EQ in the Voice/Performance mode, part EQ in the Song/Pattern mode Low-mid band of the Master EQ in the Voice/Performance mode, Mid band of the Part EQ in the Song/Pattern mode High-mid band of the Master EQ in the Voice/Performance mode. (Not available in the Song/Pattern mode.) High band of the Master EQ in the Voice/Performance mode, part EQ in the Song/Pattern mode Function assigned from the [UTILITY] → [F4] CTLASN → [SF2] ASSIGN display (page 208) in the Utility mode Function assigned for each Voice from the [VOICE] → [EDIT] → [COMMON] → [F4] CTLSET display (page 155) Function assigned for each Master from the [MASTER] → [EDIT] → Zone selection → [F5] KN/CS display (page 217) Function assigned to the Master Effect parameters from the [UTILITY] → [F4] CTLASN → [SF5] MEF display. * For Drum Voices, this affects the release time for all played notes, whether held or released. ** Available only when setting the Zone Switch to on in the Master Mode (page 215) When pressing any of the Control function buttons, the lamp(s) of the buttons will light according to the above table, and the status of the Knobs and Control sliders (currently assigned functions and set values) is shown on the LCD display. The appearance of the knob and slider in the display indicates the actual control status of the knob and slider. When a knob graphic in the display is black or a slider graphic is shown with a shadow, the corresponding Knob or Control slider on the panel affects the sound as indicated. A white knob graphic or a slider graphic without a shadow indicates that the current Knob or Control slider position differs from the actual parameter value. In this case, moving the knob or slider does not affect the sound until the knob or slider position reaches the parameter's current value (after which the knob graphic turns black or the slider graphic has a shadow). DAW REMOTE PAGE SELECT ASSIGN A PAN SEND PAN ASSIGN B REVERB ASSIGN 1 CHORUS ASSIGN 2 TEMPO ASSIGN TONE CUTOFF RESONANCE ATTACK RELEASE SWING GATE TIME VELOCITY UNIT MULTIPLY LOW LOW MID HIGH MID HIGH Adjusting these knobs/sliders affects the sound immediately. ARP FX MEF EQ Adjusting these knobs/sliders will not affect the sound until the current value is reached. Owner's Manual 51
-
 1
1 -
2
-
3
-
4
-
5
-
6
-
7
-
8
-
9
-
10
-
11
-
12
-
13
-
14
-
15
-
16
-
17
-
18
-
19
-
20
-
21
-
22
-
23
-
24
-
25
-
26
-
27
-
28
-
29
-
30
-
31
-
32
-
33
-
34
-
35
-
36
-
37
-
38
-
39
-
40
-
41
-
42
-
43
-
44
-
45
-
 46
46 -
 47
47 -
 48
48 -
 49
49 -
 50
50 -
 51
51 -
 52
52 -
 53
53 -
 54
54 -
 55
55 -
 56
56 -
57
-
58
-
59
-
60
-
61
-
62
-
63
-
64
-
65
-
66
-
67
-
68
-
69
-
70
-
71
-
72
-
73
-
74
-
75
-
76
-
77
-
78
-
79
-
80
-
81
-
82
-
83
-
84
-
85
-
86
-
87
-
88
-
89
-
90
-
91
-
92
-
93
-
94
-
95
-
96
-
97
-
98
-
99
-
100
-
101
-
102
-
103
-
104
-
105
-
106
-
107
-
108
-
109
-
110
-
111
-
112
-
113
-
114
-
115
-
116
-
117
-
118
-
119
-
120
-
121
-
122
-
123
-
124
-
125
-
126
-
127
-
128
-
129
-
130
-
131
-
132
-
133
-
134
-
135
-
136
-
137
-
138
-
139
-
140
-
141
-
142
-
143
-
144
-
145
-
146
-
147
-
148
-
149
-
150
-
151
-
152
-
153
-
154
-
155
-
156
-
157
-
158
-
159
-
160
-
161
-
162
-
163
-
164
-
165
-
166
-
167
-
168
-
169
-
170
-
171
-
172
-
173
-
174
-
175
-
176
-
177
-
178
-
179
-
180
-
181
-
182
-
183
-
184
-
185
-
186
-
187
-
188
-
189
-
190
-
191
-
192
-
193
-
194
-
195
-
196
-
197
-
198
-
199
-
200
-
201
-
202
-
203
-
204
-
205
-
206
-
207
-
208
-
209
-
210
-
211
-
212
-
213
-
214
-
215
-
216
-
217
-
218
-
219
-
220
-
221
-
222
-
223
-
224
-
225
-
226
-
227
-
228
-
229
-
230
-
231
-
232
-
233
-
234
-
235
-
236
-
237
-
238
-
239
-
240
 |
 |
