Yamaha MO6 Owner's Manual - Page 75
Using Mute/Solo with the Song and, Pattern tracks, To mute a track
 |
UPC - 086792837703
View all Yamaha MO6 manuals
Add to My Manuals
Save this manual to your list of manuals |
Page 75 highlights
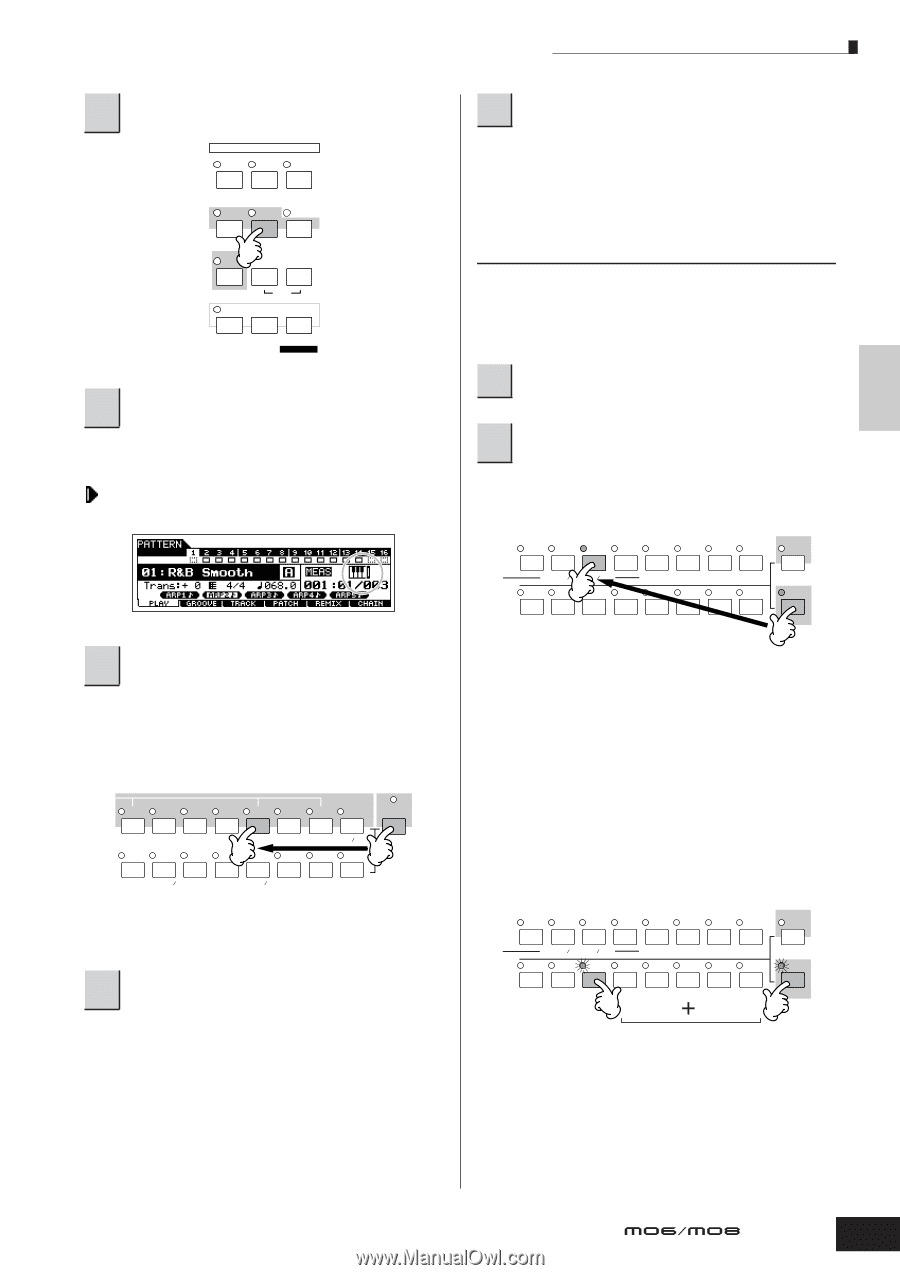
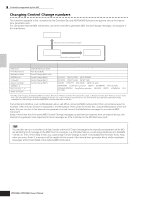
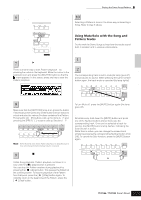
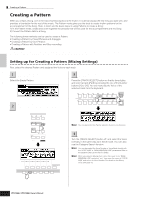
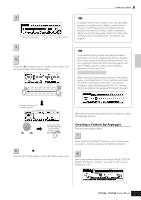
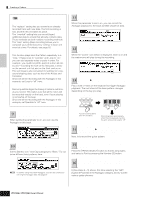
Creating a Song on the MO Quick Guide Playing the Demo Songs/Patterns 6 Press the [PATTERN] button to enter the Pattern mode. VOICE MODE PERFORM MASTER 10 Select and play another Demo Pattern. Selecting a Pattern is done in the same way as selecting a Song. Refer to step 5 above. SONG PATTERN MIXING DAW REMOTE FILE UTILITY EDIT DEMO JOB STORE COMPARE SCENE STORE SET LOCATE 7 Press the [F] (Play) button to start Pattern playback. There is another way to start Pattern playback-by pressing the notes on the keyboard. Move the cursor to the keyboard icon and press the [INC/YES] button so that the mark appears. In this status, press any key to start the Pattern playback. 8 Try out various rhythm variations by changing the Section. Make sure that the [SECTION] lamp is on (press the button if necessary), then press any of the buttons shown below to select and play the various Sections contained in a Pattern. Pressing the [A] - [H] buttons calls up Sections A - H and pressing the [PRE1] - [-] buttons calls up Sections I - P. PRE 1 PRE 2 PRE 3 PRE 4 USER 1 USER 2 GM - SECTION A. PIANO KEYBOARD ORGAN A B C GUITAR PLUCKED D BASS E STRINGS BRASS REED PIPE F G H SYN LEAD SYN PAD SYN COMP CHROMATIC DRUM SE MUSICAL FX COMBI CHOIR PERCUSSION PERCUSSION n Some Sections of the Demo Pattern may have no data. Because of this, selecting some Sections may result in no sound. 9 Press the [J] (Stop) button to stop Pattern playback. Unlike Song playback, Pattern playback continues in a loop until the [J] (Stop) button is pressed. You can stop the Pattern anytime during playback by pressing the [J] (Stop) button. This pauses the Pattern at the current position. To resume playback of the Pattern from that point, press the [F] (Play) button again. To instantly return to the beginning of the Pattern, press the [ E I ] (Top) button. Using Mute/Solo with the Song and Pattern tracks Try this with the Demo Songs to hear how the tracks sound both in isolation and in various combinations. ■ To mute a track 1 Press the [MUTE] button (the lamp lights). 2 Press any of the NUMBER [1] - [16] buttons to select the track number to be muted. The corresponding track is set to mute (its lamp goes off) and produces no sound. When pressing the same number button again, the track mute is canceled (its lamp lights). 1 2 3 4 5 6 7 8 TRACK SELECT ELEMENT PERF. PART ZONE 9 10 11 12 13 14 15 16 MUTE SOLO To turn Mute off, press the [MUTE] button again (the lamp goes off). ■ To solo a track Simultaneously hold down the [MUTE] button and press one of the Number buttons [1] to [16] to solo the corresponding track. Once you've selected a track for soloing, the [MUTE] button's lamp flashes, indicating the Solo function is active. While Solo is active, you can change the soloed track simply by pressing the corresponding Number button [1] to [16]. To cancel the Solo function, press the [MUTE] button again. 1 2 3 4 5 6 7 8 TRACK SELECT ELEMENT PERF. PART ZONE 9 10 11 12 13 14 15 16 MUTE SOLO Owner's Manual 75
-
 1
1 -
2
-
3
-
4
-
5
-
6
-
7
-
8
-
9
-
10
-
11
-
12
-
13
-
14
-
15
-
16
-
17
-
18
-
19
-
20
-
21
-
22
-
23
-
24
-
25
-
26
-
27
-
28
-
29
-
30
-
31
-
32
-
33
-
34
-
35
-
36
-
37
-
38
-
39
-
40
-
41
-
42
-
43
-
44
-
45
-
46
-
47
-
48
-
49
-
50
-
51
-
52
-
53
-
54
-
55
-
56
-
57
-
58
-
59
-
60
-
61
-
62
-
63
-
64
-
65
-
66
-
67
-
68
-
69
-
 70
70 -
 71
71 -
 72
72 -
 73
73 -
 74
74 -
 75
75 -
 76
76 -
 77
77 -
 78
78 -
 79
79 -
 80
80 -
81
-
82
-
83
-
84
-
85
-
86
-
87
-
88
-
89
-
90
-
91
-
92
-
93
-
94
-
95
-
96
-
97
-
98
-
99
-
100
-
101
-
102
-
103
-
104
-
105
-
106
-
107
-
108
-
109
-
110
-
111
-
112
-
113
-
114
-
115
-
116
-
117
-
118
-
119
-
120
-
121
-
122
-
123
-
124
-
125
-
126
-
127
-
128
-
129
-
130
-
131
-
132
-
133
-
134
-
135
-
136
-
137
-
138
-
139
-
140
-
141
-
142
-
143
-
144
-
145
-
146
-
147
-
148
-
149
-
150
-
151
-
152
-
153
-
154
-
155
-
156
-
157
-
158
-
159
-
160
-
161
-
162
-
163
-
164
-
165
-
166
-
167
-
168
-
169
-
170
-
171
-
172
-
173
-
174
-
175
-
176
-
177
-
178
-
179
-
180
-
181
-
182
-
183
-
184
-
185
-
186
-
187
-
188
-
189
-
190
-
191
-
192
-
193
-
194
-
195
-
196
-
197
-
198
-
199
-
200
-
201
-
202
-
203
-
204
-
205
-
206
-
207
-
208
-
209
-
210
-
211
-
212
-
213
-
214
-
215
-
216
-
217
-
218
-
219
-
220
-
221
-
222
-
223
-
224
-
225
-
226
-
227
-
228
-
229
-
230
-
231
-
232
-
233
-
234
-
235
-
236
-
237
-
238
-
239
-
240
 |
 |