Yamaha MO6 Owner's Manual - Page 57
Drum Voice Edit, Oscillator, Pitch, Filter, Amplitude, and EG Envelope Generator
 |
UPC - 086792837703
View all Yamaha MO6 manuals
Add to My Manuals
Save this manual to your list of manuals |
Page 57 highlights
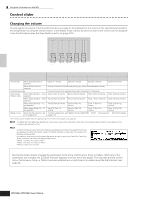
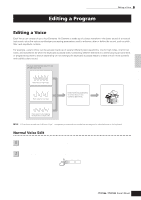
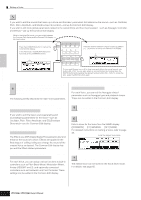
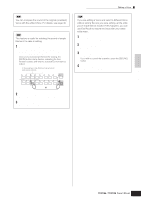
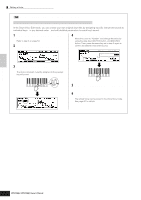
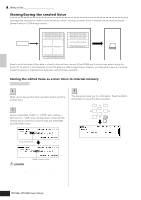
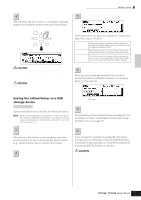
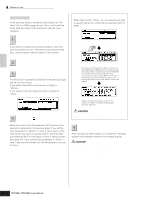
Editing a Program Quick Guide Drum Voice Edit Editing a Voice 1 Press the [VOICE] button to enter the Voice mode, then select a Drum Voice to be edited. 2 Press the [EDIT] button to enter the Voice Edit mode. EDIT JOB STORE COMPARE 3 Call up the Common Edit display or Key Edit display. If you want to edit the sounds that make up a Drum Voice and the basic parameters that determine the sound, such as Oscillator, Pitch, Filter, Amplitude, and EG (Envelope Generator), call up the Key Edit display. To edit more global parameters related to the overall Drum Voice and how it's processed, such as Arpeggio, Controller, and Effects, call up the Common Edit display. While in the Voice Edit mode, you can switch between the Common Edit display and the Key Edit display as shown below. Calling up the Common Edit display Press the [COMMON] button to call up the Common Edit display. In the Edit mode, the [DRUM KITS] button functions as the [COMMON] button. Indicates a Common Edit display. DRUM KITS PRE 1 PRE 2 PRE 3 PRE 4 FAVORITES A. PIANO KEYBOARD ORGAN A B C GUITAR PLUCKED D SYN LEAD 1 SYN PAD CHOIR 2 SYN COMP CHROMATIC PERCUSSION 3 4 Calling up the Key Edit display Press the Number [1] button to call up the Key Edit display, then select the key to which the desired instrument is assigned. Indicates the display for editing the key C0. COMMON ELEMENT PERF. PART ZONE 9 10 11 12 C0 C1 Key Edit (1 - 73) Key 1 Key 5 Key 10 Key 18 Key 21 C6 Key 73 Select the desired menu for editing by 4 pressing the [F1] - [F6] and [SF1] - [SF5] buttons, then edit the parameters. The main parameters available are basically the same as in the Normal Voice Edit (page 53). What is called Key Edit in the Drum Voice corresponds to Element Edit in the Normal Voice. Please keep in mind that the LFO parameters are not available in the Drum Voice. 5 Repeat 3 - 4 as desired. 6 Name the edited Drum Voice. Enter a name for the Voice from the NAME display ([COMMON] → [F1] GENERAL → [SF1] NAME). For detailed instructions on naming a Voice, refer to page 38 in the Basic Operation section. Enter the desired Voice name. 7 Store the edited Voice to internal User memory. The edited Voice can be stored in the Voice Store mode. See page 60 for details. Owner's Manual 57
-
 1
1 -
2
-
3
-
4
-
5
-
6
-
7
-
8
-
9
-
10
-
11
-
12
-
13
-
14
-
15
-
16
-
17
-
18
-
19
-
20
-
21
-
22
-
23
-
24
-
25
-
26
-
27
-
28
-
29
-
30
-
31
-
32
-
33
-
34
-
35
-
36
-
37
-
38
-
39
-
40
-
41
-
42
-
43
-
44
-
45
-
46
-
47
-
48
-
49
-
50
-
51
-
 52
52 -
 53
53 -
 54
54 -
 55
55 -
 56
56 -
 57
57 -
 58
58 -
 59
59 -
 60
60 -
 61
61 -
 62
62 -
63
-
64
-
65
-
66
-
67
-
68
-
69
-
70
-
71
-
72
-
73
-
74
-
75
-
76
-
77
-
78
-
79
-
80
-
81
-
82
-
83
-
84
-
85
-
86
-
87
-
88
-
89
-
90
-
91
-
92
-
93
-
94
-
95
-
96
-
97
-
98
-
99
-
100
-
101
-
102
-
103
-
104
-
105
-
106
-
107
-
108
-
109
-
110
-
111
-
112
-
113
-
114
-
115
-
116
-
117
-
118
-
119
-
120
-
121
-
122
-
123
-
124
-
125
-
126
-
127
-
128
-
129
-
130
-
131
-
132
-
133
-
134
-
135
-
136
-
137
-
138
-
139
-
140
-
141
-
142
-
143
-
144
-
145
-
146
-
147
-
148
-
149
-
150
-
151
-
152
-
153
-
154
-
155
-
156
-
157
-
158
-
159
-
160
-
161
-
162
-
163
-
164
-
165
-
166
-
167
-
168
-
169
-
170
-
171
-
172
-
173
-
174
-
175
-
176
-
177
-
178
-
179
-
180
-
181
-
182
-
183
-
184
-
185
-
186
-
187
-
188
-
189
-
190
-
191
-
192
-
193
-
194
-
195
-
196
-
197
-
198
-
199
-
200
-
201
-
202
-
203
-
204
-
205
-
206
-
207
-
208
-
209
-
210
-
211
-
212
-
213
-
214
-
215
-
216
-
217
-
218
-
219
-
220
-
221
-
222
-
223
-
224
-
225
-
226
-
227
-
228
-
229
-
230
-
231
-
232
-
233
-
234
-
235
-
236
-
237
-
238
-
239
-
240
 |
 |
