Yamaha MO6 Owner's Manual - Page 117
Remote Control Assignments, When controlling Multi Part Editor/SQ01 V2
 |
UPC - 086792837703
View all Yamaha MO6 manuals
Add to My Manuals
Save this manual to your list of manuals |
Page 117 highlights
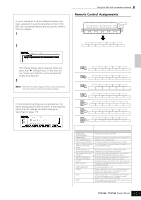
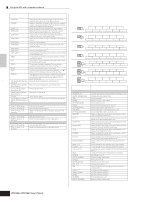
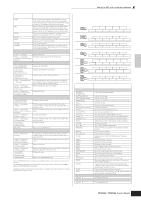
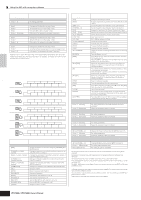
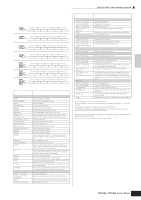
Connecting the MO to external devices Quick Guide Checking the Remote Control assignments If you're unsure as to which software function has been assigned to a particular panel control on the MO, this convenient feature lets you quickly check it from the display. 1 In the Remote Control mode, press the [INFORMATION] button to call up the information display, indicating the function of the last pressed button. 2 Press the button for which you want to check the assignment. This display shown above appears when you press the [F] (Play) button. In this way, you can check each button's control assignment simply by pressing it. 3 Press the [INFORMATION] button again to return to the Remote Control mode. n While the Information display is shown, the panel buttons cannot be used to control the computer software. Demo display in Remote Control function If the connection settings are not appropriate, the demo display (below) will be shown. If this happens, check the MO settings and DAW settings as described on page 113. Using the MO with computer software Remote Control Assignments SF1 SF2 SF3 SF4 SF5 INFORMATION F1 F2 F3 F4 F5 F6 SF1 SF2 SF3 SF4 SF5 F1 F2 F3 F4 F5 F6 When controlling Multi Part Editor/SQ01 V2 Functions of 01X assigned to [F1] - [F6] and [SF1] - [SF5] buttons PAN / SEND PAGE1 SEND GROUP NAME/VALUE DIAL RESET KN1-4/5-8 PAN DYNAMICS EFFECT BANK-L BANK-R SHIFT TONE FADER BANKS FLIP SOLO REC/RDY NAME/VALUE DIAL RESET KN1-4/5-8 BANK-L BANK-R SHIFT ARP FX EQ MIXER/LAYER INST AUX/BUS NAME/VALUE DIAL RESET KN1-4/5-8 AUDIO MIDI OTHER BANK-L BANK-R SHIFT PAGE2 EQ LOW EQ HIGH-MID NAME/VALUE DIAL RESET KN1-4/5-8 SEL CH EQ LOW-MID EQ HIGH BANK-L BANK-R SHIFT PAN / SEND TONE F5 F6 F7 F8 F1 F2 F3 F4 KN1-4/5-8 SHIFT TONE ARP FX NAME/VALUE DIAL RESET KN1-4/5-8 BANK-L BANK-R SHIFT ARP FX EQ CURSOR-L CURSOR-R SCRUB DIAL RESET KN1-4/5-8 CURSOR-DWN CURSOR-UP ZOOM BANK-L BANK-R SHIFT Button/Controller names on 01X Functions In all modes: [DISPLAY UP] [DISPLAY DOWN] Changes the parameter to be edited. [NAME/VALUE] Changes the indication of the parameter name and its value. [SHIFT]+[NAME/VALUE] Changes the meter display mode. [ON] (in the normal status) Turns each channel off or on (mutes/unmutes the signal). [SHIFT] + [ON] of the Master Channel (in the normal status) Turns all the channels including the Master Channel off or on (mutes/unmutes the signal). [SHIFT] + [ON] of each Turns all the channels with the exception of the Master channel (in the normal status) Channel off or on (mutes/unmutes the signal). [ON] (with the [SOLO] lamp Turns the Solo function of each channel on or off (applies to turned on) the Channel Module/Software Synthesizer Module) [SHIFT] + [ON] (with the [SOLO] lamp turned on) Turns the Solo function of each channel on or off (applies to the Channel Module/Software Synthesizer Module) [SOLO] Changes the function of the [ON] button to the Solo function. [SHIFT]+[SOLO] Determines the Solo/Mute settings of the selected tracks in the Track View window. [SHIFT]+[REC RDY] Turns track recording on or off. [AUDIO] Starts the Audio Mixer or moves the Audio Mixer Window to the front of the computer screen. This button operation applies to the Channel Module software. [INST] Starts the Audio Mixer or moves the Audio Mixer Window to the front of the computer screen. This button operation applies to the Software Synthesizer Module. [MIDI] Starts the MIDI Editor (such as the Multi Part Editor) or moves it to the front of the computer screen. Owner's Manual 117
-
 1
1 -
2
-
3
-
4
-
5
-
6
-
7
-
8
-
9
-
10
-
11
-
12
-
13
-
14
-
15
-
16
-
17
-
18
-
19
-
20
-
21
-
22
-
23
-
24
-
25
-
26
-
27
-
28
-
29
-
30
-
31
-
32
-
33
-
34
-
35
-
36
-
37
-
38
-
39
-
40
-
41
-
42
-
43
-
44
-
45
-
46
-
47
-
48
-
49
-
50
-
51
-
52
-
53
-
54
-
55
-
56
-
57
-
58
-
59
-
60
-
61
-
62
-
63
-
64
-
65
-
66
-
67
-
68
-
69
-
70
-
71
-
72
-
73
-
74
-
75
-
76
-
77
-
78
-
79
-
80
-
81
-
82
-
83
-
84
-
85
-
86
-
87
-
88
-
89
-
90
-
91
-
92
-
93
-
94
-
95
-
96
-
97
-
98
-
99
-
100
-
101
-
102
-
103
-
104
-
105
-
106
-
107
-
108
-
109
-
110
-
111
-
 112
112 -
 113
113 -
 114
114 -
 115
115 -
 116
116 -
 117
117 -
 118
118 -
 119
119 -
 120
120 -
 121
121 -
 122
122 -
123
-
124
-
125
-
126
-
127
-
128
-
129
-
130
-
131
-
132
-
133
-
134
-
135
-
136
-
137
-
138
-
139
-
140
-
141
-
142
-
143
-
144
-
145
-
146
-
147
-
148
-
149
-
150
-
151
-
152
-
153
-
154
-
155
-
156
-
157
-
158
-
159
-
160
-
161
-
162
-
163
-
164
-
165
-
166
-
167
-
168
-
169
-
170
-
171
-
172
-
173
-
174
-
175
-
176
-
177
-
178
-
179
-
180
-
181
-
182
-
183
-
184
-
185
-
186
-
187
-
188
-
189
-
190
-
191
-
192
-
193
-
194
-
195
-
196
-
197
-
198
-
199
-
200
-
201
-
202
-
203
-
204
-
205
-
206
-
207
-
208
-
209
-
210
-
211
-
212
-
213
-
214
-
215
-
216
-
217
-
218
-
219
-
220
-
221
-
222
-
223
-
224
-
225
-
226
-
227
-
228
-
229
-
230
-
231
-
232
-
233
-
234
-
235
-
236
-
237
-
238
-
239
-
240
 |
 |
