Yamaha MO6 Owner's Manual - Page 38
Naming, Basic naming operation
 |
UPC - 086792837703
View all Yamaha MO6 manuals
Add to My Manuals
Save this manual to your list of manuals |
Page 38 highlights
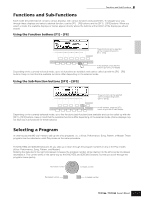
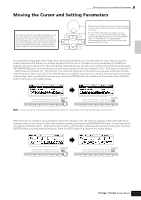
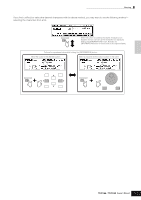
Basic Operation Naming Naming You can freely name your created data such as Voices and files saved to the USB storage device. The chart below lists the types of data that can be named along with the operations for calling up the respective naming displays. Data types that can be named Voice Performance Song Pattern Mixing Template Mixing Voice Phrase Master Arpeggio Volume Label of the USB storage device File/Folder saved to the USB storage device How to call up the naming display [VOICE] → [EDIT] → [F1] GENERAL → [SF1] NAME [PERFORM] → [EDIT] → [F1] GENERAL → [SF1] NAME [SONG] → [JOB] → [F6] SONG → 04: Song Name [PATTERN] → [JOB] → [F6] PATTERN → 05: Pattern Name [SONG] or [PATTERN] → [MIXING] → [STORE] [SONG] or [PATTERN] → [MIXING] → [F5] VCEED → [F1] GENERAL → [SF1] NAME [PATTERN] → [JOB] → [F4] PHRASE → 09: Phrase Name [MASTER] → [EDIT] → [F1] NAME [SONG] → [JOB] → [F5] TRACK → 07: Put Track To Arp [PATTERN] → [JOB] → [F5] TRACK → 06: Put Track To Arp [FILE] → [F1] CONFIG → [SF2] FORMAT [FILE] → [F2] SAVE or [F4] RENAME Page 153 172 189 202 192 203 200 216 188 201 211 211 First, call up the name input display according to the above table, then, move the cursor by using the Cursor buttons to the desired location and input a character. See below for details. n Since the name of the program is part of the data, make sure that you properly save the program after naming it. ■ Basic naming operation As shown below, you can set the name by repeating the two operations-moving the cursor to the desired location by using the Cursor buttons and selecting a character by using the data dial, [INC/YES] button, and [DEC/NO] button. Moving the cursor to the desired location on the name Selecting a character at the cursor location DEC/NO INC / YES EXIT ENTER EXECUTE DEC/NO INC / YES 38 Owner's Manual
-
 1
1 -
2
-
3
-
4
-
5
-
6
-
7
-
8
-
9
-
10
-
11
-
12
-
13
-
14
-
15
-
16
-
17
-
18
-
19
-
20
-
21
-
22
-
23
-
24
-
25
-
26
-
27
-
28
-
29
-
30
-
31
-
32
-
 33
33 -
 34
34 -
 35
35 -
 36
36 -
 37
37 -
 38
38 -
 39
39 -
 40
40 -
 41
41 -
 42
42 -
 43
43 -
44
-
45
-
46
-
47
-
48
-
49
-
50
-
51
-
52
-
53
-
54
-
55
-
56
-
57
-
58
-
59
-
60
-
61
-
62
-
63
-
64
-
65
-
66
-
67
-
68
-
69
-
70
-
71
-
72
-
73
-
74
-
75
-
76
-
77
-
78
-
79
-
80
-
81
-
82
-
83
-
84
-
85
-
86
-
87
-
88
-
89
-
90
-
91
-
92
-
93
-
94
-
95
-
96
-
97
-
98
-
99
-
100
-
101
-
102
-
103
-
104
-
105
-
106
-
107
-
108
-
109
-
110
-
111
-
112
-
113
-
114
-
115
-
116
-
117
-
118
-
119
-
120
-
121
-
122
-
123
-
124
-
125
-
126
-
127
-
128
-
129
-
130
-
131
-
132
-
133
-
134
-
135
-
136
-
137
-
138
-
139
-
140
-
141
-
142
-
143
-
144
-
145
-
146
-
147
-
148
-
149
-
150
-
151
-
152
-
153
-
154
-
155
-
156
-
157
-
158
-
159
-
160
-
161
-
162
-
163
-
164
-
165
-
166
-
167
-
168
-
169
-
170
-
171
-
172
-
173
-
174
-
175
-
176
-
177
-
178
-
179
-
180
-
181
-
182
-
183
-
184
-
185
-
186
-
187
-
188
-
189
-
190
-
191
-
192
-
193
-
194
-
195
-
196
-
197
-
198
-
199
-
200
-
201
-
202
-
203
-
204
-
205
-
206
-
207
-
208
-
209
-
210
-
211
-
212
-
213
-
214
-
215
-
216
-
217
-
218
-
219
-
220
-
221
-
222
-
223
-
224
-
225
-
226
-
227
-
228
-
229
-
230
-
231
-
232
-
233
-
234
-
235
-
236
-
237
-
238
-
239
-
240
 |
 |
