Compaq Armada E700 Compaq Armada E700 Series Reference Guide - Page 32
Replacing the Primary Battery Pack
 |
View all Compaq Armada E700 manuals
Add to My Manuals
Save this manual to your list of manuals |
Page 32 highlights
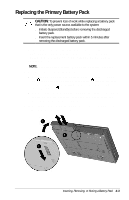
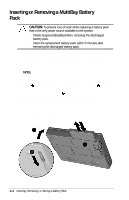
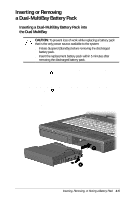
Replacing the Primary Battery Pack CAUTION: To prevent loss of work while replacing a battery pack that is the only power source available to the system: s Initiate Suspend (Standby) before removing the discharged battery pack. s Insert the replacement battery pack within 5 minutes after removing the discharged battery pack. 1. If the computer is on, a MultiBay does not contain a charged battery pack, and the system is not connected to external power, initiate Suspend (Standby) by pressing the suspend button. NOTE: Extensive drive activity may delay Suspend (Standby). 2. Insert or remove the battery pack. 1 2 s To remove the primary battery pack-Tilt the computer up , then slide the battery release latch toward the rear 3 of the computer while pulling on the center lower edge of the battery pack . s To insert the primary battery pack-With the large label facing up and the contacts facing the computer, slide the battery pack into the battery bay. 3. If you initiated Suspend (Standby), press the suspend button to return your work to the screen. Inserting, Removing, or Storing a Battery Pack 4-3
-
 1
1 -
2
-
3
-
4
-
5
-
6
-
7
-
8
-
9
-
10
-
11
-
12
-
13
-
14
-
15
-
16
-
17
-
18
-
19
-
20
-
21
-
22
-
23
-
24
-
25
-
26
-
 27
27 -
 28
28 -
 29
29 -
 30
30 -
 31
31 -
 32
32 -
 33
33 -
 34
34 -
 35
35 -
 36
36 -
 37
37 -
38
-
39
-
40
-
41
-
42
-
43
-
44
-
45
-
46
-
47
-
48
-
49
-
50
-
51
-
52
-
53
-
54
-
55
-
56
-
57
-
58
-
59
-
60
-
61
-
62
-
63
-
64
-
65
-
66
-
67
-
68
-
69
-
70
-
71
-
72
-
73
-
74
-
75
-
76
-
77
-
78
-
79
-
80
-
81
-
82
-
83
-
84
-
85
-
86
-
87
-
88
-
89
-
90
-
91
-
92
-
93
-
94
-
95
-
96
-
97
-
98
-
99
-
100
-
101
-
102
-
103
-
104
-
105
-
106
-
107
-
108
-
109
-
110
-
111
-
112
-
113
-
114
-
115
-
116
-
117
-
118
-
119
-
120
-
121
-
122
-
123
-
124
-
125
-
126
-
127
-
128
-
129
-
130
-
131
-
132
-
133
-
134
-
135
-
136
-
137
-
138
-
139
-
140
-
141
-
142
-
143
-
144
-
145
-
146
-
147
-
148
-
149
-
150
-
151
-
152
-
153
-
154
-
155
-
156
-
157
-
158
-
159
-
160
-
161
-
162
-
163
-
164
-
165
-
166
-
167
-
168
-
169
-
170
-
171
-
172
-
173
-
174
-
175
 |
 |
