Lexmark X925 Lexmark Document Distributor - Page 100
Understanding software client setup
 |
View all Lexmark X925 manuals
Add to My Manuals
Save this manual to your list of manuals |
Page 100 highlights
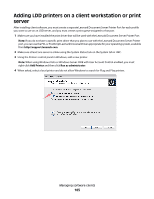
• Prompts cannot be used with software clients. • The Solution Status Page cannot be associated with a software client group. Note: Separate client licenses are required for using software clients in LDD. For more information about adding licenses to an existing system, see "Adding an MFP, e-forms virtual printer, or software client license to an existing server" on page 63. Understanding software client setup Preparing software clients for use with LDD solutions requires a slightly different process than setup and solution deployment for printers. The following steps provide an overview of installation of client software and assignment of solutions to software clients. Each step is covered in more detail in the following sections. After installing other LDD system components: 1 Upload a solution to LDD as shown in "Uploading solutions to the LDD system" on page 84. 2 If necessary, install client software licenses on the LDD system as shown in "Adding an MFP, e-forms virtual printer, or software client license to an existing server" on page 63. 3 Create a software client group to contain software clients to which a particular solution should be available. 4 Add IP addresses to the software client group for the computers on which client software will be installed and to which a particular solution should be available. 5 Add the solution to the new software client group. Note: Only solutions developed for use with client software (instead of, or in addition to, printers) may be made available to software client groups. 6 Install client software on each of the client computers. Note: Servers must be set online to successfully install client software. 7 Run Windows Update to make sure the latest updates for the .NET framework are installed. 8 If using Lexmark Document Server Ports, add print queues assigned to the appropriate Lexmark Document Server Port on each client computer or print server. 9 Test all print queues that use Lexmark Document Server Ports. Note: For information on testing Lexmark Document Server Ports, see "Using LDD print queues" on page 110. 10 Use test jobs to complete setup of Select'N'Send from each client. Note: For information on testing and using Select'N'Send client software, see "Using the Select'N'Send GUI" on page 111. Managing software clients 100
-
 1
1 -
2
-
3
-
4
-
5
-
6
-
7
-
8
-
9
-
10
-
11
-
12
-
13
-
14
-
15
-
16
-
17
-
18
-
19
-
20
-
21
-
22
-
23
-
24
-
25
-
26
-
27
-
28
-
29
-
30
-
31
-
32
-
33
-
34
-
35
-
36
-
37
-
38
-
39
-
40
-
41
-
42
-
43
-
44
-
45
-
46
-
47
-
48
-
49
-
50
-
51
-
52
-
53
-
54
-
55
-
56
-
57
-
58
-
59
-
60
-
61
-
62
-
63
-
64
-
65
-
66
-
67
-
68
-
69
-
70
-
71
-
72
-
73
-
74
-
75
-
76
-
77
-
78
-
79
-
80
-
81
-
82
-
83
-
84
-
85
-
86
-
87
-
88
-
89
-
90
-
91
-
92
-
93
-
94
-
 95
95 -
 96
96 -
 97
97 -
 98
98 -
 99
99 -
 100
100 -
 101
101 -
 102
102 -
 103
103 -
 104
104 -
 105
105 -
106
-
107
-
108
-
109
-
110
-
111
-
112
-
113
-
114
-
115
-
116
-
117
-
118
-
119
-
120
-
121
-
122
-
123
-
124
-
125
-
126
-
127
-
128
-
129
-
130
-
131
-
132
-
133
-
134
-
135
-
136
-
137
-
138
-
139
-
140
-
141
 |
 |