Lexmark X925 Lexmark Document Distributor - Page 108
Apply, Close, and then click
 |
View all Lexmark X925 manuals
Add to My Manuals
Save this manual to your list of manuals |
Page 108 highlights
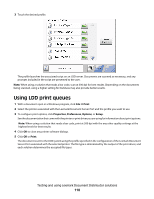
10 Repeat steps 4-9 to create as many additional Lexmark Document Server Printer Ports as desired, assigning each port to the same profile. 11 Make sure all the newly created ports are selected in the ports list 12 Click Apply, and then click Close. Managing software clients 108
-
 1
1 -
2
-
3
-
4
-
5
-
6
-
7
-
8
-
9
-
10
-
11
-
12
-
13
-
14
-
15
-
16
-
17
-
18
-
19
-
20
-
21
-
22
-
23
-
24
-
25
-
26
-
27
-
28
-
29
-
30
-
31
-
32
-
33
-
34
-
35
-
36
-
37
-
38
-
39
-
40
-
41
-
42
-
43
-
44
-
45
-
46
-
47
-
48
-
49
-
50
-
51
-
52
-
53
-
54
-
55
-
56
-
57
-
58
-
59
-
60
-
61
-
62
-
63
-
64
-
65
-
66
-
67
-
68
-
69
-
70
-
71
-
72
-
73
-
74
-
75
-
76
-
77
-
78
-
79
-
80
-
81
-
82
-
83
-
84
-
85
-
86
-
87
-
88
-
89
-
90
-
91
-
92
-
93
-
94
-
95
-
96
-
97
-
98
-
99
-
100
-
101
-
102
-
 103
103 -
 104
104 -
 105
105 -
 106
106 -
 107
107 -
 108
108 -
 109
109 -
 110
110 -
 111
111 -
 112
112 -
 113
113 -
114
-
115
-
116
-
117
-
118
-
119
-
120
-
121
-
122
-
123
-
124
-
125
-
126
-
127
-
128
-
129
-
130
-
131
-
132
-
133
-
134
-
135
-
136
-
137
-
138
-
139
-
140
-
141
 |
 |

10
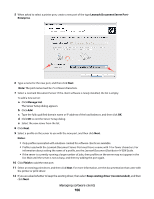
Repeat steps 4–9 to create as many additional Lexmark Document Server Printer Ports as desired, assigning each
port to the same profile.
11
Make sure all the newly created ports are selected in the ports list
12
Click
Apply
, and then click
Close
.
Managing software clients
108