Lexmark X925 Lexmark Document Distributor - Page 107
Increasing LDD print queue availability using printer pooling
 |
View all Lexmark X925 manuals
Add to My Manuals
Save this manual to your list of manuals |
Page 107 highlights
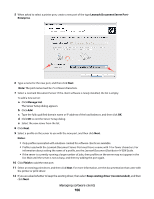
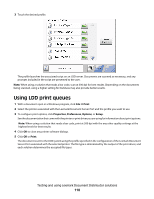
13 Type a printer name that describes the profile used with the new printer. 14 Select whether to use the new print queue as the default, and then click Next. 15 Select whether to share the new print queue. If you are installing the print queue on a server, select Share name, and then type a name to use for the print queue on the network. 16 Click Next. 17 Select No to skip printing a test page. 18 Confirm the settings for the new printer, and then click Finish. 19 After the printer has been added, right-click it in the Printers control panel, and then click Properties. 20 Click the Advanced tab. 21 Make sure Spool print documents so program finishes printing faster is selected, and then select Start printing after last page is spooled. Note: This setting is required in order to report an accurate page count to the LDD system, which may be used by some solutions. Additionally, if a large job needs significant time to spool, smaller jobs can still complete while the large job is spooling. 22 Click OK. Increasing LDD print queue availability using printer pooling You can use printer pooling for an LDD print queue on a print server in order to efficiently provide a single print queue to several users and avoid backups when large jobs are submitted. 1 In the Printers control panel in Windows, right-click an LDD print queue, and then click Properties. Note: When using Windows Vista or Windows Server 2008 with User Account Control enabled, click Run as administrator Properties. 2 Click the Ports tab. 3 Select Enable printer pooling. 4 Click Add Port. 5 Select Lexmark Document Server Port - Enterprise, and then click New Port. 6 Type a name for the new port, and then click Next. Note: The port name must be 75 or fewer characters. 7 Select the same Lexmark Document Server used for the initial port created for the selected LDD printer, and then click Next. 8 Select the same profile used for the initial port created for the selected LDD printer, and then click Next. Note: If the server is currently running a large number of jobs, then profiles on the server may not appear in the list. Wait until the server is not as busy, and then try adding the port again. 9 Click Finish, and then click Close to close the Printer Ports window. The new port appears and is selected in the port list in the printer properties window. Managing software clients 107
-
 1
1 -
2
-
3
-
4
-
5
-
6
-
7
-
8
-
9
-
10
-
11
-
12
-
13
-
14
-
15
-
16
-
17
-
18
-
19
-
20
-
21
-
22
-
23
-
24
-
25
-
26
-
27
-
28
-
29
-
30
-
31
-
32
-
33
-
34
-
35
-
36
-
37
-
38
-
39
-
40
-
41
-
42
-
43
-
44
-
45
-
46
-
47
-
48
-
49
-
50
-
51
-
52
-
53
-
54
-
55
-
56
-
57
-
58
-
59
-
60
-
61
-
62
-
63
-
64
-
65
-
66
-
67
-
68
-
69
-
70
-
71
-
72
-
73
-
74
-
75
-
76
-
77
-
78
-
79
-
80
-
81
-
82
-
83
-
84
-
85
-
86
-
87
-
88
-
89
-
90
-
91
-
92
-
93
-
94
-
95
-
96
-
97
-
98
-
99
-
100
-
101
-
 102
102 -
 103
103 -
 104
104 -
 105
105 -
 106
106 -
 107
107 -
 108
108 -
 109
109 -
 110
110 -
 111
111 -
 112
112 -
113
-
114
-
115
-
116
-
117
-
118
-
119
-
120
-
121
-
122
-
123
-
124
-
125
-
126
-
127
-
128
-
129
-
130
-
131
-
132
-
133
-
134
-
135
-
136
-
137
-
138
-
139
-
140
-
141
 |
 |