Lexmark X925 Lexmark Document Distributor - Page 31
Installing the load balancer, Setup.exe, Install Enterprise System, Agree, Notes, Start
 |
View all Lexmark X925 manuals
Add to My Manuals
Save this manual to your list of manuals |
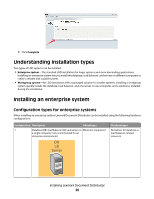
Page 31 highlights
Installing the load balancer On the computer that will run the load balancer: 1 If the Lexmark Solutions installation window is not open, run the file Setup.exe from the LDD installation package. The Lexmark Solutions installation window appears. 2 Click Install Enterprise System. 3 Click Install Load Balancer. 4 Click Agree to accept the license agreement. 5 If necessary, specify a location for the installation, and then click Next. Note: The installation path cannot contain double-byte characters. 6 Type the fully qualified domain name or IP address of the computer on which the database is installed, and then click Next. Notes: • If you are installing the load balancer on the same computer as the database, you must still use the fully qualified domain name or IP address of the computer on the network. Do not use localhost or the loopback IP address (127.0.0.1) for the location of the database. • If you are installing an LDD system on a network without a reliable DNS, use only IP addresses (not host names) during installation. For additional steps after installation, see "Using LDD without DNS" on page 37. • When installing any configuration other than configuration 1, the location of the database can be set most conveniently during installation. If the database is moved, or the IP address of the database changes for any other reason, you must uninstall and reinstall the load balancer, or contact Lexmark Professional Services to assist in modifying your current installation. For information about changing the IP address of a Configuration 1 system, see "Changing the IP address on a configuration 1 system" on page 55. 7 Specify the folder that contains your LDD license files, and then click Next. Notes: • If the license files are located on a network share that requires authentication, you must supply authentication before specifying the license location. To authenticate with the remote server, click Start Run, type the Uniform Naming Convention (UNC) path to the share (for example, \\myserver\myshare\), and then type the User name and Password when requested. • During installation, the license files are copied to the program folder. You can safely move or deleted the license files from the temporary location where you saved them. 8 If you are installing a system to recover a backup: a Select Restore Install (RI). b Type the path of the folder containing the .ri file from the backup, or click the folder icon and then locate the .ri file. 9 Click Finish. 10 Allow the installation to complete, and then click Done. Installing Lexmark Document Distributor 31
-
 1
1 -
2
-
3
-
4
-
5
-
6
-
7
-
8
-
9
-
10
-
11
-
12
-
13
-
14
-
15
-
16
-
17
-
18
-
19
-
20
-
21
-
22
-
23
-
24
-
25
-
 26
26 -
 27
27 -
 28
28 -
 29
29 -
 30
30 -
 31
31 -
 32
32 -
 33
33 -
 34
34 -
 35
35 -
 36
36 -
37
-
38
-
39
-
40
-
41
-
42
-
43
-
44
-
45
-
46
-
47
-
48
-
49
-
50
-
51
-
52
-
53
-
54
-
55
-
56
-
57
-
58
-
59
-
60
-
61
-
62
-
63
-
64
-
65
-
66
-
67
-
68
-
69
-
70
-
71
-
72
-
73
-
74
-
75
-
76
-
77
-
78
-
79
-
80
-
81
-
82
-
83
-
84
-
85
-
86
-
87
-
88
-
89
-
90
-
91
-
92
-
93
-
94
-
95
-
96
-
97
-
98
-
99
-
100
-
101
-
102
-
103
-
104
-
105
-
106
-
107
-
108
-
109
-
110
-
111
-
112
-
113
-
114
-
115
-
116
-
117
-
118
-
119
-
120
-
121
-
122
-
123
-
124
-
125
-
126
-
127
-
128
-
129
-
130
-
131
-
132
-
133
-
134
-
135
-
136
-
137
-
138
-
139
-
140
-
141
 |
 |