Lexmark X925 Lexmark Document Distributor - Page 106
Lexmark Document Server Port, Enterprise, Manage List, Notes, Finish, Keep existing driver recommended
 |
View all Lexmark X925 manuals
Add to My Manuals
Save this manual to your list of manuals |
Page 106 highlights
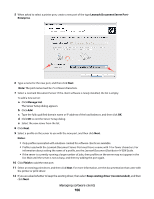
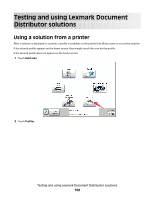
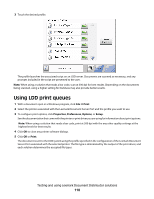
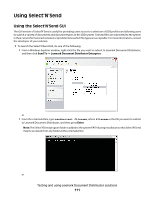
5 When asked to select a printer port, create a new port of the type Lexmark Document Server Port - Enterprise. 6 Type a name for the new port, and then click Next. Note: The port name must be 75 or fewer characters. 7 Select a Lexmark Document Server. If the client software is newly installed, the list is empty. To add a new server: a Click Manage List. The Server Setup dialog appears. b Click Add. c Type the fully qualified domain name or IP address of the load balancer, and then click OK. d Click OK to exit the Server Setup dialog. e Select the new server from the list. 8 Click Next. 9 Select a profile on the server to use with the new port, and then click Next. Notes: • Only profiles associated with solutions created for software clients are available. • Profiles used with the Lexmark Document Server Port must have a name with 14 or fewer characters. For information about setting the name of a profile, see the Lexmark Document Distributor 4.4 SDK Guide. • If the server is currently running a large number of jobs, then profiles on the server may not appear in the list. Wait until the server is not as busy, and then try adding the port again. 10 Click Finish to add the new port. 11 Select an existing print driver, and then click Next. For more information, see the documentation that came with the printer or print driver. 12 If you are asked whether to keep the existing driver, then select Keep existing driver (recommended), and then click Next. Managing software clients 106
-
 1
1 -
2
-
3
-
4
-
5
-
6
-
7
-
8
-
9
-
10
-
11
-
12
-
13
-
14
-
15
-
16
-
17
-
18
-
19
-
20
-
21
-
22
-
23
-
24
-
25
-
26
-
27
-
28
-
29
-
30
-
31
-
32
-
33
-
34
-
35
-
36
-
37
-
38
-
39
-
40
-
41
-
42
-
43
-
44
-
45
-
46
-
47
-
48
-
49
-
50
-
51
-
52
-
53
-
54
-
55
-
56
-
57
-
58
-
59
-
60
-
61
-
62
-
63
-
64
-
65
-
66
-
67
-
68
-
69
-
70
-
71
-
72
-
73
-
74
-
75
-
76
-
77
-
78
-
79
-
80
-
81
-
82
-
83
-
84
-
85
-
86
-
87
-
88
-
89
-
90
-
91
-
92
-
93
-
94
-
95
-
96
-
97
-
98
-
99
-
100
-
 101
101 -
 102
102 -
 103
103 -
 104
104 -
 105
105 -
 106
106 -
 107
107 -
 108
108 -
 109
109 -
 110
110 -
 111
111 -
112
-
113
-
114
-
115
-
116
-
117
-
118
-
119
-
120
-
121
-
122
-
123
-
124
-
125
-
126
-
127
-
128
-
129
-
130
-
131
-
132
-
133
-
134
-
135
-
136
-
137
-
138
-
139
-
140
-
141
 |
 |
