Lexmark X925 Lexmark Document Distributor - Page 64
mfp.lic, client.lic, from the System list.
 |
View all Lexmark X925 manuals
Add to My Manuals
Save this manual to your list of manuals |
Page 64 highlights
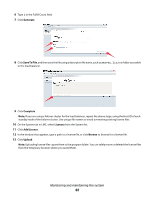
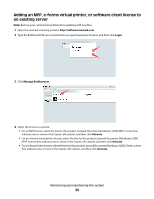
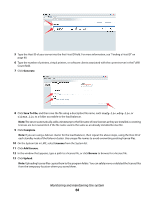
5 Type the Host ID of your server into the first Host ID field. For more information, see "Finding a Host ID" on page 60. 6 Type the number of printers, virtual printers, or software clients associated with the current server in the Fulfill Count field. 7 Click Generate. 8 Click Save To File, and then save the file using a descriptive file name, such as mfp.lic, efvp.lic, or client.lic, to a folder accessible to the load balancer. Note: The server automatically adds a timestamp to the file name of new licenses as they are installed, so existing licenses are not overwritten if the file name used is the same as an already installed license file. 9 Click Complete. Note: If you are using a failover cluster for the load balancer, then repeat the above steps, using the Host ID of each standby node of the failover cluster. Use unique file names to avoid overwriting existing license files. 10 On the System tab in LMC, select Licenses from the System list. 11 Click Add License. 12 In the window that appears, type a path to a license file, or click Browse to browse for a license file. 13 Click Upload. Note: Uploading license files copies them to the program folder. You can safely move or deleted the license files from the temporary location where you saved them. Monitoring and maintaining the system 64
-
 1
1 -
2
-
3
-
4
-
5
-
6
-
7
-
8
-
9
-
10
-
11
-
12
-
13
-
14
-
15
-
16
-
17
-
18
-
19
-
20
-
21
-
22
-
23
-
24
-
25
-
26
-
27
-
28
-
29
-
30
-
31
-
32
-
33
-
34
-
35
-
36
-
37
-
38
-
39
-
40
-
41
-
42
-
43
-
44
-
45
-
46
-
47
-
48
-
49
-
50
-
51
-
52
-
53
-
54
-
55
-
56
-
57
-
58
-
 59
59 -
 60
60 -
 61
61 -
 62
62 -
 63
63 -
 64
64 -
 65
65 -
 66
66 -
 67
67 -
 68
68 -
 69
69 -
70
-
71
-
72
-
73
-
74
-
75
-
76
-
77
-
78
-
79
-
80
-
81
-
82
-
83
-
84
-
85
-
86
-
87
-
88
-
89
-
90
-
91
-
92
-
93
-
94
-
95
-
96
-
97
-
98
-
99
-
100
-
101
-
102
-
103
-
104
-
105
-
106
-
107
-
108
-
109
-
110
-
111
-
112
-
113
-
114
-
115
-
116
-
117
-
118
-
119
-
120
-
121
-
122
-
123
-
124
-
125
-
126
-
127
-
128
-
129
-
130
-
131
-
132
-
133
-
134
-
135
-
136
-
137
-
138
-
139
-
140
-
141
 |
 |
