Lexmark X925 Lexmark Document Distributor - Page 78
Backup and disaster recovery, Automatically backing up the system on a schedule
 |
View all Lexmark X925 manuals
Add to My Manuals
Save this manual to your list of manuals |
Page 78 highlights
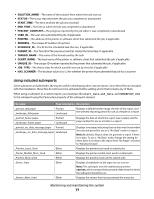
File name Page orientation Description _SoftwareClients_Most_Used Either Displays the software clients most used to submit jobs _Solution_Profile_Most_Used Either Displays the solution profiles most used for submitted jobs _Solution_Profile_Printers Either Displays the printers from which the most jobs are submitted for each profile _Solution_Profile_Scheduled_Scripts Either Displays the solution profiles most often run by scheduled tasks _Solution_Profile_SoftwareClients Either Displays the software clients from which the most jobs are submitted for each profiles _Solution_Profile_Users Either Displays the users who most often submit jobs for each profile _Solutions_Most_Used Either Displays the solutions most used for submitted jobs _Task_Most_Run Either Displays the most frequently run tasks _Users_Most_Active Either Displays the users who have submitted the most jobs _Users_Most_Cancellations Either Displays the users who have canceled the most jobs _Users_Printers Either Displays the users who most often submit jobs for each printer _Users_SoftwareClients Either Displays the users who most often submit jobs from each software client Backup and disaster recovery Automatically backing up the system on a schedule You can back up the databases and solutions in an LDD system to a network share. In the event a recovery is necessary, a new system can access the recovery data using a Restore Install. You can direct existing servers from a partially failed system to the new load balancer and/or database, or you can install new servers. When a scheduled backup occurs, the system validates backup database files on the share and sends an e-mail message that indicates success or failure to the address specified for the "Admin email address" setting of the Confirm service. Any failures are also recorded in the system log. Backups should be scheduled during off-peak times to avoid negatively affecting system performance. 1 Click the System tab. 2 Select Schedule from the System list. 3 Click Add. 4 Select Backup Restore. 5 Type a description for the task, and then click Next. 6 Type the UNC path of the existing network share (for example, \\myserver\myshare\) where the system should be backed up. 7 If the network share requires authentication, type the user name and password. 8 To back up the jobs list and the log, make sure Keep Jobs Logs Database is selected. Monitoring and maintaining the system 78
-
 1
1 -
2
-
3
-
4
-
5
-
6
-
7
-
8
-
9
-
10
-
11
-
12
-
13
-
14
-
15
-
16
-
17
-
18
-
19
-
20
-
21
-
22
-
23
-
24
-
25
-
26
-
27
-
28
-
29
-
30
-
31
-
32
-
33
-
34
-
35
-
36
-
37
-
38
-
39
-
40
-
41
-
42
-
43
-
44
-
45
-
46
-
47
-
48
-
49
-
50
-
51
-
52
-
53
-
54
-
55
-
56
-
57
-
58
-
59
-
60
-
61
-
62
-
63
-
64
-
65
-
66
-
67
-
68
-
69
-
70
-
71
-
72
-
 73
73 -
 74
74 -
 75
75 -
 76
76 -
 77
77 -
 78
78 -
 79
79 -
 80
80 -
 81
81 -
 82
82 -
 83
83 -
84
-
85
-
86
-
87
-
88
-
89
-
90
-
91
-
92
-
93
-
94
-
95
-
96
-
97
-
98
-
99
-
100
-
101
-
102
-
103
-
104
-
105
-
106
-
107
-
108
-
109
-
110
-
111
-
112
-
113
-
114
-
115
-
116
-
117
-
118
-
119
-
120
-
121
-
122
-
123
-
124
-
125
-
126
-
127
-
128
-
129
-
130
-
131
-
132
-
133
-
134
-
135
-
136
-
137
-
138
-
139
-
140
-
141
 |
 |