Lexmark X925 Lexmark Document Distributor - Page 72
Scheduling a report, Additional Parameters, Run Report, Notes, System, Schedule, Report
 |
View all Lexmark X925 manuals
Add to My Manuals
Save this manual to your list of manuals |
Page 72 highlights
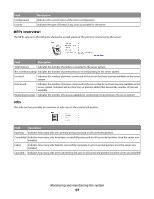
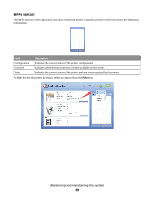
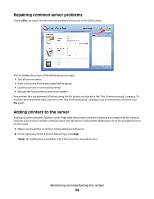
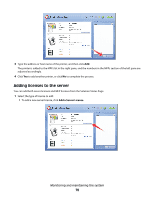
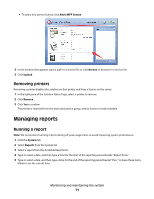
6 Select an Output Format. Note: Each report has a default selection for Output Format, which may be the format that the report was specifically designed to use. For more information about a custom report, contact the designer of your custom report. 7 To save the report to a file: a Select the check box beside Save To. b Click ... beside Save To. c Type a Destination Folder Path using either a local drive letter or a UNC path for a network share. d If the folder is located on a network share that requires authentication, type the Network share user name and Network share password. e Click OK. 8 To send the report in an e-mail message: a Select the check box beside Email To. b Click ... beside Email To. c Edit the fields of the e-mail message as necessary, and then click OK. 9 If additional query parameters are available for the selected report, click Additional Parameters to specify values for those parameters. If no additional parameters are available, the button is disabled. Note: Additional parameters can be defined only when including a report during with a workflow solution during development. For more information, see the Lexmark Document Distributor SDK Guide. 10 Click Run Report. The report is displayed in a new window and may be saved to a file or sent in an e-mail message, depending on the selected options. Notes: • Only summary reports are supported. Even if a custom report has a detail section defined, the section will not be displayed. If a custom report does not have a summary section, the finished report will be blank. • Pop-ups must be allowed for LMC in your Internet browser to view reports. • Adobe Reader is required to view PDF reports. Scheduling a report Note: We recommend running reports during off-peak usage times to avoid impacting system performance. 1 Click the System tab. 2 Select Schedule from the System list. 3 Click Add. 4 Click Report. Note: Some solutions may include a script that runs a report with a predetermined configuration, which can be scheduled like any other script. Additionally, reports run through a script can be run separately for each server in the system. For more information, contact the developer of your solution. 5 Type a description for the task, and then click Next. Monitoring and maintaining the system 72
-
 1
1 -
2
-
3
-
4
-
5
-
6
-
7
-
8
-
9
-
10
-
11
-
12
-
13
-
14
-
15
-
16
-
17
-
18
-
19
-
20
-
21
-
22
-
23
-
24
-
25
-
26
-
27
-
28
-
29
-
30
-
31
-
32
-
33
-
34
-
35
-
36
-
37
-
38
-
39
-
40
-
41
-
42
-
43
-
44
-
45
-
46
-
47
-
48
-
49
-
50
-
51
-
52
-
53
-
54
-
55
-
56
-
57
-
58
-
59
-
60
-
61
-
62
-
63
-
64
-
65
-
66
-
 67
67 -
 68
68 -
 69
69 -
 70
70 -
 71
71 -
 72
72 -
 73
73 -
 74
74 -
 75
75 -
 76
76 -
 77
77 -
78
-
79
-
80
-
81
-
82
-
83
-
84
-
85
-
86
-
87
-
88
-
89
-
90
-
91
-
92
-
93
-
94
-
95
-
96
-
97
-
98
-
99
-
100
-
101
-
102
-
103
-
104
-
105
-
106
-
107
-
108
-
109
-
110
-
111
-
112
-
113
-
114
-
115
-
116
-
117
-
118
-
119
-
120
-
121
-
122
-
123
-
124
-
125
-
126
-
127
-
128
-
129
-
130
-
131
-
132
-
133
-
134
-
135
-
136
-
137
-
138
-
139
-
140
-
141
 |
 |
