Lexmark X925 Lexmark Document Distributor - Page 84
Uploading solutions to the LDD system, Configuring global solution settings
 |
View all Lexmark X925 manuals
Add to My Manuals
Save this manual to your list of manuals |
Page 84 highlights
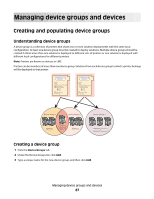
Uploading solutions to the LDD system 1 Click the Solutions tab. 2 Select All Solutions from the Solutions list. 3 Click Install/Upgrade. 4 In the window that appears, type a path to a solution file, or click Browse to browse for a solution file. 5 Click Upload. Notes: • If you are upgrading an existing solution, we recommend that you set all servers offline so that jobs for the solution are not accepted during the upgrade. Servers can be set online again after policy updates for the associated device groups. • If you install a workflow solution that includes a component, you may need to restart the Lexmark Solutions Application Server from the Windows Services control panel for the solution to fully function. • Solutions should be removed from home screens, device groups, and software client groups before removal. For more information about removing solutions, see "Removing solutions" on page 85. Configuring global solution settings 1 On the Solutions tab, select a solution name from the Solutions list. 2 Select Configuration from the Tasks list. 3 Adjust the settings for the solution as needed. For more information, refer to the documentation provided with the solution. 4 Click Apply. Editing local settings for a deployed or assigned solution Local settings are configured during deployment or assignment of a solution. Follow these steps to configure the local settings of a solution for a device group to which it has already been deployed or a software client group to which it has already been assigned: 1 On the Device Groups tab, select a device group from the Device Groups list. or On the Software Client Groups tab, select a software client group from the Software Client Groups list. 2 Select Solutions from the Tasks list. 3 Select a solution from the list in the main section, and then click Edit. 4 Configure the deployment settings of the solution for the current device group, and then click Finish. Note: A Policy Update is required after changing solution settings that affect a device group. For more information see "Updating policies for device groups" on page 95. Managing solutions 84
-
 1
1 -
2
-
3
-
4
-
5
-
6
-
7
-
8
-
9
-
10
-
11
-
12
-
13
-
14
-
15
-
16
-
17
-
18
-
19
-
20
-
21
-
22
-
23
-
24
-
25
-
26
-
27
-
28
-
29
-
30
-
31
-
32
-
33
-
34
-
35
-
36
-
37
-
38
-
39
-
40
-
41
-
42
-
43
-
44
-
45
-
46
-
47
-
48
-
49
-
50
-
51
-
52
-
53
-
54
-
55
-
56
-
57
-
58
-
59
-
60
-
61
-
62
-
63
-
64
-
65
-
66
-
67
-
68
-
69
-
70
-
71
-
72
-
73
-
74
-
75
-
76
-
77
-
78
-
 79
79 -
 80
80 -
 81
81 -
 82
82 -
 83
83 -
 84
84 -
 85
85 -
 86
86 -
 87
87 -
 88
88 -
 89
89 -
90
-
91
-
92
-
93
-
94
-
95
-
96
-
97
-
98
-
99
-
100
-
101
-
102
-
103
-
104
-
105
-
106
-
107
-
108
-
109
-
110
-
111
-
112
-
113
-
114
-
115
-
116
-
117
-
118
-
119
-
120
-
121
-
122
-
123
-
124
-
125
-
126
-
127
-
128
-
129
-
130
-
131
-
132
-
133
-
134
-
135
-
136
-
137
-
138
-
139
-
140
-
141
 |
 |