Lexmark X925 Lexmark Document Distributor - Page 97
Viewing or editing the layout of the home screen on specific devices, Search, Notes, Home Screen
 |
View all Lexmark X925 manuals
Add to My Manuals
Save this manual to your list of manuals |
Page 97 highlights
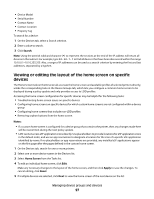
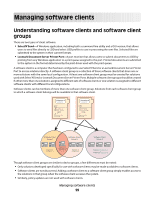
• Device Model • Serial Number • Contact Name • Contact Location • Property Tag To search for a device: 1 On the Devices tab, select a Search criterion. 2 Enter a value to search. 3 Click Search. Note: Using the asterisk wildcard character (*) to represent the sections at the end of the IP address will return all devices in that subnet. For example, type 10.10.*.* to find all devices that have been discovered within the range 10.10.0.1-10.10.255.255. Also, a range of IP addresses can be used as a search criterion by entering the first and last addresses, separated by a hyphen. Viewing or editing the layout of the home screen on specific devices The Home Screen task on the Devices tab accesses the home screen and available profiles of selected printers directly, unlike the corresponding task on the Device Groups tab, which lets you configure a common home screen to be deployed during a policy update and only provides access to LDD profiles. Accessing the home screen configuration for specific devices may be helpful for the following tasks: • Troubleshooting home screen issues on specific devices • Configuring home screens on specific devices for which custom home screens are not configured within a device group • Configuring home screens that include non-LDD profiles • Removing orphan buttons from the home screen Notes: • If a custom home screen is configured for a device group that contains the printer, then any changes made here will be overwritten during the next policy update. • LMC cannot access eSF application icons directly. Use placeholders to provide locations for eSF application icons in the default order, and use an app reservation to designate a location for the icon of a specific eSF application identified by name. If no placeholders or app reservations are provided, any installed eSF applications appear on the first page after the pages defined in the custom home screen. 1 On the Devices tab, search for one or more printers. 2 Select one or more device names in the Devices list. 3 Select Home Screen from the Tasks list. 4 To edit an individual home screen, click Edit. Make any necessary changes to the layout of the home screen, and then click Apply to save the changes. To cancel editing, click Reset. 5 If multiple devices are selected, click Next to view the home screen of the next device on the list. Managing device groups and devices 97
-
 1
1 -
2
-
3
-
4
-
5
-
6
-
7
-
8
-
9
-
10
-
11
-
12
-
13
-
14
-
15
-
16
-
17
-
18
-
19
-
20
-
21
-
22
-
23
-
24
-
25
-
26
-
27
-
28
-
29
-
30
-
31
-
32
-
33
-
34
-
35
-
36
-
37
-
38
-
39
-
40
-
41
-
42
-
43
-
44
-
45
-
46
-
47
-
48
-
49
-
50
-
51
-
52
-
53
-
54
-
55
-
56
-
57
-
58
-
59
-
60
-
61
-
62
-
63
-
64
-
65
-
66
-
67
-
68
-
69
-
70
-
71
-
72
-
73
-
74
-
75
-
76
-
77
-
78
-
79
-
80
-
81
-
82
-
83
-
84
-
85
-
86
-
87
-
88
-
89
-
90
-
91
-
 92
92 -
 93
93 -
 94
94 -
 95
95 -
 96
96 -
 97
97 -
 98
98 -
 99
99 -
 100
100 -
 101
101 -
 102
102 -
103
-
104
-
105
-
106
-
107
-
108
-
109
-
110
-
111
-
112
-
113
-
114
-
115
-
116
-
117
-
118
-
119
-
120
-
121
-
122
-
123
-
124
-
125
-
126
-
127
-
128
-
129
-
130
-
131
-
132
-
133
-
134
-
135
-
136
-
137
-
138
-
139
-
140
-
141
 |
 |