Lexmark X925 Lexmark Document Distributor - Page 102
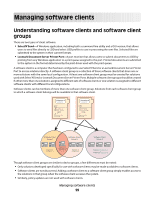
Assigning solutions to a software client group, Installing client software
 |
View all Lexmark X925 manuals
Add to My Manuals
Save this manual to your list of manuals |
Page 102 highlights
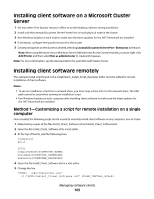
In a CSV file, each line must contain a single IP address. An XML file is structured like the following example: 10.10.2.200 10.10.2.150 Assigning solutions to a software client group Assigning a solution to a software client group grants the software clients in the group access to the solution on the server, which allows users of these software clients to execute jobs using the solution. 1 Click the Software Client Groups tab. 2 Select a software client group from the Software Client Groups list. 3 Select Solutions from the Tasks list. 4 In the main section, click Add. 5 Select the solution from the list, and then click Next. 6 Configure the local settings of the solution for the current software client group, and then click Finish. Installing client software On a client computer or print server: 1 From the LDD installation package, run the file Setup.exe. The Lexmark Solutions installation window appears. 2 Click Install Enterprise System. 3 Click Install Client Software. 4 Click Agree to accept the license agreement. 5 Make sure Client Software is selected and highlighted. If necessary, specify a location for the installation. 6 To include Select'N'Send in the installation, select Select'N'Send from the list. Note: Do not install Select'N'Send on a print server. 7 To include the Lexmark Document Server Port in the installation, select Lexmark Document Server Printer Port. 8 Click Finish, and then allow the installation to complete. 9 If prompted, select Yes to restart the computer. Otherwise, click Done to exit the installation package. 10 Run Windows Update to make sure the latest updates for the .NET framework are installed. Managing software clients 102
-
 1
1 -
2
-
3
-
4
-
5
-
6
-
7
-
8
-
9
-
10
-
11
-
12
-
13
-
14
-
15
-
16
-
17
-
18
-
19
-
20
-
21
-
22
-
23
-
24
-
25
-
26
-
27
-
28
-
29
-
30
-
31
-
32
-
33
-
34
-
35
-
36
-
37
-
38
-
39
-
40
-
41
-
42
-
43
-
44
-
45
-
46
-
47
-
48
-
49
-
50
-
51
-
52
-
53
-
54
-
55
-
56
-
57
-
58
-
59
-
60
-
61
-
62
-
63
-
64
-
65
-
66
-
67
-
68
-
69
-
70
-
71
-
72
-
73
-
74
-
75
-
76
-
77
-
78
-
79
-
80
-
81
-
82
-
83
-
84
-
85
-
86
-
87
-
88
-
89
-
90
-
91
-
92
-
93
-
94
-
95
-
96
-
 97
97 -
 98
98 -
 99
99 -
 100
100 -
 101
101 -
 102
102 -
 103
103 -
 104
104 -
 105
105 -
 106
106 -
 107
107 -
108
-
109
-
110
-
111
-
112
-
113
-
114
-
115
-
116
-
117
-
118
-
119
-
120
-
121
-
122
-
123
-
124
-
125
-
126
-
127
-
128
-
129
-
130
-
131
-
132
-
133
-
134
-
135
-
136
-
137
-
138
-
139
-
140
-
141
 |
 |
