Lexmark X925 Lexmark Document Distributor - Page 74
Adding a report, Task Summary Report, Tops Report, User Report, System, Reports, Upload Report Files
 |
View all Lexmark X925 manuals
Add to My Manuals
Save this manual to your list of manuals |
Page 74 highlights
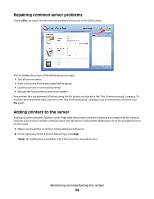
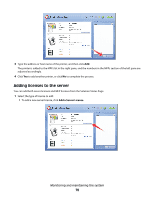
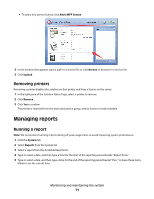
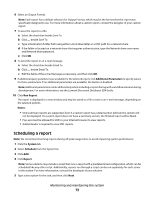
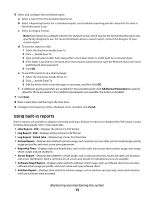
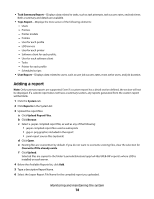
• Task Summary Report-Displays data related to tasks, such as task attempts, task success rates, and task times. Both a summary and details are available. • Tops Report-Displays the most active of the following elements: - Users - Printers - Printer models - Profiles - User for each profile - LDD servers - User for each printer - Software client for each profile, - User for each software client - Tasks - Printer for each profile - Scheduled scripts • User Report-Displays data related to users, such as user job success rates, most active users, and job duration. Adding a report Note: Only summary reports are supported. Even if a custom report has a detail section defined, the section will not be displayed. If a custom report does not have a summary section, any reports generated from the custom report will be blank. 1 Click the System tab. 2 Click Reports in the System list. 3 Upload the report files: a Click Upload Report Files. b Click Browse. c Select a .jasper compiled report file, as well as any of the following: • .jasper compiled report files used as subreports • .jpg or .png graphics included in the report • .jrxml report source files (optional) d Click Open. e Existing files are overwritten by default. If you do not want to overwrite existing files, clear the selection for Overwrite if file already exists. f Click Upload. Selected files are copied to the folder \Lexmark\Solutions\apps\wf-ldss\WEB-INF\reports\ where LDD is installed on each server. 4 Below the Available Reports list, click Add. 5 Type a descriptive Report Name. 6 Select the Jasper Report File Name for the compiled report you uploaded. Monitoring and maintaining the system 74
-
 1
1 -
2
-
3
-
4
-
5
-
6
-
7
-
8
-
9
-
10
-
11
-
12
-
13
-
14
-
15
-
16
-
17
-
18
-
19
-
20
-
21
-
22
-
23
-
24
-
25
-
26
-
27
-
28
-
29
-
30
-
31
-
32
-
33
-
34
-
35
-
36
-
37
-
38
-
39
-
40
-
41
-
42
-
43
-
44
-
45
-
46
-
47
-
48
-
49
-
50
-
51
-
52
-
53
-
54
-
55
-
56
-
57
-
58
-
59
-
60
-
61
-
62
-
63
-
64
-
65
-
66
-
67
-
68
-
 69
69 -
 70
70 -
 71
71 -
 72
72 -
 73
73 -
 74
74 -
 75
75 -
 76
76 -
 77
77 -
 78
78 -
 79
79 -
80
-
81
-
82
-
83
-
84
-
85
-
86
-
87
-
88
-
89
-
90
-
91
-
92
-
93
-
94
-
95
-
96
-
97
-
98
-
99
-
100
-
101
-
102
-
103
-
104
-
105
-
106
-
107
-
108
-
109
-
110
-
111
-
112
-
113
-
114
-
115
-
116
-
117
-
118
-
119
-
120
-
121
-
122
-
123
-
124
-
125
-
126
-
127
-
128
-
129
-
130
-
131
-
132
-
133
-
134
-
135
-
136
-
137
-
138
-
139
-
140
-
141
 |
 |
