Lexmark X925 Lexmark Document Distributor - Page 118
Creating input queues for forms printers, Create a new port, Standard TCP/IP Port, Notes, Custom
 |
View all Lexmark X925 manuals
Add to My Manuals
Save this manual to your list of manuals |
Page 118 highlights
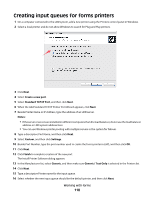
Creating input queues for forms printers 1 On a computer connected to the LDD system, add a new printer using the Printers control panel in Windows. 2 Select a local printer and do not allow Windows to search for Plug and Play printers. 3 Click Next. 4 Select Create a new port. 5 Select Standard TCP/IP Port, and then click Next. 6 When the Add Standard TCP/IP Printer Port Wizard appears, click Next. 7 Beside Printer Name or IP Address, type the address of an LDD server. Notes: • If the server or servers are installed on different computers than the load balancer, do not use the load balancer address or LDD system address here. • You can use Windows printer pooling with multiple servers in the system for failover. 8 Type a descriptive Port Name, and then click Next. 9 Select Custom, and then click Settings. 10 Beside Port Number, type the port number used to create the forms printer in LMC, and then click OK. 11 Click Next. 12 Click Finish to complete creation of the new port. The Install Printer Software dialog appears. 13 In the Manufacturer list, select Generic, and then make sure Generic / Text Only is selected in the Printers list. 14 Click Next. 15 Type a descriptive Printer name for the input queue. 16 Select whether the new input queue should be the default printer, and then click Next. Working with forms 118
-
 1
1 -
2
-
3
-
4
-
5
-
6
-
7
-
8
-
9
-
10
-
11
-
12
-
13
-
14
-
15
-
16
-
17
-
18
-
19
-
20
-
21
-
22
-
23
-
24
-
25
-
26
-
27
-
28
-
29
-
30
-
31
-
32
-
33
-
34
-
35
-
36
-
37
-
38
-
39
-
40
-
41
-
42
-
43
-
44
-
45
-
46
-
47
-
48
-
49
-
50
-
51
-
52
-
53
-
54
-
55
-
56
-
57
-
58
-
59
-
60
-
61
-
62
-
63
-
64
-
65
-
66
-
67
-
68
-
69
-
70
-
71
-
72
-
73
-
74
-
75
-
76
-
77
-
78
-
79
-
80
-
81
-
82
-
83
-
84
-
85
-
86
-
87
-
88
-
89
-
90
-
91
-
92
-
93
-
94
-
95
-
96
-
97
-
98
-
99
-
100
-
101
-
102
-
103
-
104
-
105
-
106
-
107
-
108
-
109
-
110
-
111
-
112
-
 113
113 -
 114
114 -
 115
115 -
 116
116 -
 117
117 -
 118
118 -
 119
119 -
 120
120 -
 121
121 -
 122
122 -
 123
123 -
124
-
125
-
126
-
127
-
128
-
129
-
130
-
131
-
132
-
133
-
134
-
135
-
136
-
137
-
138
-
139
-
140
-
141
 |
 |
