Samsung SPH-M580 User Manual (user Manual) (ver.f12) (English) - Page 146
A. Sprint Service: The Basics, Type to compose, Attach, Pictures, Capture picture, Videos
 |
View all Samsung SPH-M580 manuals
Add to My Manuals
Save this manual to your list of manuals |
Page 146 highlights
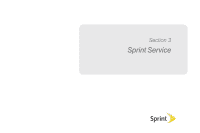
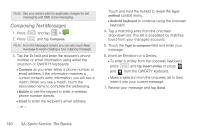
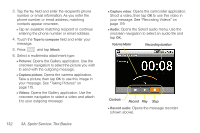
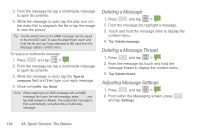
3. Tap the To: field and enter the recipient's phone number or email information. As you enter the phone number or email address, matching contacts appear onscreen. Ⅲ Tap an available matching recipient or continue entering the phone number or email address. 4. Touch the Type to compose field and enter your message. 5. Press and tap Attach. 6. Select a multimedia attachment type: Ⅲ Pictures: Opens the Gallery application. Use the onscreen navigation to select the picture you wish to send with the outgoing message. Ⅲ Capture picture: Opens the camera application. Take a picture, then tap OK to use this image in your message. See "Taking Pictures" on page 115. Ⅲ Videos: Opens the Gallery application. Use the onscreen navigation to select a video and attach it to your outgoing message. 132 3A. Sprint Service: The Basics Ⅲ Capture video: Opens the camcorder application. Shoot a video, then tap OK to use this video in your message. See "Recording Videos" on page 119. Ⅲ Audio: Opens the Select audio menu. Use the onscreen navigation to select an audio file and tap OK. Volume Meter Recording duration Controls Record Play Stop Ⅲ Record audio: Opens the message recorder (shown above).
-
 1
1 -
2
-
3
-
4
-
5
-
6
-
7
-
8
-
9
-
10
-
11
-
12
-
13
-
14
-
15
-
16
-
17
-
18
-
19
-
20
-
21
-
22
-
23
-
24
-
25
-
26
-
27
-
28
-
29
-
30
-
31
-
32
-
33
-
34
-
35
-
36
-
37
-
38
-
39
-
40
-
41
-
42
-
43
-
44
-
45
-
46
-
47
-
48
-
49
-
50
-
51
-
52
-
53
-
54
-
55
-
56
-
57
-
58
-
59
-
60
-
61
-
62
-
63
-
64
-
65
-
66
-
67
-
68
-
69
-
70
-
71
-
72
-
73
-
74
-
75
-
76
-
77
-
78
-
79
-
80
-
81
-
82
-
83
-
84
-
85
-
86
-
87
-
88
-
89
-
90
-
91
-
92
-
93
-
94
-
95
-
96
-
97
-
98
-
99
-
100
-
101
-
102
-
103
-
104
-
105
-
106
-
107
-
108
-
109
-
110
-
111
-
112
-
113
-
114
-
115
-
116
-
117
-
118
-
119
-
120
-
121
-
122
-
123
-
124
-
125
-
126
-
127
-
128
-
129
-
130
-
131
-
132
-
133
-
134
-
135
-
136
-
137
-
138
-
139
-
140
-
 141
141 -
 142
142 -
 143
143 -
 144
144 -
 145
145 -
 146
146 -
 147
147 -
 148
148 -
 149
149 -
 150
150 -
 151
151 -
152
-
153
-
154
-
155
-
156
-
157
-
158
-
159
-
160
-
161
-
162
-
163
-
164
-
165
-
166
-
167
-
168
-
169
-
170
-
171
-
172
-
173
-
174
-
175
-
176
-
177
-
178
-
179
-
180
-
181
-
182
-
183
-
184
-
185
-
186
-
187
-
188
-
189
-
190
-
191
-
192
-
193
-
194
-
195
-
196
-
197
-
198
-
199
-
200
-
201
-
202
-
203
-
204
-
205
-
206
-
207
-
208
-
209
-
210
-
211
-
212
-
213
-
214
-
215
-
216
-
217
-
218
-
219
-
220
-
221
-
222
-
223
-
224
-
225
-
226
-
227
-
228
-
229
-
230
 |
 |