Samsung SPH-M920 User Manual (user Manual) (ver.f6) (English) - Page 82
Synchronizing Your Corporate Account, Corporate email account. See Corporate Email
 |
View all Samsung SPH-M920 manuals
Add to My Manuals
Save this manual to your list of manuals |
Page 82 highlights
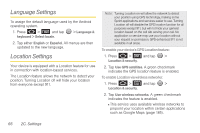
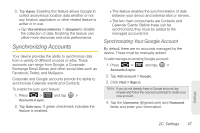
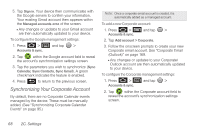
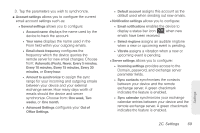
5. Tap Sign in. Your device then communicates with the Google servers to confirm your information. Your existing Gmail account then appears within the Managed accounts area of the screen. Ⅲ Any changes or updates to your Gmail account are then automatically updated to your device. To configure the Google management settings: 1. Press > and tap > Accounts & sync. 2. Tap within the Google account field to reveal the account's synchronization settings screen. 3. Tap the parameters you wish to synchronize (Sync Calendar, Sync Contacts, Sync Gmail). A green checkmark indicates the feature is enabled. 4. Press to return to the previous screen. Synchronizing Your Corporate Account By default, there are no Corporate Calendar events managed by the device. These must be manually added. (See "Synchronizing Corporate Calendar Events" on page 95.) Note: Once a corporate email account is created, it is automatically added as a managed account. To add a new Corporate account: 1. Press > and tap > Accounts & sync. 2. Tap Add account > Corporate. 3. Follow the onscreen prompts to create your new Corporate email account. See "Corporate Email (Outlook)" on page 169. Ⅲ Any changes or updates to your Corporate/ Outlook account are then automatically updated to your device. To configure the Corporate management settings: 1. Press > and tap > Accounts & sync. 2. Tap within the Corporate account field to reveal the account's synchronization settings screen. 68 2C. Settings
-
 1
1 -
2
-
3
-
4
-
5
-
6
-
7
-
8
-
9
-
10
-
11
-
12
-
13
-
14
-
15
-
16
-
17
-
18
-
19
-
20
-
21
-
22
-
23
-
24
-
25
-
26
-
27
-
28
-
29
-
30
-
31
-
32
-
33
-
34
-
35
-
36
-
37
-
38
-
39
-
40
-
41
-
42
-
43
-
44
-
45
-
46
-
47
-
48
-
49
-
50
-
51
-
52
-
53
-
54
-
55
-
56
-
57
-
58
-
59
-
60
-
61
-
62
-
63
-
64
-
65
-
66
-
67
-
68
-
69
-
70
-
71
-
72
-
73
-
74
-
75
-
76
-
 77
77 -
 78
78 -
 79
79 -
 80
80 -
 81
81 -
 82
82 -
 83
83 -
 84
84 -
 85
85 -
 86
86 -
 87
87 -
88
-
89
-
90
-
91
-
92
-
93
-
94
-
95
-
96
-
97
-
98
-
99
-
100
-
101
-
102
-
103
-
104
-
105
-
106
-
107
-
108
-
109
-
110
-
111
-
112
-
113
-
114
-
115
-
116
-
117
-
118
-
119
-
120
-
121
-
122
-
123
-
124
-
125
-
126
-
127
-
128
-
129
-
130
-
131
-
132
-
133
-
134
-
135
-
136
-
137
-
138
-
139
-
140
-
141
-
142
-
143
-
144
-
145
-
146
-
147
-
148
-
149
-
150
-
151
-
152
-
153
-
154
-
155
-
156
-
157
-
158
-
159
-
160
-
161
-
162
-
163
-
164
-
165
-
166
-
167
-
168
-
169
-
170
-
171
-
172
-
173
-
174
-
175
-
176
-
177
-
178
-
179
-
180
-
181
-
182
-
183
-
184
-
185
-
186
-
187
-
188
-
189
-
190
-
191
-
192
-
193
-
194
-
195
-
196
-
197
-
198
-
199
-
200
-
201
-
202
-
203
-
204
-
205
-
206
-
207
-
208
-
209
-
210
-
211
-
212
-
213
-
214
-
215
-
216
-
217
-
218
-
219
-
220
-
221
-
222
-
223
-
224
-
225
-
226
-
227
-
228
-
229
-
230
-
231
-
232
-
233
-
234
-
235
-
236
-
237
-
238
 |
 |