Toshiba 47L6200U User Guide - Page 120
Auto Brightness Sensor, Backlight Adjustment Pro, SETTINGS, PICTURE, Advanced Picture Settings
 |
View all Toshiba 47L6200U manuals
Add to My Manuals
Save this manual to your list of manuals |
Page 120 highlights
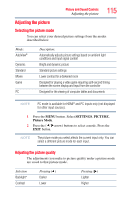
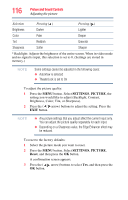
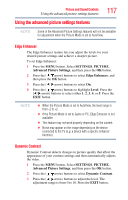
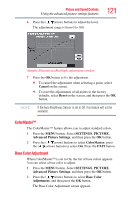
120 Picture and Sound Controls Using the advanced picture settings features NOTE The differences may not always be noticeable. For the best results, use lower settings, as picture quality may be greatly reduced if the setting is too high. If the picture mode is set to Game or PC, this feature is not available. Auto Brightness Sensor When the Auto Brightness function of Auto Brightness Sensor is set to On, the TV optimizes the backlighting levels to suit ambient light conditions. 1 Press the MENU button. Select SETTINGS, PICTURE, Advanced Picture Settings, and then press the OK button. 2 Press the ( / arrow) buttons to select Auto Brightness Sensor Settings, and then press the OK button. 3 Press the ( / arrow) buttons to select Auto Brightness Sensor. 4 Press the ( / arrow) buttons to select On or Off. Press the EXIT button. NOTE When the Picture Mode is set to AutoView, this feature is automatically set to On. Backlight Adjustment Pro This feature adjusts the backlight so that it can change to match the ambient light conditions. 1 Press the MENU button. Select SETTINGS, PICTURE, Advanced Picture Settings, and then press the OK button. 2 Press the ( / arrow) buttons to select Auto Brightness Sensor Settings, and then press the OK button. 3 Press the ( / arrow) buttons to select Backlight Adjustment Pro, and then press the OK button. The Backlight Control Level screen appears. 4 Press the OK button to display the adjustment window. 5 Press the ( / arrow) buttons to select the point.
-
 1
1 -
2
-
3
-
4
-
5
-
6
-
7
-
8
-
9
-
10
-
11
-
12
-
13
-
14
-
15
-
16
-
17
-
18
-
19
-
20
-
21
-
22
-
23
-
24
-
25
-
26
-
27
-
28
-
29
-
30
-
31
-
32
-
33
-
34
-
35
-
36
-
37
-
38
-
39
-
40
-
41
-
42
-
43
-
44
-
45
-
46
-
47
-
48
-
49
-
50
-
51
-
52
-
53
-
54
-
55
-
56
-
57
-
58
-
59
-
60
-
61
-
62
-
63
-
64
-
65
-
66
-
67
-
68
-
69
-
70
-
71
-
72
-
73
-
74
-
75
-
76
-
77
-
78
-
79
-
80
-
81
-
82
-
83
-
84
-
85
-
86
-
87
-
88
-
89
-
90
-
91
-
92
-
93
-
94
-
95
-
96
-
97
-
98
-
99
-
100
-
101
-
102
-
103
-
104
-
105
-
106
-
107
-
108
-
109
-
110
-
111
-
112
-
113
-
114
-
 115
115 -
 116
116 -
 117
117 -
 118
118 -
 119
119 -
 120
120 -
 121
121 -
 122
122 -
 123
123 -
 124
124 -
 125
125 -
126
-
127
-
128
-
129
-
130
-
131
-
132
-
133
-
134
-
135
-
136
-
137
-
138
-
139
-
140
-
141
-
142
-
143
-
144
-
145
-
146
-
147
-
148
-
149
-
150
-
151
-
152
-
153
-
154
-
155
-
156
-
157
-
158
-
159
-
160
-
161
-
162
-
163
-
164
-
165
-
166
-
167
-
168
-
169
-
170
-
171
-
172
-
173
-
174
-
175
-
176
-
177
-
178
-
179
-
180
-
181
-
182
-
183
-
184
-
185
-
186
-
187
-
188
-
189
-
190
-
191
-
192
-
193
-
194
-
195
-
196
-
197
-
198
-
199
-
200
-
201
-
202
-
203
-
204
-
205
-
206
 |
 |
