Toshiba 47L6200U User Guide - Page 55
IR Blaster Setup, The IR Blaster Setup Add devices screen will appear.
 |
View all Toshiba 47L6200U manuals
Add to My Manuals
Save this manual to your list of manuals |
Page 55 highlights
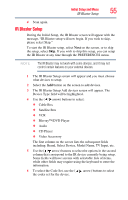
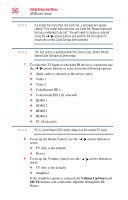
Initial Setup and Menu IR Blaster Setup 55 4 Scan again. IR Blaster Setup During the Initial Setup, the IR Blaster screen will appear with the message, "IR Blaster setup will now begin. If you wish to skip, please select Skip." To start the IR Blaster setup, select Next on the screen, or to skip the setup, select Skip. If you wish to skip this setup, you can setup the IR Blaster at any time through the PREFERENCES menu. NOTE The IR Blaster may not work with some devices, and it may not control certain features on your external devices. 1 The IR Blaster Setup screen will appear and you must choose what devices to setup. 2 Select the Add button on the screen to add devices. 3 The IR Blaster Setup Add devices screen will appear. The Device Type field will be highlighted. 4 Use the ( / arrow) buttons to select: ❖ Cable Box ❖ Satellite Box ❖ VCR ❖ Blu-ray™/DVD Player ❖ Audio ❖ CD Player ❖ Video Accessory The first column on the screen lists the subsequent fields including: Brand, Select Device, Model Name, TV Input, etc. 5 Use the ( / arrow) buttons to select the options in the second column that correspond to the IR device currently being setup. Some fields will have screens with selectable lists of items, while other fields may require using the keyboard to enter the information. 6 To select the Code Set, use the ( / arrow) buttons to select the codes set for the device.
-
 1
1 -
2
-
3
-
4
-
5
-
6
-
7
-
8
-
9
-
10
-
11
-
12
-
13
-
14
-
15
-
16
-
17
-
18
-
19
-
20
-
21
-
22
-
23
-
24
-
25
-
26
-
27
-
28
-
29
-
30
-
31
-
32
-
33
-
34
-
35
-
36
-
37
-
38
-
39
-
40
-
41
-
42
-
43
-
44
-
45
-
46
-
47
-
48
-
49
-
 50
50 -
 51
51 -
 52
52 -
 53
53 -
 54
54 -
 55
55 -
 56
56 -
 57
57 -
 58
58 -
 59
59 -
 60
60 -
61
-
62
-
63
-
64
-
65
-
66
-
67
-
68
-
69
-
70
-
71
-
72
-
73
-
74
-
75
-
76
-
77
-
78
-
79
-
80
-
81
-
82
-
83
-
84
-
85
-
86
-
87
-
88
-
89
-
90
-
91
-
92
-
93
-
94
-
95
-
96
-
97
-
98
-
99
-
100
-
101
-
102
-
103
-
104
-
105
-
106
-
107
-
108
-
109
-
110
-
111
-
112
-
113
-
114
-
115
-
116
-
117
-
118
-
119
-
120
-
121
-
122
-
123
-
124
-
125
-
126
-
127
-
128
-
129
-
130
-
131
-
132
-
133
-
134
-
135
-
136
-
137
-
138
-
139
-
140
-
141
-
142
-
143
-
144
-
145
-
146
-
147
-
148
-
149
-
150
-
151
-
152
-
153
-
154
-
155
-
156
-
157
-
158
-
159
-
160
-
161
-
162
-
163
-
164
-
165
-
166
-
167
-
168
-
169
-
170
-
171
-
172
-
173
-
174
-
175
-
176
-
177
-
178
-
179
-
180
-
181
-
182
-
183
-
184
-
185
-
186
-
187
-
188
-
189
-
190
-
191
-
192
-
193
-
194
-
195
-
196
-
197
-
198
-
199
-
200
-
201
-
202
-
203
-
204
-
205
-
206
 |
 |