Toshiba 47L6200U User Guide - Page 38
Connecting an HDMI® audio system - tv model
 |
View all Toshiba 47L6200U manuals
Add to My Manuals
Save this manual to your list of manuals |
Page 38 highlights
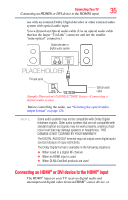
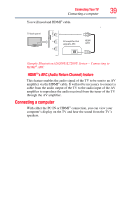
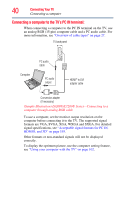
38 Connecting Your TV Connecting an HDMI® audio system To connect an audio receiver and playback devices, you will need HDMI® cables, see "HDMI® cable (with HDMI Logo)" on page 28. NOTE If several devices are connected, HDMI® CEC Control feature may not operate properly, see "HDMI® CEC Control input source selection" on page 100. For proper operation, it is recommended that you use HDMI® cables with the HDMI® Logo ( ). Before controlling the devices: ❖ For an explanation of setup and operations, see "Other HDMI® CEC Control functions" on page 101. ❖ Configure the connected devices. See each device's operation manual. NOTE This feature is limited to models incorporating Toshiba's HDMI® CEC Control feature. However, Toshiba is not liable for those operations. See the individual instruction manuals for compatibility information. When using an external AV amplifier the picture and sound may not be properly synchronized. In this case, adjust the delay time of the sound on the AV amplifier. NOTE The control range of the delay time differs according to the device you use. Connecting an HDMI® audio system If your HDMI® amplifier supports ARC, audio from the TV can be sent to the amplifier via an existing HDMI® cable.
-
 1
1 -
2
-
3
-
4
-
5
-
6
-
7
-
8
-
9
-
10
-
11
-
12
-
13
-
14
-
15
-
16
-
17
-
18
-
19
-
20
-
21
-
22
-
23
-
24
-
25
-
26
-
27
-
28
-
29
-
30
-
31
-
32
-
 33
33 -
 34
34 -
 35
35 -
 36
36 -
 37
37 -
 38
38 -
 39
39 -
 40
40 -
 41
41 -
 42
42 -
 43
43 -
44
-
45
-
46
-
47
-
48
-
49
-
50
-
51
-
52
-
53
-
54
-
55
-
56
-
57
-
58
-
59
-
60
-
61
-
62
-
63
-
64
-
65
-
66
-
67
-
68
-
69
-
70
-
71
-
72
-
73
-
74
-
75
-
76
-
77
-
78
-
79
-
80
-
81
-
82
-
83
-
84
-
85
-
86
-
87
-
88
-
89
-
90
-
91
-
92
-
93
-
94
-
95
-
96
-
97
-
98
-
99
-
100
-
101
-
102
-
103
-
104
-
105
-
106
-
107
-
108
-
109
-
110
-
111
-
112
-
113
-
114
-
115
-
116
-
117
-
118
-
119
-
120
-
121
-
122
-
123
-
124
-
125
-
126
-
127
-
128
-
129
-
130
-
131
-
132
-
133
-
134
-
135
-
136
-
137
-
138
-
139
-
140
-
141
-
142
-
143
-
144
-
145
-
146
-
147
-
148
-
149
-
150
-
151
-
152
-
153
-
154
-
155
-
156
-
157
-
158
-
159
-
160
-
161
-
162
-
163
-
164
-
165
-
166
-
167
-
168
-
169
-
170
-
171
-
172
-
173
-
174
-
175
-
176
-
177
-
178
-
179
-
180
-
181
-
182
-
183
-
184
-
185
-
186
-
187
-
188
-
189
-
190
-
191
-
192
-
193
-
194
-
195
-
196
-
197
-
198
-
199
-
200
-
201
-
202
-
203
-
204
-
205
-
206
 |
 |