Asus SCSI 320-0 Global Array Manager Transition Tool - Page 126
Change Cache Policy, Change Read Policy, Change Write Policy, Virtual Sizing, Add Capacity
 |
View all Asus SCSI 320-0 manuals
Add to My Manuals
Save this manual to your list of manuals |
Page 126 highlights
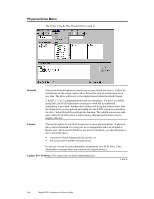
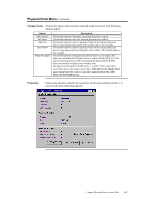
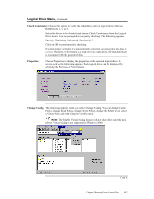
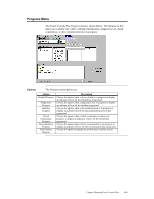
Logical Drive Menu, Continued Change Cache Policy Click on Cache to change the cache memory policy. You can choose Direct or Cached. Change Read Policy Click on Read to change the Cache Read Policy. You can choose Normal, Read Ahead, or Adaptive Read Ahead. Read Policy Normal Read Ahead Adaptive Read Ahead Description The MegaRAID controller does not use read-ahead for the selected logical drive. The MegaRAID controller uses read-ahead for the selected logical drive. This is the default setting. The MegaRAID controller begins using read-ahead if the two most recent disk accesses occurred in sequential sectors. If all read requests are random, the algorithm reverts to Normal. However, all requests are still evaluated for possible sequential operation. Change Write Policy Click on Write to change the Cache Write Policy. The settings are: Setting Write Back Write Thru Description The MegaRAID controller sends a data transfer completion signal to the host when the controller cache has received all the data in a transaction. The MegaRAID controller sends a data transfer completion signal to the host when the disk array has received all the data in a transaction. This is the default setting. Write-through caching has a data security advantage over write-back caching. Write-back caching has a performance advantage over write-through caching. If running Windows NT, you should not use writeback for any logical drive that is to be used as a Novell NetWare volume. Virtual Sizing Click on this option to enable or disable the Virtual Sizing Option. See Chapter 9 for more information about virtual sizing. Note: Virtual sizing is not supported in Windows 2000. Add Capacity Click on this option to add additional drive(s) to the specified logical drive. First click on the drive icon for each physical drive to be added. Then click on the icon for the logical drive to be added to. Then select Add Capacity from the Logical Drive menu. Click on OK when prompted to confirm the new logical drive configuration. You can also select a new RAID level for the selected logical drive when the Select RAID Level prompt appears. You can select any RAID level that is not grayed out. Click on OK to complete the operation. See Chapter 9 for more information about online capacity expansion. Note: Virtual sizing is not supported in Windows 2000. Important The physical drive must be in the READY state before it can be added to a logical drive. No operation can be started while a drive is being reconstructed. 118 MegaRAID Configuration Software Guide
-
 1
1 -
2
-
3
-
4
-
5
-
6
-
7
-
8
-
9
-
10
-
11
-
12
-
13
-
14
-
15
-
16
-
17
-
18
-
19
-
20
-
21
-
22
-
23
-
24
-
25
-
26
-
27
-
28
-
29
-
30
-
31
-
32
-
33
-
34
-
35
-
36
-
37
-
38
-
39
-
40
-
41
-
42
-
43
-
44
-
45
-
46
-
47
-
48
-
49
-
50
-
51
-
52
-
53
-
54
-
55
-
56
-
57
-
58
-
59
-
60
-
61
-
62
-
63
-
64
-
65
-
66
-
67
-
68
-
69
-
70
-
71
-
72
-
73
-
74
-
75
-
76
-
77
-
78
-
79
-
80
-
81
-
82
-
83
-
84
-
85
-
86
-
87
-
88
-
89
-
90
-
91
-
92
-
93
-
94
-
95
-
96
-
97
-
98
-
99
-
100
-
101
-
102
-
103
-
104
-
105
-
106
-
107
-
108
-
109
-
110
-
111
-
112
-
113
-
114
-
115
-
116
-
117
-
118
-
119
-
120
-
 121
121 -
 122
122 -
 123
123 -
 124
124 -
 125
125 -
 126
126 -
 127
127 -
 128
128 -
 129
129 -
 130
130 -
 131
131 -
132
-
133
-
134
-
135
-
136
-
137
-
138
-
139
-
140
-
141
-
142
-
143
-
144
-
145
-
146
-
147
-
148
-
149
-
150
-
151
-
152
-
153
-
154
 |
 |