Asus SCSI 320-0 Global Array Manager Transition Tool - Page 83
Direct I/O, accesses occurred in sequential sectors. If all read requests are random, the algorithm
 |
View all Asus SCSI 320-0 manuals
Add to My Manuals
Save this manual to your list of manuals |
Page 83 highlights
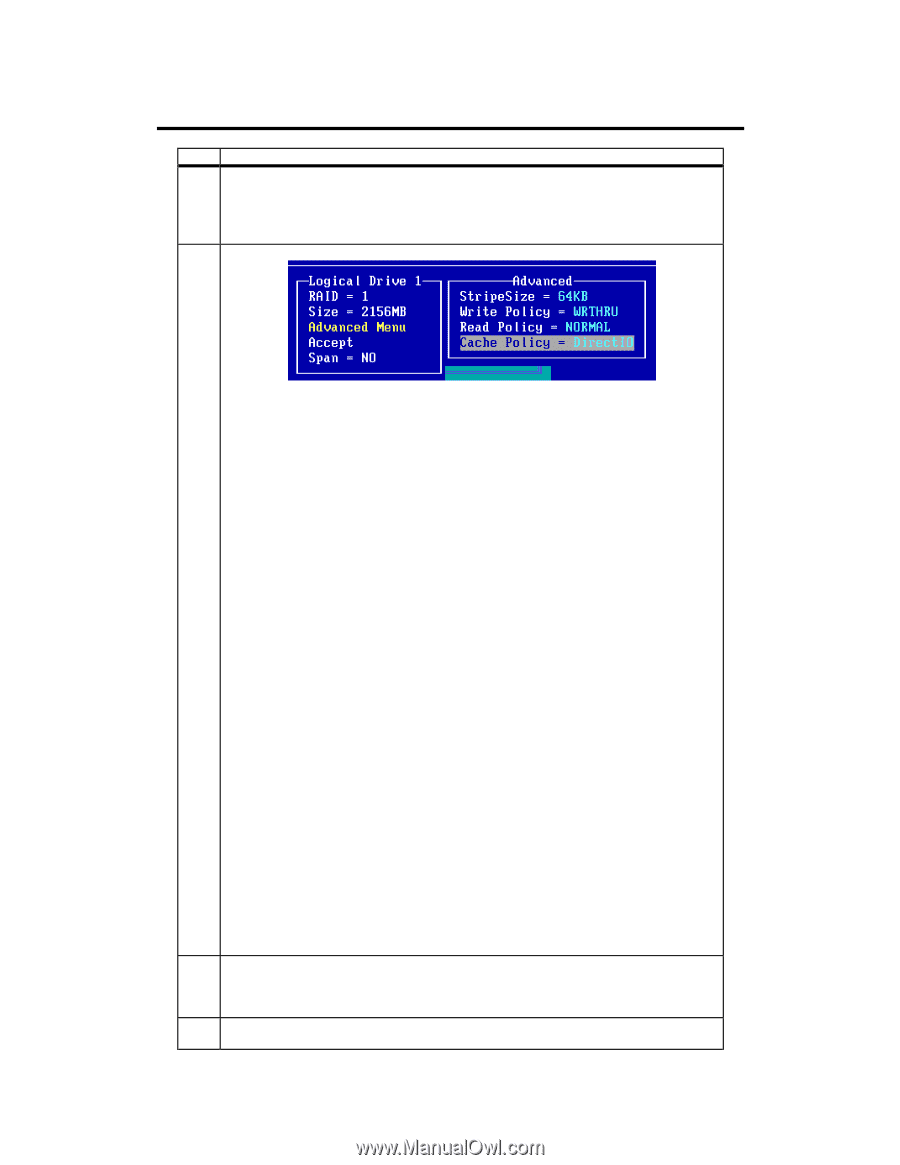
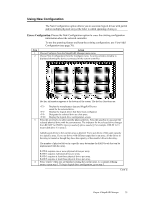
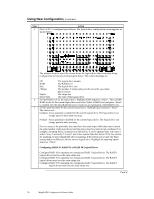
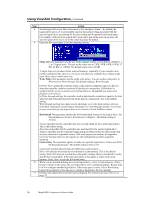
Using New Configuration, Continued Step Action 8 Set the logical drive size. Move the cursor to Size and press . By default, the logical drive size is set to all available space in the array(s) being associated with the current logical drive, accounting for the Span setting and for partially used array space. For example, if the previous logical drive used only a part of the space in an array, the current logical drive size is set to the remaining space by default. 9 Choose the Advanced menu (see below) to set remaining options. Stripe size This parameter specifies the size of the segment written to each disk in a RAID 1, 3, 5, 10, 30, or 50 logical drive. You can set the stripe size to 2 KB, 4 KB, 8 KB, 16 KB, 32 KB, 64 KB, or 128 KB. The default stripe size is 64 MB. A larger stripe size produces better read performance, especially if your computer does mostly sequential reads. If you are sure that your computer does random reads more often, select a small stripe size. Write Policy This parameter specifies the cache write policy. You can set the write policy to Write-back or Write-through. The default setting is Write-through. In Write-back caching, the controller sends a data transfer completion signal to the host when the controller cache has received all the data in a transaction. If WriteBack is enabled and the system is quickly turned off and then on, MegaRAID may hang when flushing cache memory. Adapters that contain a battery backup will default to WriteBack caching. In Write-through caching, the controller sends a data transfer completion signal to the host when the disk subsystem has received all the data in a transaction. This is the default setting. Write-through caching has a data security advantage over write-back caching. Write-back caching has a performance advantage over write-through caching. You should not use write-back for any logical drive that is to be used as a Novell NetWare volume. Read-ahead This parameter specifies that the SCSI read-ahead feature is used for the logical drive. You can set this parameter to Normal, Read-ahead, or Adaptive. The default setting is Normal. Normal specifies that the controller does not use read-ahead for the current logical drive. This is the default setting. Read-ahead specifies that the controller uses read-ahead for the current logical drive. Adaptive specifies that the controller begins using read-ahead if the two most recent disk accesses occurred in sequential sectors. If all read requests are random, the algorithm reverts to Normal, however, all requests are still evaluated for possible sequential operation. Cache Policy This parameter applies to reads on a specific logical drive. It does not affect the Read-ahead cache. The default setting is Direct I/O. Cached I/O specifies that all reads are buffered in cache memory. Direct I/O specifies that reads are not buffered in cache memory. This is the default setting. Direct I/O does not override the cache policy settings. Data is transferred to cache and the host concurrently. If the same data block is read again, it comes from cache memory. Press to exit the Advanced Menu. 10 After the current logical drive is defined, select Accept and press . If space remains in the arrays, the next logical drive to be configured appears. Repeat steps 6 to 9 to configure another logical drive. If all array space has been used, a list of the existing logical drives appears. Press any key to continue and respond to the Save prompt. 11 Initialize the logical drives you have just configured. See Initializing Logical Drives on page 79. Chapter 4 MegaRAID Manager 75
-
 1
1 -
2
-
3
-
4
-
5
-
6
-
7
-
8
-
9
-
10
-
11
-
12
-
13
-
14
-
15
-
16
-
17
-
18
-
19
-
20
-
21
-
22
-
23
-
24
-
25
-
26
-
27
-
28
-
29
-
30
-
31
-
32
-
33
-
34
-
35
-
36
-
37
-
38
-
39
-
40
-
41
-
42
-
43
-
44
-
45
-
46
-
47
-
48
-
49
-
50
-
51
-
52
-
53
-
54
-
55
-
56
-
57
-
58
-
59
-
60
-
61
-
62
-
63
-
64
-
65
-
66
-
67
-
68
-
69
-
70
-
71
-
72
-
73
-
74
-
75
-
76
-
77
-
 78
78 -
 79
79 -
 80
80 -
 81
81 -
 82
82 -
 83
83 -
 84
84 -
 85
85 -
 86
86 -
 87
87 -
 88
88 -
89
-
90
-
91
-
92
-
93
-
94
-
95
-
96
-
97
-
98
-
99
-
100
-
101
-
102
-
103
-
104
-
105
-
106
-
107
-
108
-
109
-
110
-
111
-
112
-
113
-
114
-
115
-
116
-
117
-
118
-
119
-
120
-
121
-
122
-
123
-
124
-
125
-
126
-
127
-
128
-
129
-
130
-
131
-
132
-
133
-
134
-
135
-
136
-
137
-
138
-
139
-
140
-
141
-
142
-
143
-
144
-
145
-
146
-
147
-
148
-
149
-
150
-
151
-
152
-
153
-
154
 |
 |