Asus SCSI 320-0 Global Array Manager Transition Tool - Page 91
Rebuilding Failed Disk Drives, Description, Action
 |
View all Asus SCSI 320-0 manuals
Add to My Manuals
Save this manual to your list of manuals |
Page 91 highlights
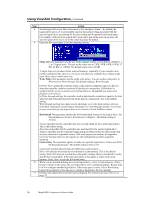
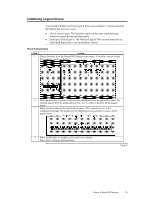
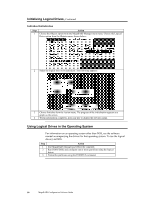
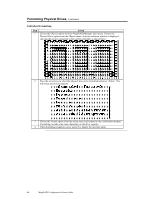
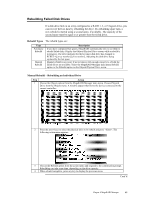
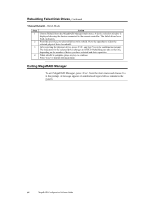
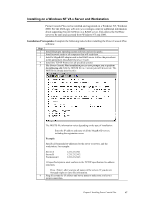
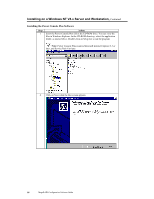
Rebuilding Failed Disk Drives If a disk drive fails in an array configured as a RAID 1, 3, or 5 logical drive, you can recover the lost data by rebuilding the drive. If a rebuilding spare fails, a new rebuild is started using a second spare, if available. The capacity of the second spare must be equal to or greater than the failed drive. Rebuild Types The rebuild types are: Type Automatic Rebuild Manual Rebuild Description If you have configured hot spares, MegaRAID automatically tries to use them to rebuild failed disks. Display the Objects/Physical Drive screen while a rebuild is in progress. The drive indicator for the hot spare disk drive has changed to REBLD A[array number]-[drive number], indicating the disk drive being replaced by the hot spare. Manual rebuild is necessary if no hot spares with enough capacity to rebuild the failed drives are available. Select the MegaRAID Manager main menu Rebuild option or the Rebuild option on the Objects/Physical Drive menu. Manual Rebuild - Rebuilding an Individual Drive Step Action 1 Choose the Objects option from the MegaRAID Manager main menu. Choose Physical Drive from the Objects menu. A window appears that shows the devices connected to the current controller: 2 Press the arrow keys to select the physical drive to be rebuilt and press . The following action menu appears: 3 Choose the Rebuild option from the action menu and respond to the confirmation prompt. Rebuilding can take some time, depending on the drive capacity. 4 When rebuild completes, press any key to display the previous menu. Cont'd Chapter 4 MegaRAID Manager 83
-
 1
1 -
2
-
3
-
4
-
5
-
6
-
7
-
8
-
9
-
10
-
11
-
12
-
13
-
14
-
15
-
16
-
17
-
18
-
19
-
20
-
21
-
22
-
23
-
24
-
25
-
26
-
27
-
28
-
29
-
30
-
31
-
32
-
33
-
34
-
35
-
36
-
37
-
38
-
39
-
40
-
41
-
42
-
43
-
44
-
45
-
46
-
47
-
48
-
49
-
50
-
51
-
52
-
53
-
54
-
55
-
56
-
57
-
58
-
59
-
60
-
61
-
62
-
63
-
64
-
65
-
66
-
67
-
68
-
69
-
70
-
71
-
72
-
73
-
74
-
75
-
76
-
77
-
78
-
79
-
80
-
81
-
82
-
83
-
84
-
85
-
 86
86 -
 87
87 -
 88
88 -
 89
89 -
 90
90 -
 91
91 -
 92
92 -
 93
93 -
 94
94 -
 95
95 -
 96
96 -
97
-
98
-
99
-
100
-
101
-
102
-
103
-
104
-
105
-
106
-
107
-
108
-
109
-
110
-
111
-
112
-
113
-
114
-
115
-
116
-
117
-
118
-
119
-
120
-
121
-
122
-
123
-
124
-
125
-
126
-
127
-
128
-
129
-
130
-
131
-
132
-
133
-
134
-
135
-
136
-
137
-
138
-
139
-
140
-
141
-
142
-
143
-
144
-
145
-
146
-
147
-
148
-
149
-
150
-
151
-
152
-
153
-
154
 |
 |
