Brother International PR-620 Users Manual - English - Page 113
Reserved Needle Bar Settings
 |
View all Brother International PR-620 manuals
Add to My Manuals
Save this manual to your list of manuals |
Page 113 highlights
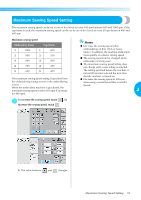
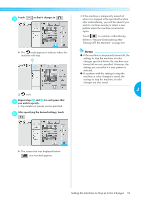
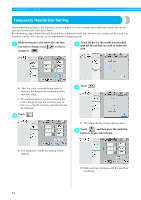
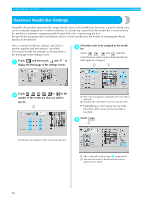
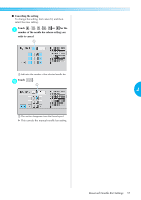
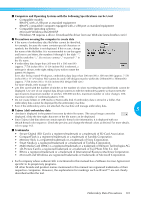
EMBROIDERING SETTINGS Reserved Needle Bar Settings Normally, the machine automatically assigns thread colors to the needle bars; however, a specific thread color can be manually assigned to a certain needle bar. If a needle bar is specified, that needle bar is removed from the machine's automatic assignments and the specified color remains assigned to it. By specifically assigning often used thread colors to certain needle bars, the trouble of changing the thread spools can be reduced. Once a manual needle bar setting is specified, it remains applied until the setting is cancelled. The manual needle bar settings can be specified in the third page of the settings screen. Touch , and then touch and to 1 display the third page of the settings screen. Select the color to be assigned to the needle 3 bar. Touch , , and until the color that you wish to select from the thread table appears enlarged. Touch , , , , or for the 2 number of the needle bar that you wish to specify. 1 The color that appears enlarged is the color that is selected. 2 Displays the color that is selected and its name X Highlighting a color square moves in the direction of the arrow on the key that is touched. Touch . 4 1 Indicates the number of the selected needle bar X The color selected in step 3 is specified. 1 The selected color of thread and the anchor appear on the spool. 96
-
 1
1 -
2
-
3
-
4
-
5
-
6
-
7
-
8
-
9
-
10
-
11
-
12
-
13
-
14
-
15
-
16
-
17
-
18
-
19
-
20
-
21
-
22
-
23
-
24
-
25
-
26
-
27
-
28
-
29
-
30
-
31
-
32
-
33
-
34
-
35
-
36
-
37
-
38
-
39
-
40
-
41
-
42
-
43
-
44
-
45
-
46
-
47
-
48
-
49
-
50
-
51
-
52
-
53
-
54
-
55
-
56
-
57
-
58
-
59
-
60
-
61
-
62
-
63
-
64
-
65
-
66
-
67
-
68
-
69
-
70
-
71
-
72
-
73
-
74
-
75
-
76
-
77
-
78
-
79
-
80
-
81
-
82
-
83
-
84
-
85
-
86
-
87
-
88
-
89
-
90
-
91
-
92
-
93
-
94
-
95
-
96
-
97
-
98
-
99
-
100
-
101
-
102
-
103
-
104
-
105
-
106
-
107
-
 108
108 -
 109
109 -
 110
110 -
 111
111 -
 112
112 -
 113
113 -
 114
114 -
 115
115 -
 116
116 -
 117
117 -
 118
118 -
119
-
120
-
121
-
122
-
123
-
124
-
125
-
126
-
127
-
128
-
129
-
130
-
131
-
132
-
133
-
134
-
135
-
136
-
137
-
138
-
139
-
140
-
141
-
142
-
143
-
144
-
145
-
146
-
147
-
148
-
149
-
150
-
151
-
152
-
153
-
154
-
155
-
156
-
157
-
158
-
159
-
160
-
161
-
162
-
163
-
164
-
165
-
166
-
167
-
168
-
169
-
170
-
171
-
172
-
173
-
174
-
175
-
176
-
177
-
178
-
179
-
180
-
181
-
182
-
183
-
184
-
185
-
186
-
187
-
188
-
189
-
190
-
191
-
192
-
193
-
194
-
195
-
196
-
197
-
198
-
199
-
200
-
201
-
202
-
203
-
204
-
205
-
206
-
207
-
208
-
209
-
210
-
211
-
212
-
213
-
214
-
215
-
216
-
217
-
218
-
219
-
220
-
221
-
222
-
223
-
224
-
225
-
226
-
227
-
228
-
229
-
230
-
231
-
232
-
233
-
234
-
235
-
236
-
237
 |
 |
