Brother International PR-620 Users Manual - English - Page 183
Hooping Techniques
 |
View all Brother International PR-620 manuals
Add to My Manuals
Save this manual to your list of manuals |
Page 183 highlights
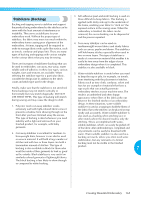
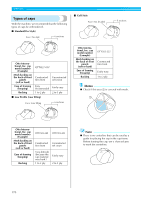
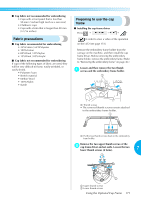
APPENDIX Hooping Techniques "Use the right tool for the right job" is a statement many of us have heard throughout the years. This statement holds true even in the embroidery industry. The wrong size or type of embroidery frame may result in poor design alignment during sewing or damage the product altogether. You can take a perfectly created design and ruin the final results by simply not using the correct frame size, type or technique designed for its application. ■ Frame Basics Tubular frames: This type of frame allows tubular fabric or pre-assembled garments to be placed around the hook assembly. It allows embroidering of the front of a garment without stitching through the back of it. Cap frames: These are specialized embroidery frames (hoops) designed to hold caps for embroidering. They are available in a variety of styles for various machines, with two basic styles: one that allows sewing a flattened cap (for use on a flat machine) or one that allows sewing the cap in its natural curved shape (for use on a tubular machine). Hooping fabric: The framed fabric and backing should be perfectly flat and free of wrinkles or bubbles. If there are bubbles or wrinkles that must be removed, be sure that you pull on the fabric and backing together. Pull no more than is necessary to make the fabric flat and smooth. Overstretching the fabric during this process may cause puckers around the finished design when the frame is removed. Gaps may also be generated between design parts. Inner/outer frame positioning: There should be a slight ridge (3 mm (1/8 inch)) of fabric and backing below the outer frame on the back side. Tighten the screw only if the inner frame feels loose. Avoid overtightening the screw as this will cause puckers in the fabric and may "strip" the screw. 166
-
 1
1 -
2
-
3
-
4
-
5
-
6
-
7
-
8
-
9
-
10
-
11
-
12
-
13
-
14
-
15
-
16
-
17
-
18
-
19
-
20
-
21
-
22
-
23
-
24
-
25
-
26
-
27
-
28
-
29
-
30
-
31
-
32
-
33
-
34
-
35
-
36
-
37
-
38
-
39
-
40
-
41
-
42
-
43
-
44
-
45
-
46
-
47
-
48
-
49
-
50
-
51
-
52
-
53
-
54
-
55
-
56
-
57
-
58
-
59
-
60
-
61
-
62
-
63
-
64
-
65
-
66
-
67
-
68
-
69
-
70
-
71
-
72
-
73
-
74
-
75
-
76
-
77
-
78
-
79
-
80
-
81
-
82
-
83
-
84
-
85
-
86
-
87
-
88
-
89
-
90
-
91
-
92
-
93
-
94
-
95
-
96
-
97
-
98
-
99
-
100
-
101
-
102
-
103
-
104
-
105
-
106
-
107
-
108
-
109
-
110
-
111
-
112
-
113
-
114
-
115
-
116
-
117
-
118
-
119
-
120
-
121
-
122
-
123
-
124
-
125
-
126
-
127
-
128
-
129
-
130
-
131
-
132
-
133
-
134
-
135
-
136
-
137
-
138
-
139
-
140
-
141
-
142
-
143
-
144
-
145
-
146
-
147
-
148
-
149
-
150
-
151
-
152
-
153
-
154
-
155
-
156
-
157
-
158
-
159
-
160
-
161
-
162
-
163
-
164
-
165
-
166
-
167
-
168
-
169
-
170
-
171
-
172
-
173
-
174
-
175
-
176
-
177
-
 178
178 -
 179
179 -
 180
180 -
 181
181 -
 182
182 -
 183
183 -
 184
184 -
 185
185 -
 186
186 -
 187
187 -
 188
188 -
189
-
190
-
191
-
192
-
193
-
194
-
195
-
196
-
197
-
198
-
199
-
200
-
201
-
202
-
203
-
204
-
205
-
206
-
207
-
208
-
209
-
210
-
211
-
212
-
213
-
214
-
215
-
216
-
217
-
218
-
219
-
220
-
221
-
222
-
223
-
224
-
225
-
226
-
227
-
228
-
229
-
230
-
231
-
232
-
233
-
234
-
235
-
236
-
237
 |
 |