Brother International PR-620 Users Manual - English - Page 198
Align the centerline of the cap with the notch
 |
View all Brother International PR-620 manuals
Add to My Manuals
Save this manual to your list of manuals |
Page 198 highlights
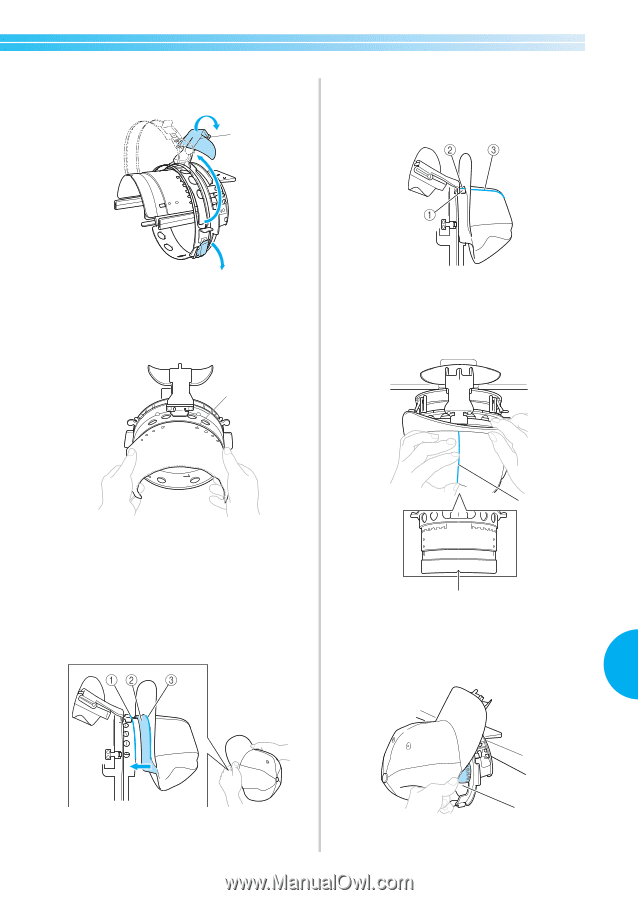
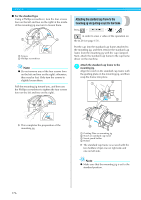
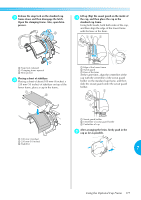
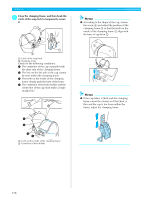
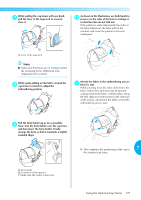
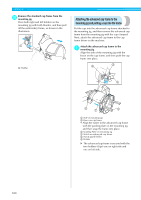
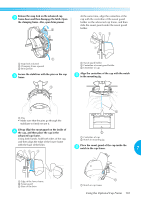
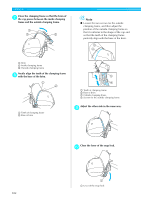
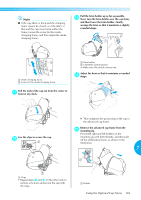
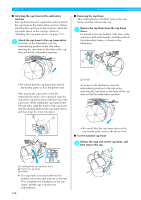
Release the snap lock on the advanced cap 2 frame down and then disengage the latch. Open the clamping frame. Also, open brim presser. 3 2 At the same time, align the centerline of the cap with the centerline of the sweat guard holder on the advanced cap frame, and then slide the sweat guard under the sweat guard holder. 1 1 Snap lock released 2 Clamping frame opened 3 Brim presser Secure the stabilizer with the pins on the cap 3 frame. 1 Sweat guard holder 2 Centerline of sweat guard holder 3 Centerline of cap Align the centerline of the cap with the notch 5 in the mounting jig. 1 1 1 Pins • Make sure that the pins go through the stabilizer to firmly secure it. Lift up (flip) the sweat guard on the inside of 4 the cap, and then place the cap in the 2 advanced cap frame. Using both hands, hold both sides of the cap, and then align the edge of the lower frame 1 Centerline of cap 2 Notch in mounting jig with the base of the brim. Place the sweat guard of the cap inside the 6 notch in the cap frame. 7 1 Edge of the lower frame 2 Sweat guard 3 Base of the brim 1 1 Notch in cap frame Using the Optional Cap Frame 181
-
 1
1 -
2
-
3
-
4
-
5
-
6
-
7
-
8
-
9
-
10
-
11
-
12
-
13
-
14
-
15
-
16
-
17
-
18
-
19
-
20
-
21
-
22
-
23
-
24
-
25
-
26
-
27
-
28
-
29
-
30
-
31
-
32
-
33
-
34
-
35
-
36
-
37
-
38
-
39
-
40
-
41
-
42
-
43
-
44
-
45
-
46
-
47
-
48
-
49
-
50
-
51
-
52
-
53
-
54
-
55
-
56
-
57
-
58
-
59
-
60
-
61
-
62
-
63
-
64
-
65
-
66
-
67
-
68
-
69
-
70
-
71
-
72
-
73
-
74
-
75
-
76
-
77
-
78
-
79
-
80
-
81
-
82
-
83
-
84
-
85
-
86
-
87
-
88
-
89
-
90
-
91
-
92
-
93
-
94
-
95
-
96
-
97
-
98
-
99
-
100
-
101
-
102
-
103
-
104
-
105
-
106
-
107
-
108
-
109
-
110
-
111
-
112
-
113
-
114
-
115
-
116
-
117
-
118
-
119
-
120
-
121
-
122
-
123
-
124
-
125
-
126
-
127
-
128
-
129
-
130
-
131
-
132
-
133
-
134
-
135
-
136
-
137
-
138
-
139
-
140
-
141
-
142
-
143
-
144
-
145
-
146
-
147
-
148
-
149
-
150
-
151
-
152
-
153
-
154
-
155
-
156
-
157
-
158
-
159
-
160
-
161
-
162
-
163
-
164
-
165
-
166
-
167
-
168
-
169
-
170
-
171
-
172
-
173
-
174
-
175
-
176
-
177
-
178
-
179
-
180
-
181
-
182
-
183
-
184
-
185
-
186
-
187
-
188
-
189
-
190
-
191
-
192
-
 193
193 -
 194
194 -
 195
195 -
 196
196 -
 197
197 -
 198
198 -
 199
199 -
 200
200 -
 201
201 -
 202
202 -
 203
203 -
204
-
205
-
206
-
207
-
208
-
209
-
210
-
211
-
212
-
213
-
214
-
215
-
216
-
217
-
218
-
219
-
220
-
221
-
222
-
223
-
224
-
225
-
226
-
227
-
228
-
229
-
230
-
231
-
232
-
233
-
234
-
235
-
236
-
237
 |
 |