Brother International PR-620 Users Manual - English - Page 196
rounded shape.
 |
View all Brother International PR-620 manuals
Add to My Manuals
Save this manual to your list of manuals |
Page 196 highlights
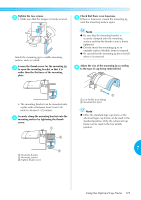
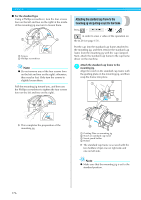
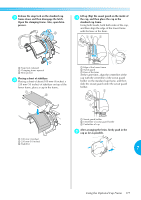
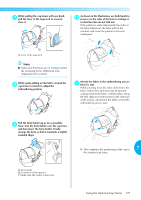
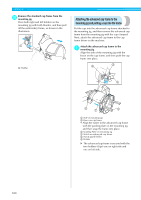
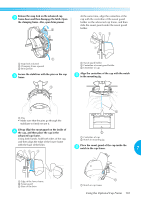
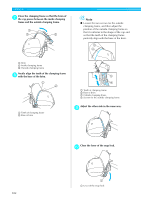
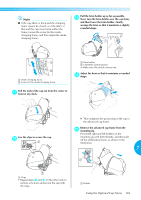
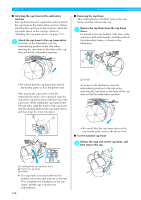
While pulling the cap down with one hand, 7 pull the lever of the snap lock to securely close it. As shown in the illustration, use both hands to 0 press in on the sides of the brim to reshape it so that the sides do not fold out. If the pattern is embroidered with the sides of the brim folded out, the brim will hit the machine and cause the pattern to become misaligned. 1 1 Lever of the snap lock Note ● Make sure that there are no wrinkles within the clamping frame. Otherwise miss alignment will occurred. While again pulling on the fabric around the 8 cap frame to stretch it, adjust the embroidering position. Stretch the fabric in the embroidering area so a that it is taut. While pressing in on the sides of the brim, the fabric within the cap frame may be pressed, causing slack in the fabric. Pull the fabric along the left, right and center seams in the direction of the arrows, and stretch the fabric so that the embroidering area is taut. Pull the brim holder up as far as possible. 9 Next, turn the brim holder over the cap brim, and then lower the brim holder. Finally, arrange the brim so that it maintains a slightly rounded shape. X This completes the positioning of the cap in 7 the standard cap frame. 1 Brim holder 2 Centerline of brim presser • Make sure the notch comes out. Using the Optional Cap Frame 179
-
 1
1 -
2
-
3
-
4
-
5
-
6
-
7
-
8
-
9
-
10
-
11
-
12
-
13
-
14
-
15
-
16
-
17
-
18
-
19
-
20
-
21
-
22
-
23
-
24
-
25
-
26
-
27
-
28
-
29
-
30
-
31
-
32
-
33
-
34
-
35
-
36
-
37
-
38
-
39
-
40
-
41
-
42
-
43
-
44
-
45
-
46
-
47
-
48
-
49
-
50
-
51
-
52
-
53
-
54
-
55
-
56
-
57
-
58
-
59
-
60
-
61
-
62
-
63
-
64
-
65
-
66
-
67
-
68
-
69
-
70
-
71
-
72
-
73
-
74
-
75
-
76
-
77
-
78
-
79
-
80
-
81
-
82
-
83
-
84
-
85
-
86
-
87
-
88
-
89
-
90
-
91
-
92
-
93
-
94
-
95
-
96
-
97
-
98
-
99
-
100
-
101
-
102
-
103
-
104
-
105
-
106
-
107
-
108
-
109
-
110
-
111
-
112
-
113
-
114
-
115
-
116
-
117
-
118
-
119
-
120
-
121
-
122
-
123
-
124
-
125
-
126
-
127
-
128
-
129
-
130
-
131
-
132
-
133
-
134
-
135
-
136
-
137
-
138
-
139
-
140
-
141
-
142
-
143
-
144
-
145
-
146
-
147
-
148
-
149
-
150
-
151
-
152
-
153
-
154
-
155
-
156
-
157
-
158
-
159
-
160
-
161
-
162
-
163
-
164
-
165
-
166
-
167
-
168
-
169
-
170
-
171
-
172
-
173
-
174
-
175
-
176
-
177
-
178
-
179
-
180
-
181
-
182
-
183
-
184
-
185
-
186
-
187
-
188
-
189
-
190
-
 191
191 -
 192
192 -
 193
193 -
 194
194 -
 195
195 -
 196
196 -
 197
197 -
 198
198 -
 199
199 -
 200
200 -
 201
201 -
202
-
203
-
204
-
205
-
206
-
207
-
208
-
209
-
210
-
211
-
212
-
213
-
214
-
215
-
216
-
217
-
218
-
219
-
220
-
221
-
222
-
223
-
224
-
225
-
226
-
227
-
228
-
229
-
230
-
231
-
232
-
233
-
234
-
235
-
236
-
237
 |
 |
