Brother International PR-620 Users Manual - English - Page 91
If necessary, touch - error messages
 |
View all Brother International PR-620 manuals
Add to My Manuals
Save this manual to your list of manuals |
Page 91 highlights
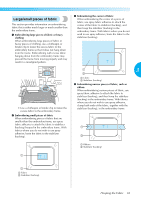
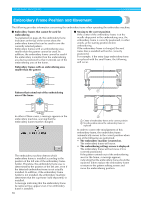
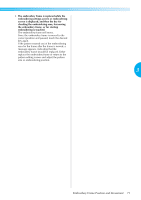
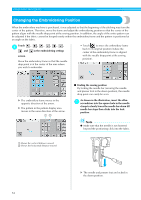
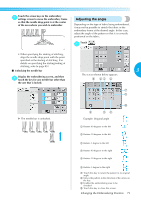
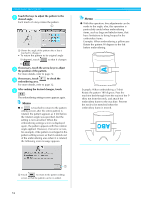
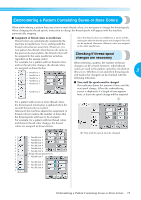
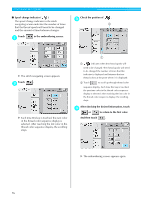
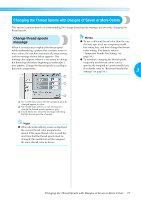
OTHER BASIC PROCEDURES Touch the keys to adjust the pattern to the 2 desired angle. Each touch of a key rotates the pattern. 1 Shows the angle of the pattern after a key is touched to change it • To return the pattern to its original angle (0 degrees), touch so that it changes to . If necessary, touch the arrow keys to adjust 3 the position of the pattern. For more details, refer to page 72. If necessary, touch 4 embroidering area. to check the For more details, refer to page 32. After making the desired changes, touch 5 . The embroidering settings screen appears again. Memo ● If is touched to return to the pattern editing screen after the entire pattern is rotated, the pattern appears as it did before the rotation angle was specified, but the setting is not cancelled. When the embroidering settings screen is displayed again, the pattern appears with the rotation angle applied. However, if an error occurs, for example, if the pattern is enlarged in the pattern editing screen so that it extends out of the embroidering area when it is rotated, the following error message appears. Memo ● With this operation, fine adjustments can be made to the angle; also, this operation is particularly useful when embroidering items, such as bags and tubular items, that have limitations to being hooped in the embroidery frame. Example: When embroidering a pillowcase Rotate the pattern 90 degrees to the left before embroidering. Example: When embroidering a T-shirt Rotate the pattern 180 degrees. Pass the machine bed through from the waist of the Tshirt, not from the neck, and attach the embroidery frame to the machine. Prevent the neck to be stretched when the embroidery frame is moved. 1 Touch to return to the pattern editing screen so that the pattern can be re-edited. 74
-
 1
1 -
2
-
3
-
4
-
5
-
6
-
7
-
8
-
9
-
10
-
11
-
12
-
13
-
14
-
15
-
16
-
17
-
18
-
19
-
20
-
21
-
22
-
23
-
24
-
25
-
26
-
27
-
28
-
29
-
30
-
31
-
32
-
33
-
34
-
35
-
36
-
37
-
38
-
39
-
40
-
41
-
42
-
43
-
44
-
45
-
46
-
47
-
48
-
49
-
50
-
51
-
52
-
53
-
54
-
55
-
56
-
57
-
58
-
59
-
60
-
61
-
62
-
63
-
64
-
65
-
66
-
67
-
68
-
69
-
70
-
71
-
72
-
73
-
74
-
75
-
76
-
77
-
78
-
79
-
80
-
81
-
82
-
83
-
84
-
85
-
 86
86 -
 87
87 -
 88
88 -
 89
89 -
 90
90 -
 91
91 -
 92
92 -
 93
93 -
 94
94 -
 95
95 -
 96
96 -
97
-
98
-
99
-
100
-
101
-
102
-
103
-
104
-
105
-
106
-
107
-
108
-
109
-
110
-
111
-
112
-
113
-
114
-
115
-
116
-
117
-
118
-
119
-
120
-
121
-
122
-
123
-
124
-
125
-
126
-
127
-
128
-
129
-
130
-
131
-
132
-
133
-
134
-
135
-
136
-
137
-
138
-
139
-
140
-
141
-
142
-
143
-
144
-
145
-
146
-
147
-
148
-
149
-
150
-
151
-
152
-
153
-
154
-
155
-
156
-
157
-
158
-
159
-
160
-
161
-
162
-
163
-
164
-
165
-
166
-
167
-
168
-
169
-
170
-
171
-
172
-
173
-
174
-
175
-
176
-
177
-
178
-
179
-
180
-
181
-
182
-
183
-
184
-
185
-
186
-
187
-
188
-
189
-
190
-
191
-
192
-
193
-
194
-
195
-
196
-
197
-
198
-
199
-
200
-
201
-
202
-
203
-
204
-
205
-
206
-
207
-
208
-
209
-
210
-
211
-
212
-
213
-
214
-
215
-
216
-
217
-
218
-
219
-
220
-
221
-
222
-
223
-
224
-
225
-
226
-
227
-
228
-
229
-
230
-
231
-
232
-
233
-
234
-
235
-
236
-
237
 |
 |
