Brother International PR-620 Users Manual - English - Page 200
arrange the brim so that it maintains a slightly
 |
View all Brother International PR-620 manuals
Add to My Manuals
Save this manual to your list of manuals |
Page 200 highlights
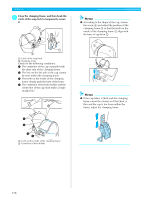
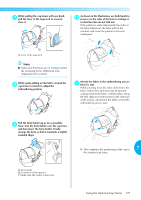
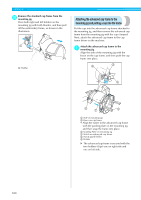
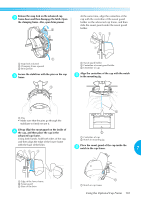
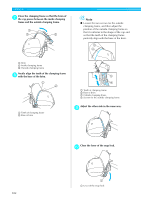
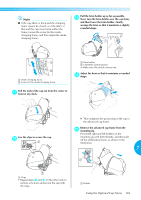
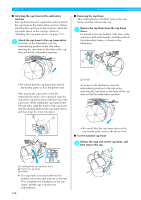
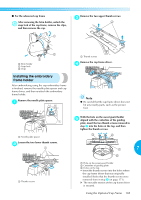
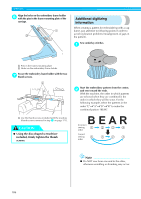
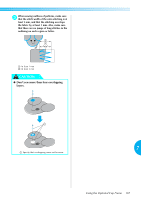
Note ● If the cap fabric is thick and the clamping frame cannot be closed, or if the fabric is thin and the cap is too loose within the frame, loosen the screw for the inside clamping frame, and then adjust the inside clamping frame. Pull the brim holder up as far as possible. c Next, turn the brim holder over the cap brim, and then lower the brim holder. Finally, arrange the brim so that it maintains a slightly rounded shape. 1 Inside clamping frame 2 Screw for the inside clamping frame 1 Brim holder 2 Centerline of brim presser • Make sure the notch comes out. Adjust the brim so that it maintains a rounded d shape. Pull the ends of the cap out from the center to a remove any slack. Use the clips to secure the cap. b 1 X This completes the positioning of the cap in the advanced cap frame. Remove the advanced cap frame from the e mounting jig. Press both right and left holders on the mounting jig with both thumbs, and then pull off the embroidery frame, as shown in the illustration. 7 1 1 1 Clips • Repeat steps a and b on the other side to remove any slack and secure the cap with the clips. 1 Holder Using the Optional Cap Frame 183
-
 1
1 -
2
-
3
-
4
-
5
-
6
-
7
-
8
-
9
-
10
-
11
-
12
-
13
-
14
-
15
-
16
-
17
-
18
-
19
-
20
-
21
-
22
-
23
-
24
-
25
-
26
-
27
-
28
-
29
-
30
-
31
-
32
-
33
-
34
-
35
-
36
-
37
-
38
-
39
-
40
-
41
-
42
-
43
-
44
-
45
-
46
-
47
-
48
-
49
-
50
-
51
-
52
-
53
-
54
-
55
-
56
-
57
-
58
-
59
-
60
-
61
-
62
-
63
-
64
-
65
-
66
-
67
-
68
-
69
-
70
-
71
-
72
-
73
-
74
-
75
-
76
-
77
-
78
-
79
-
80
-
81
-
82
-
83
-
84
-
85
-
86
-
87
-
88
-
89
-
90
-
91
-
92
-
93
-
94
-
95
-
96
-
97
-
98
-
99
-
100
-
101
-
102
-
103
-
104
-
105
-
106
-
107
-
108
-
109
-
110
-
111
-
112
-
113
-
114
-
115
-
116
-
117
-
118
-
119
-
120
-
121
-
122
-
123
-
124
-
125
-
126
-
127
-
128
-
129
-
130
-
131
-
132
-
133
-
134
-
135
-
136
-
137
-
138
-
139
-
140
-
141
-
142
-
143
-
144
-
145
-
146
-
147
-
148
-
149
-
150
-
151
-
152
-
153
-
154
-
155
-
156
-
157
-
158
-
159
-
160
-
161
-
162
-
163
-
164
-
165
-
166
-
167
-
168
-
169
-
170
-
171
-
172
-
173
-
174
-
175
-
176
-
177
-
178
-
179
-
180
-
181
-
182
-
183
-
184
-
185
-
186
-
187
-
188
-
189
-
190
-
191
-
192
-
193
-
194
-
 195
195 -
 196
196 -
 197
197 -
 198
198 -
 199
199 -
 200
200 -
 201
201 -
 202
202 -
 203
203 -
 204
204 -
 205
205 -
206
-
207
-
208
-
209
-
210
-
211
-
212
-
213
-
214
-
215
-
216
-
217
-
218
-
219
-
220
-
221
-
222
-
223
-
224
-
225
-
226
-
227
-
228
-
229
-
230
-
231
-
232
-
233
-
234
-
235
-
236
-
237
 |
 |
