Brother International PR-620 Users Manual - English - Page 160
Changing the language, Changing the units of, measurements, Changing the display guides
 |
View all Brother International PR-620 manuals
Add to My Manuals
Save this manual to your list of manuals |
Page 160 highlights
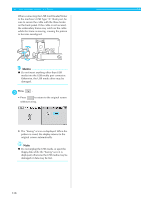
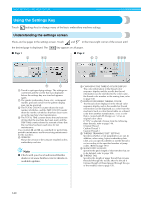
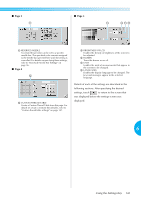
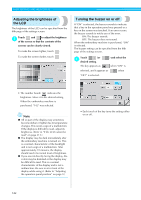
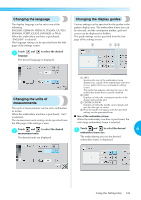
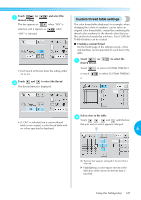
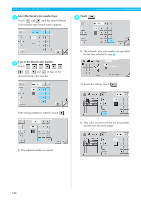
Changing the language The display language can be set to any of the following. ENGLISH, GERMAN, FRENCH, ITALIAN, DUTCH, SPANISH, PORTUGUESE, JAPANESE or THAI. When the embroidery machine is purchased, "ENGLISH" is selected. The language setting can be specified from the fifth page of the settings screen. Touch and 1 language. to select the desired The desired language is displayed. Changing the display guides Various settings can be specified for the guides in the pattern display area. The embroidery frame size can be selected, and the centerpoint marker, grid and cursor can be displayed or hidden. The guide settings can be specified from the first page of the settings screen. Changing the units of measurements The units of measurements can be set to millimeters or inches. When the embroidery machine is purchased, "mm" is selected. The measurement units setting can be specified from the fifth page of the settings screen. 1 AREA Specifies the size of the embroidery frame displayed as a guide in the pattern type selection screen, pattern list screen and pattern editing screen. The guide that appears indicates the size of the embroidery frame that is actually installed. 2 GRID Displays or hides the centerpoint marker of the design (red) and the grid. 3 CENTER CURSOR Displays or hides the needle cursor (green) and specifies the type of cursor. 4 How the guides will appear with the specified settings can be previewed here. ■ Size of the embroidery frame When the embroidery machine is purchased, the extra-large embroidery frame is selected. Touch and to select the desired 1 measurement units. Touch and to select the desired 1 embroidery frame size. 6 The desired units are displayed. The embroidering area for the desired embroidery frame is displayed. Using the Settings Key 143
-
 1
1 -
2
-
3
-
4
-
5
-
6
-
7
-
8
-
9
-
10
-
11
-
12
-
13
-
14
-
15
-
16
-
17
-
18
-
19
-
20
-
21
-
22
-
23
-
24
-
25
-
26
-
27
-
28
-
29
-
30
-
31
-
32
-
33
-
34
-
35
-
36
-
37
-
38
-
39
-
40
-
41
-
42
-
43
-
44
-
45
-
46
-
47
-
48
-
49
-
50
-
51
-
52
-
53
-
54
-
55
-
56
-
57
-
58
-
59
-
60
-
61
-
62
-
63
-
64
-
65
-
66
-
67
-
68
-
69
-
70
-
71
-
72
-
73
-
74
-
75
-
76
-
77
-
78
-
79
-
80
-
81
-
82
-
83
-
84
-
85
-
86
-
87
-
88
-
89
-
90
-
91
-
92
-
93
-
94
-
95
-
96
-
97
-
98
-
99
-
100
-
101
-
102
-
103
-
104
-
105
-
106
-
107
-
108
-
109
-
110
-
111
-
112
-
113
-
114
-
115
-
116
-
117
-
118
-
119
-
120
-
121
-
122
-
123
-
124
-
125
-
126
-
127
-
128
-
129
-
130
-
131
-
132
-
133
-
134
-
135
-
136
-
137
-
138
-
139
-
140
-
141
-
142
-
143
-
144
-
145
-
146
-
147
-
148
-
149
-
150
-
151
-
152
-
153
-
154
-
 155
155 -
 156
156 -
 157
157 -
 158
158 -
 159
159 -
 160
160 -
 161
161 -
 162
162 -
 163
163 -
 164
164 -
 165
165 -
166
-
167
-
168
-
169
-
170
-
171
-
172
-
173
-
174
-
175
-
176
-
177
-
178
-
179
-
180
-
181
-
182
-
183
-
184
-
185
-
186
-
187
-
188
-
189
-
190
-
191
-
192
-
193
-
194
-
195
-
196
-
197
-
198
-
199
-
200
-
201
-
202
-
203
-
204
-
205
-
206
-
207
-
208
-
209
-
210
-
211
-
212
-
213
-
214
-
215
-
216
-
217
-
218
-
219
-
220
-
221
-
222
-
223
-
224
-
225
-
226
-
227
-
228
-
229
-
230
-
231
-
232
-
233
-
234
-
235
-
236
-
237
 |
 |
