Brother International PR-620 Users Manual - English - Page 90
Adjusting the angle
 |
View all Brother International PR-620 manuals
Add to My Manuals
Save this manual to your list of manuals |
Page 90 highlights
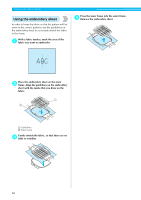
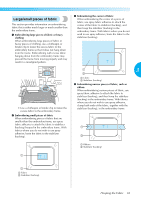
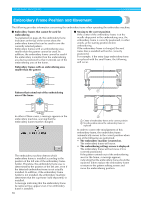
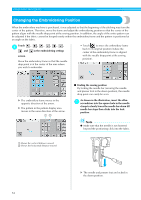
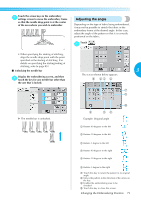
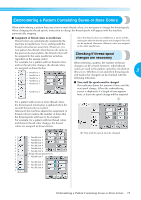
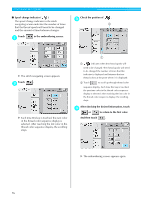
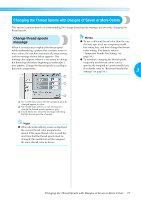
Touch the arrow keys in the embroidery 2 settings screen to move the embroidery frame so that the needle drop point is at the center of the area where you wish to embroider. Adjusting the angle Depending on the type of fabric being embroidered, it may not be possible to stretch the fabric in the embroidery frame at the desired angle. In this case, adjust the angle of the pattern so that it is correctly positioned on the fabric. Touch . 1 • When specifying the starting of stitching, align the needle drop point with the point specified as the starting of stitching. (For details on specifying the starting/ending of stitching, refer to page 89.) ■ Unlocking the needle bar 3 Display the embroidering screen, and then 1 touch the key for any needle bar other than the one that is locked. The screen shown below appears. X The needle bar is unlocked. Example: Original angle 1 Rotates 90 degrees to the left 2 Rotates 10 degrees to the left 3 Rotates 1 degree to the left 4 Rotates 90 degrees to the right 5 Rotates 10 degrees to the right 6 Rotates 1 degree to the right 7 Touch this key to return the pattern to its original angle. 8 Moves the pattern in the direction of the arrow on the key. 9 Enables the embroidering area to be checked 0 Touch this key to close this screen. Changing the Embroidering Position 73
-
 1
1 -
2
-
3
-
4
-
5
-
6
-
7
-
8
-
9
-
10
-
11
-
12
-
13
-
14
-
15
-
16
-
17
-
18
-
19
-
20
-
21
-
22
-
23
-
24
-
25
-
26
-
27
-
28
-
29
-
30
-
31
-
32
-
33
-
34
-
35
-
36
-
37
-
38
-
39
-
40
-
41
-
42
-
43
-
44
-
45
-
46
-
47
-
48
-
49
-
50
-
51
-
52
-
53
-
54
-
55
-
56
-
57
-
58
-
59
-
60
-
61
-
62
-
63
-
64
-
65
-
66
-
67
-
68
-
69
-
70
-
71
-
72
-
73
-
74
-
75
-
76
-
77
-
78
-
79
-
80
-
81
-
82
-
83
-
84
-
 85
85 -
 86
86 -
 87
87 -
 88
88 -
 89
89 -
 90
90 -
 91
91 -
 92
92 -
 93
93 -
 94
94 -
 95
95 -
96
-
97
-
98
-
99
-
100
-
101
-
102
-
103
-
104
-
105
-
106
-
107
-
108
-
109
-
110
-
111
-
112
-
113
-
114
-
115
-
116
-
117
-
118
-
119
-
120
-
121
-
122
-
123
-
124
-
125
-
126
-
127
-
128
-
129
-
130
-
131
-
132
-
133
-
134
-
135
-
136
-
137
-
138
-
139
-
140
-
141
-
142
-
143
-
144
-
145
-
146
-
147
-
148
-
149
-
150
-
151
-
152
-
153
-
154
-
155
-
156
-
157
-
158
-
159
-
160
-
161
-
162
-
163
-
164
-
165
-
166
-
167
-
168
-
169
-
170
-
171
-
172
-
173
-
174
-
175
-
176
-
177
-
178
-
179
-
180
-
181
-
182
-
183
-
184
-
185
-
186
-
187
-
188
-
189
-
190
-
191
-
192
-
193
-
194
-
195
-
196
-
197
-
198
-
199
-
200
-
201
-
202
-
203
-
204
-
205
-
206
-
207
-
208
-
209
-
210
-
211
-
212
-
213
-
214
-
215
-
216
-
217
-
218
-
219
-
220
-
221
-
222
-
223
-
224
-
225
-
226
-
227
-
228
-
229
-
230
-
231
-
232
-
233
-
234
-
235
-
236
-
237
 |
 |
