Brother International PR-620 Users Manual - English - Page 34
Basic Procedures - embroidery hoops
 |
View all Brother International PR-620 manuals
Add to My Manuals
Save this manual to your list of manuals |
Page 34 highlights
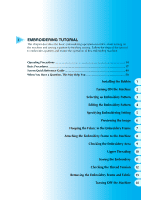
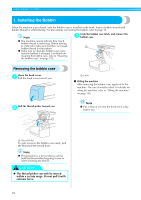
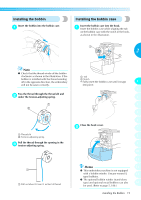
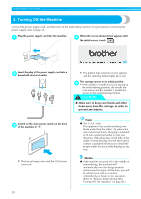
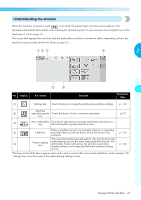
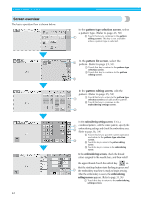
Basic Procedures Basic embroidering procedures are described below. Check the overall procedure below, before operating the embroidery machine. Procedure Operation 1 Install the bobbin. 2 Turn on the machine. Tutorial Reference Page Operating Procedure Reference Page p. 18 p.15 2 p. 20 p.14, 16 3 Select an embroidery pattern. p. 23 4 Edit the embroidery pattern. p. 25 5 Specify the embroidering settings. p. 26 6 Check the previewed image. p. 27 7 Hoop the fabric in the embroidery frame. p. 28 p. 16 8 Attach the embroidery frame to the machine. p. 30 9 Check the embroidery area. p. 32 10 Thread the upper threads. p. 33 p.16 Unlock the machine, then press the start/stop button to start 11 embroidering. (Once embroidering is completed, the machine automatically stops.) p. 42 12 Check the thread tension. p. 45 13 Remove the embroidery frame, and then remove the fabric from the frame. p. 46 14 Turn off the machine. p. 47 (Example) Embroidery pattern The operations to embroider the pattern shown at the left are described on the following pages. Although embroidering can continue without the pattern being edited or embroidering settings being specified, refer to page 119 for details on editing the patterns, and refer to page 87 for details on specifying embroidering settings. Descriptions of the keys and other information that appear in the main LCD screens are provided in the tables on pages 49 to 57. Use these tables for quick reference. The various operating precautions that must be observed during the basic procedures are provided on pages 14 to 16. These precautions must be strictly observed in order for the machine to function properly. Make sure to read these precautions. Basic Procedures 17
-
 1
1 -
2
-
3
-
4
-
5
-
6
-
7
-
8
-
9
-
10
-
11
-
12
-
13
-
14
-
15
-
16
-
17
-
18
-
19
-
20
-
21
-
22
-
23
-
24
-
25
-
26
-
27
-
28
-
 29
29 -
 30
30 -
 31
31 -
 32
32 -
 33
33 -
 34
34 -
 35
35 -
 36
36 -
 37
37 -
 38
38 -
 39
39 -
40
-
41
-
42
-
43
-
44
-
45
-
46
-
47
-
48
-
49
-
50
-
51
-
52
-
53
-
54
-
55
-
56
-
57
-
58
-
59
-
60
-
61
-
62
-
63
-
64
-
65
-
66
-
67
-
68
-
69
-
70
-
71
-
72
-
73
-
74
-
75
-
76
-
77
-
78
-
79
-
80
-
81
-
82
-
83
-
84
-
85
-
86
-
87
-
88
-
89
-
90
-
91
-
92
-
93
-
94
-
95
-
96
-
97
-
98
-
99
-
100
-
101
-
102
-
103
-
104
-
105
-
106
-
107
-
108
-
109
-
110
-
111
-
112
-
113
-
114
-
115
-
116
-
117
-
118
-
119
-
120
-
121
-
122
-
123
-
124
-
125
-
126
-
127
-
128
-
129
-
130
-
131
-
132
-
133
-
134
-
135
-
136
-
137
-
138
-
139
-
140
-
141
-
142
-
143
-
144
-
145
-
146
-
147
-
148
-
149
-
150
-
151
-
152
-
153
-
154
-
155
-
156
-
157
-
158
-
159
-
160
-
161
-
162
-
163
-
164
-
165
-
166
-
167
-
168
-
169
-
170
-
171
-
172
-
173
-
174
-
175
-
176
-
177
-
178
-
179
-
180
-
181
-
182
-
183
-
184
-
185
-
186
-
187
-
188
-
189
-
190
-
191
-
192
-
193
-
194
-
195
-
196
-
197
-
198
-
199
-
200
-
201
-
202
-
203
-
204
-
205
-
206
-
207
-
208
-
209
-
210
-
211
-
212
-
213
-
214
-
215
-
216
-
217
-
218
-
219
-
220
-
221
-
222
-
223
-
224
-
225
-
226
-
227
-
228
-
229
-
230
-
231
-
232
-
233
-
234
-
235
-
236
-
237
 |
 |
