Brother International PR-620 Users Manual - English - Page 190
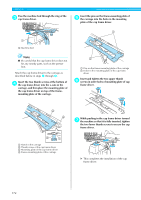
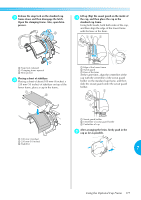
the machine bed and then tighten the two
 |
View all Brother International PR-620 manuals
Add to My Manuals
Save this manual to your list of manuals |
Page 190 highlights
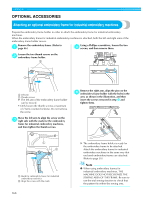
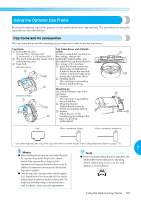
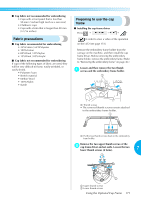
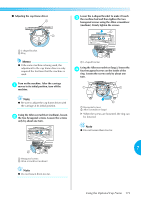
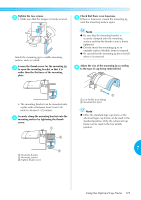
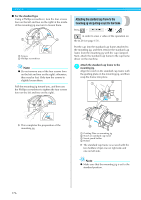
■ Adjusting the cap frame driver Lower the L-shaped bracket to make it touch 3 the machine bed and then tighten the two hexagonal screws using the Allen screwdriver (medium). Firmly tighten the screws. 1 L-shaped bracket 2 Ring Memo ● If the same machine is being used, the adjustment to the cap frame driver is only required the first time that the machine is used. Turn on the machine. After the carriage 1 moves to its initial position, turn off the machine. 1 L-shaped bracket Using the Allen screwdriver (large), loosen the 4 four hexagonal screws on the inside of the ring. Loosen the screws only by about one turn. Note ● Be sure to adjust the cap frame driver with the carriage at its initial position. Using the Allen screwdriver (medium), loosen 2 the two hexagonal screws. Loosen the screws only by about one turn. 1 Hexagonal screws 2 Allen screwdriver (large) X When the screws are loosened, the ring can be lowered. Note ● Do not loosen them too far. 7 1 Hexagonal screws 2 Allen screwdriver (medium) Note ● Do not loosen them too far. Using the Optional Cap Frame 173
-
 1
1 -
2
-
3
-
4
-
5
-
6
-
7
-
8
-
9
-
10
-
11
-
12
-
13
-
14
-
15
-
16
-
17
-
18
-
19
-
20
-
21
-
22
-
23
-
24
-
25
-
26
-
27
-
28
-
29
-
30
-
31
-
32
-
33
-
34
-
35
-
36
-
37
-
38
-
39
-
40
-
41
-
42
-
43
-
44
-
45
-
46
-
47
-
48
-
49
-
50
-
51
-
52
-
53
-
54
-
55
-
56
-
57
-
58
-
59
-
60
-
61
-
62
-
63
-
64
-
65
-
66
-
67
-
68
-
69
-
70
-
71
-
72
-
73
-
74
-
75
-
76
-
77
-
78
-
79
-
80
-
81
-
82
-
83
-
84
-
85
-
86
-
87
-
88
-
89
-
90
-
91
-
92
-
93
-
94
-
95
-
96
-
97
-
98
-
99
-
100
-
101
-
102
-
103
-
104
-
105
-
106
-
107
-
108
-
109
-
110
-
111
-
112
-
113
-
114
-
115
-
116
-
117
-
118
-
119
-
120
-
121
-
122
-
123
-
124
-
125
-
126
-
127
-
128
-
129
-
130
-
131
-
132
-
133
-
134
-
135
-
136
-
137
-
138
-
139
-
140
-
141
-
142
-
143
-
144
-
145
-
146
-
147
-
148
-
149
-
150
-
151
-
152
-
153
-
154
-
155
-
156
-
157
-
158
-
159
-
160
-
161
-
162
-
163
-
164
-
165
-
166
-
167
-
168
-
169
-
170
-
171
-
172
-
173
-
174
-
175
-
176
-
177
-
178
-
179
-
180
-
181
-
182
-
183
-
184
-
 185
185 -
 186
186 -
 187
187 -
 188
188 -
 189
189 -
 190
190 -
 191
191 -
 192
192 -
 193
193 -
 194
194 -
 195
195 -
196
-
197
-
198
-
199
-
200
-
201
-
202
-
203
-
204
-
205
-
206
-
207
-
208
-
209
-
210
-
211
-
212
-
213
-
214
-
215
-
216
-
217
-
218
-
219
-
220
-
221
-
222
-
223
-
224
-
225
-
226
-
227
-
228
-
229
-
230
-
231
-
232
-
233
-
234
-
235
-
236
-
237
 |
 |
