Brother International PR-620 Users Manual - English - Page 209
the bobbin case, resulting in an incorrect
 |
View all Brother International PR-620 manuals
Add to My Manuals
Save this manual to your list of manuals |
Page 209 highlights
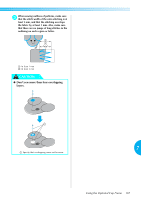
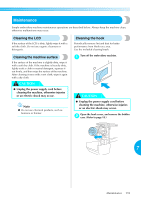
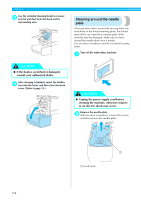
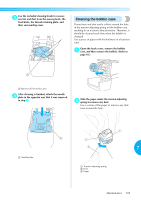
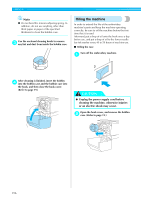
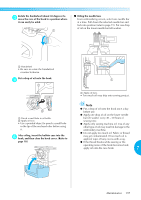
APPENDIX The bobbin will stop rotating automatically 0 when it is done winding, and the bobbin holder will return to its original position. CAUTION ● Check that the bobbin thread has been wound correctly, otherwise the needle may break or the thread tension will be incorrect. Remove the bobbin. a Note ● When removing the bobbin, do not pull on the bobbin winder seat. Doing so could loosen or remove the bobbin winder seat, resulting in damage to the bobbin winder. ● Be sure to clean the bobbin case each time that the bobbin is changed. Thread wax and dust easily collect around the hole in the tension-adjusting spring on the bobbin case, resulting in an incorrect thread tension. For details, refer to "Cleaning the bobbin case" on page 195. ● Be sure to check the tension of the bobbin thread each time that the bobbin is changed. ● Depending on the bobbin thread type, the tension of the bobbin thread may differ. Be sure to check the tension of the bobbin thread and adjust the tension if necessary. For a metal bobbin, use both weights, large (L) and small (S). For detailed instructions on how to adjust the bobbin tension, refer to page 85. Pull the thread through the guide slit in the b bobbin winder seat to cut the thread with the cutter. 192 1 2 1 Weight (L) (Parts Code: XC5974-151) 2 Weight (S) (Parts Code: XC6631-051) ■ If bobbin winding is stopped before it is finished: The bobbin winder stops automatically if the thread does not feed, for example, if it becomes tangled on the spool pin. If this occurs, correctly thread the bobbin winder, and then wind the bobbin correctly.
-
 1
1 -
2
-
3
-
4
-
5
-
6
-
7
-
8
-
9
-
10
-
11
-
12
-
13
-
14
-
15
-
16
-
17
-
18
-
19
-
20
-
21
-
22
-
23
-
24
-
25
-
26
-
27
-
28
-
29
-
30
-
31
-
32
-
33
-
34
-
35
-
36
-
37
-
38
-
39
-
40
-
41
-
42
-
43
-
44
-
45
-
46
-
47
-
48
-
49
-
50
-
51
-
52
-
53
-
54
-
55
-
56
-
57
-
58
-
59
-
60
-
61
-
62
-
63
-
64
-
65
-
66
-
67
-
68
-
69
-
70
-
71
-
72
-
73
-
74
-
75
-
76
-
77
-
78
-
79
-
80
-
81
-
82
-
83
-
84
-
85
-
86
-
87
-
88
-
89
-
90
-
91
-
92
-
93
-
94
-
95
-
96
-
97
-
98
-
99
-
100
-
101
-
102
-
103
-
104
-
105
-
106
-
107
-
108
-
109
-
110
-
111
-
112
-
113
-
114
-
115
-
116
-
117
-
118
-
119
-
120
-
121
-
122
-
123
-
124
-
125
-
126
-
127
-
128
-
129
-
130
-
131
-
132
-
133
-
134
-
135
-
136
-
137
-
138
-
139
-
140
-
141
-
142
-
143
-
144
-
145
-
146
-
147
-
148
-
149
-
150
-
151
-
152
-
153
-
154
-
155
-
156
-
157
-
158
-
159
-
160
-
161
-
162
-
163
-
164
-
165
-
166
-
167
-
168
-
169
-
170
-
171
-
172
-
173
-
174
-
175
-
176
-
177
-
178
-
179
-
180
-
181
-
182
-
183
-
184
-
185
-
186
-
187
-
188
-
189
-
190
-
191
-
192
-
193
-
194
-
195
-
196
-
197
-
198
-
199
-
200
-
201
-
202
-
203
-
 204
204 -
 205
205 -
 206
206 -
 207
207 -
 208
208 -
 209
209 -
 210
210 -
 211
211 -
 212
212 -
 213
213 -
 214
214 -
215
-
216
-
217
-
218
-
219
-
220
-
221
-
222
-
223
-
224
-
225
-
226
-
227
-
228
-
229
-
230
-
231
-
232
-
233
-
234
-
235
-
236
-
237
 |
 |
