Brother International PR-620 Users Manual - English - Page 159
Adjusting the brightness of, the LCD, Turning the buzzer on or off
 |
View all Brother International PR-620 manuals
Add to My Manuals
Save this manual to your list of manuals |
Page 159 highlights
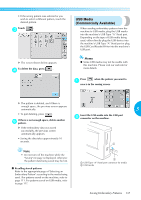
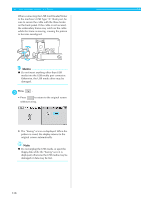
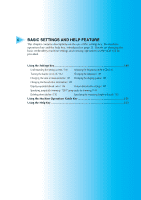
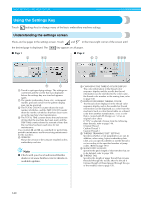
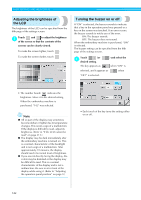
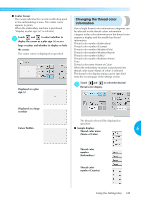
BASIC SETTINGS AND HELP FEATURE Adjusting the brightness of the LCD The brightness of the LCD can be specified from the fifth page of the settings screen. Touch and to adjust the brightness 1 of the screen so that the contents of the screens can be clearly viewed. To make the screen lighter, touch . To make the screen darker, touch Turning the buzzer on or off If "ON" is selected, the buzzer sounds to indicate that a key in the operation panel was pressed or a key on the screen was touched. If an error occurs, the buzzer sounds to notify you of the error. ON: The buzzer sounds. OFF: The buzzer does not sound. When the embroidery machine is purchased, "ON" is selected. The buzzer setting can be specified from the fifth page of the settings screen. Touch (or 1 desired setting. The key appears as ) and select the when "ON" is selected, and it appears as when "OFF" is selected. • The number beside indicates the brightness. Move it to the desired setting. When the embroidery machine is purchased, "142" was selected. Note ● All or part of the display may sometimes become darker or lighter due to temperature changes. This is not a sign of a malfunction. If the display is difficult to read, adjust its brightness. (Refer to "If the LCD cannot be read" on page 213.) ● The display may be dark immediately after the embroidery machine is turned on. This is a normal characteristic of the backlight and is not a sign of a malfunction. After approximately 10 minutes, the display should reach its normal level of brightness. ● If you are not directly facing the display, the colors may be distorted or the display may be difficult to read. This is a normal characteristic of the display and is not a malfunction. Be sure to sit in front of the display while using it. (Refer to "Adjusting the operation panel position" on page 9.) • Each touch of the key turns the setting either on or off. 142
-
 1
1 -
2
-
3
-
4
-
5
-
6
-
7
-
8
-
9
-
10
-
11
-
12
-
13
-
14
-
15
-
16
-
17
-
18
-
19
-
20
-
21
-
22
-
23
-
24
-
25
-
26
-
27
-
28
-
29
-
30
-
31
-
32
-
33
-
34
-
35
-
36
-
37
-
38
-
39
-
40
-
41
-
42
-
43
-
44
-
45
-
46
-
47
-
48
-
49
-
50
-
51
-
52
-
53
-
54
-
55
-
56
-
57
-
58
-
59
-
60
-
61
-
62
-
63
-
64
-
65
-
66
-
67
-
68
-
69
-
70
-
71
-
72
-
73
-
74
-
75
-
76
-
77
-
78
-
79
-
80
-
81
-
82
-
83
-
84
-
85
-
86
-
87
-
88
-
89
-
90
-
91
-
92
-
93
-
94
-
95
-
96
-
97
-
98
-
99
-
100
-
101
-
102
-
103
-
104
-
105
-
106
-
107
-
108
-
109
-
110
-
111
-
112
-
113
-
114
-
115
-
116
-
117
-
118
-
119
-
120
-
121
-
122
-
123
-
124
-
125
-
126
-
127
-
128
-
129
-
130
-
131
-
132
-
133
-
134
-
135
-
136
-
137
-
138
-
139
-
140
-
141
-
142
-
143
-
144
-
145
-
146
-
147
-
148
-
149
-
150
-
151
-
152
-
153
-
 154
154 -
 155
155 -
 156
156 -
 157
157 -
 158
158 -
 159
159 -
 160
160 -
 161
161 -
 162
162 -
 163
163 -
 164
164 -
165
-
166
-
167
-
168
-
169
-
170
-
171
-
172
-
173
-
174
-
175
-
176
-
177
-
178
-
179
-
180
-
181
-
182
-
183
-
184
-
185
-
186
-
187
-
188
-
189
-
190
-
191
-
192
-
193
-
194
-
195
-
196
-
197
-
198
-
199
-
200
-
201
-
202
-
203
-
204
-
205
-
206
-
207
-
208
-
209
-
210
-
211
-
212
-
213
-
214
-
215
-
216
-
217
-
218
-
219
-
220
-
221
-
222
-
223
-
224
-
225
-
226
-
227
-
228
-
229
-
230
-
231
-
232
-
233
-
234
-
235
-
236
-
237
 |
 |
