Brother International PR-620 Users Manual - English - Page 224
Error messages
 |
View all Brother International PR-620 manuals
Add to My Manuals
Save this manual to your list of manuals |
Page 224 highlights
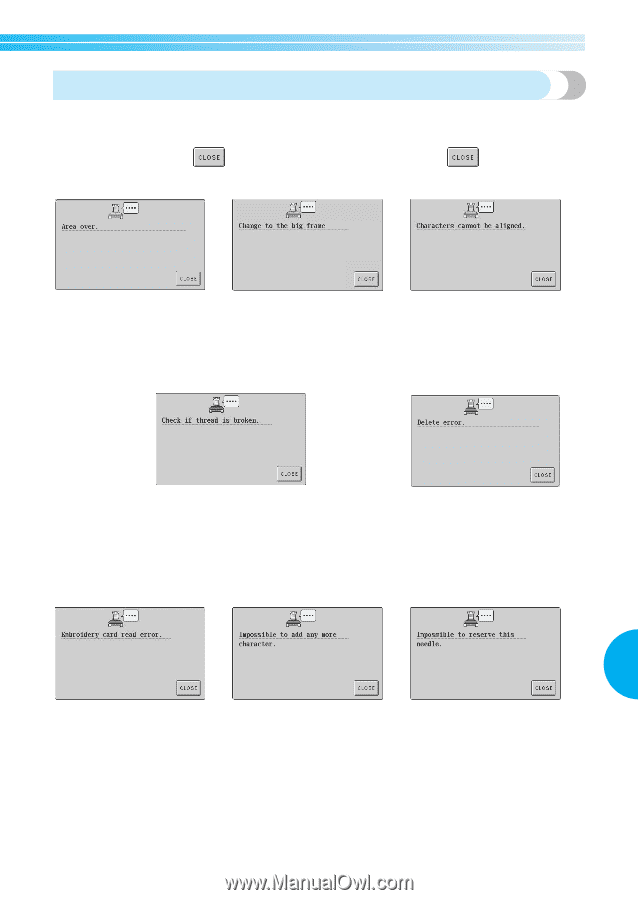
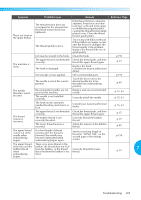
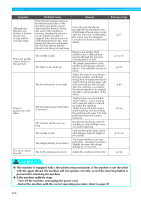
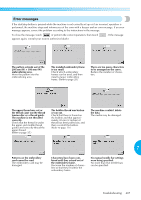
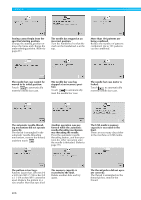
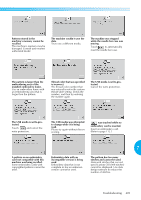
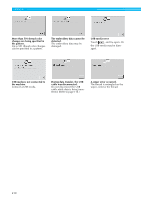
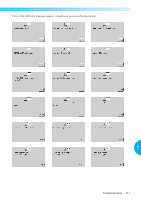
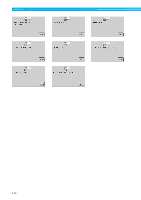
Error messages If the start/stop button is pressed while the machine is not correctly set up or if an incorrect operation is performed, the machine stops and informs you of the error with a buzzer and an error message. If an error message appears, correct the problem according to the instructions in the message. To close the message, touch or perform the correct operation, then touch appears again, consult your nearest authorized dealer. . If the message The pattern extends out of the 200 mm (H) × 300 mm (W) embroidering area. Move the pattern into the embroidering area. The installed embroidery frame is too small. Check which embroidery frames can be used, and then install a larger embroidery frame. (Refer to page 28.) There are too many characters to be arranged on the curve. Reduce the number of characters. The upper thread was cut or the thread came out the thread tension disc or a thread guide. The machine is not threaded correctly. Check that the thread is under the upper and middle thread guides and correctly thread the upper thread. (Refer to page 35.) The bobbin thread was broken or ran out. Check that there is thread on the bobbin and that approximately 50 mm (2 inches) of thread has been pulled out, and then re-install the bobbin. (Refer to page 19.) The machine couldn't delete the data. The media may be damaged. 7 Patterns on the embroidery card cannot be read. The embroidery card may be damaged. Characters have been combined until they extend out of the embroidery frame. Decrease the number of characters so that they fit within the embroidery frame. Six manual needle bar settings were being specified. No more than five needle bars can be specified. Troubleshooting 207
-
 1
1 -
2
-
3
-
4
-
5
-
6
-
7
-
8
-
9
-
10
-
11
-
12
-
13
-
14
-
15
-
16
-
17
-
18
-
19
-
20
-
21
-
22
-
23
-
24
-
25
-
26
-
27
-
28
-
29
-
30
-
31
-
32
-
33
-
34
-
35
-
36
-
37
-
38
-
39
-
40
-
41
-
42
-
43
-
44
-
45
-
46
-
47
-
48
-
49
-
50
-
51
-
52
-
53
-
54
-
55
-
56
-
57
-
58
-
59
-
60
-
61
-
62
-
63
-
64
-
65
-
66
-
67
-
68
-
69
-
70
-
71
-
72
-
73
-
74
-
75
-
76
-
77
-
78
-
79
-
80
-
81
-
82
-
83
-
84
-
85
-
86
-
87
-
88
-
89
-
90
-
91
-
92
-
93
-
94
-
95
-
96
-
97
-
98
-
99
-
100
-
101
-
102
-
103
-
104
-
105
-
106
-
107
-
108
-
109
-
110
-
111
-
112
-
113
-
114
-
115
-
116
-
117
-
118
-
119
-
120
-
121
-
122
-
123
-
124
-
125
-
126
-
127
-
128
-
129
-
130
-
131
-
132
-
133
-
134
-
135
-
136
-
137
-
138
-
139
-
140
-
141
-
142
-
143
-
144
-
145
-
146
-
147
-
148
-
149
-
150
-
151
-
152
-
153
-
154
-
155
-
156
-
157
-
158
-
159
-
160
-
161
-
162
-
163
-
164
-
165
-
166
-
167
-
168
-
169
-
170
-
171
-
172
-
173
-
174
-
175
-
176
-
177
-
178
-
179
-
180
-
181
-
182
-
183
-
184
-
185
-
186
-
187
-
188
-
189
-
190
-
191
-
192
-
193
-
194
-
195
-
196
-
197
-
198
-
199
-
200
-
201
-
202
-
203
-
204
-
205
-
206
-
207
-
208
-
209
-
210
-
211
-
212
-
213
-
214
-
215
-
216
-
217
-
218
-
 219
219 -
 220
220 -
 221
221 -
 222
222 -
 223
223 -
 224
224 -
 225
225 -
 226
226 -
 227
227 -
 228
228 -
 229
229 -
230
-
231
-
232
-
233
-
234
-
235
-
236
-
237
 |
 |