Brother International PR-620 Users Manual - English - Page 28
Positioning the spool stand, Attaching the embroidery, frame holder
 |
View all Brother International PR-620 manuals
Add to My Manuals
Save this manual to your list of manuals |
Page 28 highlights
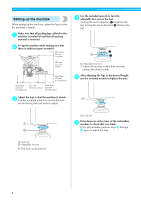
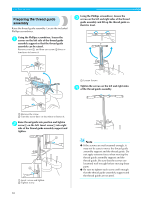
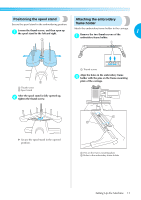
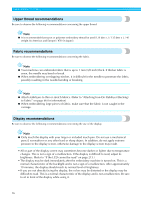
Positioning the spool stand Attaching the embroidery Secure the spool stand in the embroidering position. frame holder Loosen the thumb screw, and then open up 1 the spool stand to the left and right. 1 Attach the embroidery frame holder to the carriage. 1 Remove the two thumb screws of the 1 embroidery frame holder. 2 1 Thumb screw 2 Spool stand After the spool stand is fully opened up, 2 tighten the thumb screw. 1 Thumb screws Align the holes in the embroidery frame 2 holder with the pins on the frame-mounting plate of the carriage. X Secure the spool stand in the opened position. 1 Pins on the frame-mounting plate 2 Holes in the embroidery frame holder Setting Up the Machine 11
-
 1
1 -
2
-
3
-
4
-
5
-
6
-
7
-
8
-
9
-
10
-
11
-
12
-
13
-
14
-
15
-
16
-
17
-
18
-
19
-
20
-
21
-
22
-
 23
23 -
 24
24 -
 25
25 -
 26
26 -
 27
27 -
 28
28 -
 29
29 -
 30
30 -
 31
31 -
 32
32 -
 33
33 -
34
-
35
-
36
-
37
-
38
-
39
-
40
-
41
-
42
-
43
-
44
-
45
-
46
-
47
-
48
-
49
-
50
-
51
-
52
-
53
-
54
-
55
-
56
-
57
-
58
-
59
-
60
-
61
-
62
-
63
-
64
-
65
-
66
-
67
-
68
-
69
-
70
-
71
-
72
-
73
-
74
-
75
-
76
-
77
-
78
-
79
-
80
-
81
-
82
-
83
-
84
-
85
-
86
-
87
-
88
-
89
-
90
-
91
-
92
-
93
-
94
-
95
-
96
-
97
-
98
-
99
-
100
-
101
-
102
-
103
-
104
-
105
-
106
-
107
-
108
-
109
-
110
-
111
-
112
-
113
-
114
-
115
-
116
-
117
-
118
-
119
-
120
-
121
-
122
-
123
-
124
-
125
-
126
-
127
-
128
-
129
-
130
-
131
-
132
-
133
-
134
-
135
-
136
-
137
-
138
-
139
-
140
-
141
-
142
-
143
-
144
-
145
-
146
-
147
-
148
-
149
-
150
-
151
-
152
-
153
-
154
-
155
-
156
-
157
-
158
-
159
-
160
-
161
-
162
-
163
-
164
-
165
-
166
-
167
-
168
-
169
-
170
-
171
-
172
-
173
-
174
-
175
-
176
-
177
-
178
-
179
-
180
-
181
-
182
-
183
-
184
-
185
-
186
-
187
-
188
-
189
-
190
-
191
-
192
-
193
-
194
-
195
-
196
-
197
-
198
-
199
-
200
-
201
-
202
-
203
-
204
-
205
-
206
-
207
-
208
-
209
-
210
-
211
-
212
-
213
-
214
-
215
-
216
-
217
-
218
-
219
-
220
-
221
-
222
-
223
-
224
-
225
-
226
-
227
-
228
-
229
-
230
-
231
-
232
-
233
-
234
-
235
-
236
-
237
 |
 |

Setting Up the Machine
11
1
Positioning the spool stand
Secure the spool stand in the embroidering position.
1
Loosen the thumb screw, and then open up
the spool stand to the left and right.
1
Thumb screw
2
Spool stand
2
After the spool stand is fully opened up,
tighten the thumb screw.
Secure the spool stand in the opened
position.
Attaching the embroidery
frame holder
Attach the embroidery frame holder to the carriage.
1
Remove the two thumb screws of the
embroidery frame holder.
1
Thumb screws
2
Align the holes in the embroidery frame
holder with the pins on the frame-mounting
plate of the carriage.
1
Pins on the frame-mounting plate
2
Holes in the embroidery frame holder
2
1