Brother International PR-620 Users Manual - English - Page 62
Checking the Thread Tension
 |
View all Brother International PR-620 manuals
Add to My Manuals
Save this manual to your list of manuals |
Page 62 highlights
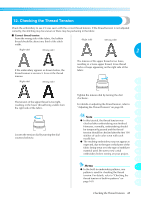
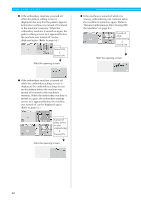
12. Checking the Thread Tension Check the embroidery to see if it was sewn with the correct thread tension. If the thread tension is not adjusted correctly, the stitching may be uneven or there may be puckering in the fabric. ■ Correct thread tension From the wrong side of the fabric, the bobbin thread should be about one third of the stitch width. (Right side) (Wrong side) (Right side) (Wrong side) 2 If the embroidery appears as shown below, the thread tension is incorrect. Correct the thread tension. (Right side) (Wrong side) The tension of the upper thread is too tight, resulting in the lower thread being visible from the right side of the fabric. Loosen the tension dial by turning the dial counterclockwise. The tension of the upper thread is too loose, resulting in a loose upper thread, loose thread locks or loops appearing on the right side of the fabric. 1 2 Tighten the tension dial by turning the dial clockwise. 3 For details on adjusting the thread tension, refer to 4 "Adjusting the Thread Tension" on page 85. 5 Note ● In this tutorial, the thread tension was 6 checked after embroidering was finished. However, normally, embroidering should be temporarily paused and the thread 7 tension should be checked after the first 100 stitches of each color sewn with each 8 needle bar. ● The resulting embroidery may not appear as expected, due to the type or thickness of the 9 fabric being sewn or to the type of stabilizer material used. Be sure to sew a trial 10 embroidery before sewing on your project. 11 Memo 12 ● In the built-in embroidery patterns, one pattern is used for checking the thread tension. For details, refer to "Checking the 13 thread tension of built-in patterns" on page 160. 14 Checking the Thread Tension 45
-
 1
1 -
2
-
3
-
4
-
5
-
6
-
7
-
8
-
9
-
10
-
11
-
12
-
13
-
14
-
15
-
16
-
17
-
18
-
19
-
20
-
21
-
22
-
23
-
24
-
25
-
26
-
27
-
28
-
29
-
30
-
31
-
32
-
33
-
34
-
35
-
36
-
37
-
38
-
39
-
40
-
41
-
42
-
43
-
44
-
45
-
46
-
47
-
48
-
49
-
50
-
51
-
52
-
53
-
54
-
55
-
56
-
 57
57 -
 58
58 -
 59
59 -
 60
60 -
 61
61 -
 62
62 -
 63
63 -
 64
64 -
 65
65 -
 66
66 -
 67
67 -
68
-
69
-
70
-
71
-
72
-
73
-
74
-
75
-
76
-
77
-
78
-
79
-
80
-
81
-
82
-
83
-
84
-
85
-
86
-
87
-
88
-
89
-
90
-
91
-
92
-
93
-
94
-
95
-
96
-
97
-
98
-
99
-
100
-
101
-
102
-
103
-
104
-
105
-
106
-
107
-
108
-
109
-
110
-
111
-
112
-
113
-
114
-
115
-
116
-
117
-
118
-
119
-
120
-
121
-
122
-
123
-
124
-
125
-
126
-
127
-
128
-
129
-
130
-
131
-
132
-
133
-
134
-
135
-
136
-
137
-
138
-
139
-
140
-
141
-
142
-
143
-
144
-
145
-
146
-
147
-
148
-
149
-
150
-
151
-
152
-
153
-
154
-
155
-
156
-
157
-
158
-
159
-
160
-
161
-
162
-
163
-
164
-
165
-
166
-
167
-
168
-
169
-
170
-
171
-
172
-
173
-
174
-
175
-
176
-
177
-
178
-
179
-
180
-
181
-
182
-
183
-
184
-
185
-
186
-
187
-
188
-
189
-
190
-
191
-
192
-
193
-
194
-
195
-
196
-
197
-
198
-
199
-
200
-
201
-
202
-
203
-
204
-
205
-
206
-
207
-
208
-
209
-
210
-
211
-
212
-
213
-
214
-
215
-
216
-
217
-
218
-
219
-
220
-
221
-
222
-
223
-
224
-
225
-
226
-
227
-
228
-
229
-
230
-
231
-
232
-
233
-
234
-
235
-
236
-
237
 |
 |
