Brother International PR-620 Users Manual - English - Page 42
Editing the Embroidery Pattern
 |
View all Brother International PR-620 manuals
Add to My Manuals
Save this manual to your list of manuals |
Page 42 highlights
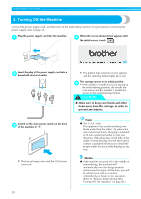
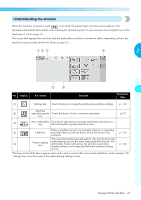
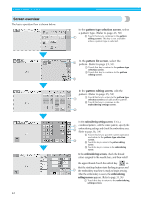
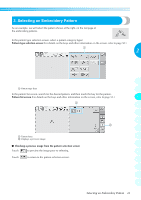
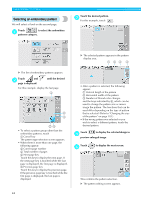
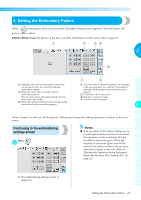
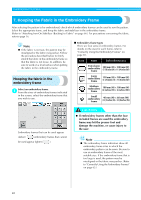
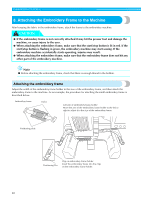
4. Editing the Embroidery Pattern When in the pattern list screen is touched, the pattern editing screen appears. From this screen, the pattern can be edited. Pattern editing screen (For details on the keys and other information on the screen, refer to page 52.) 2 1 Highlights the sizes of embroidery frames that can be used to sew the currently selected embroidery pattern 2 Shows the size of the currently selected embroidery pattern The top value shows the height and the bottom value shows the width. 3 Shows the number of thread color changes for the currently selected embroidery pattern 1 4 Touch this key to delete the pattern, for example, if the wrong pattern was selected. No pattern is selected and the pattern type selection screen 2 appears. 5 Continues to the next screen 6 Displays a preview image 3 7 Touch to edit the pattern. 4 5 In this example, we will not edit the pattern. Without performing any editing operations, continue to the next screen. 6 Continuing to the embroidering settings screen Press . 1 Memo 7 ● If an operation in the pattern editing screen is interrupted and the machine is turned off, the operation can be continued after the 8 machine is turned on again. When the machine is turned on again, you will be 9 asked if you wish to continue the previous operation or begin a new one. (Refer to "Resume the Operation Being Performed 10 Before the Machine Was Turned OFF" on page 62.) 11 12 13 X The embroidering settings screen is displayed. 14 Editing the Embroidery Pattern 25
-
 1
1 -
2
-
3
-
4
-
5
-
6
-
7
-
8
-
9
-
10
-
11
-
12
-
13
-
14
-
15
-
16
-
17
-
18
-
19
-
20
-
21
-
22
-
23
-
24
-
25
-
26
-
27
-
28
-
29
-
30
-
31
-
32
-
33
-
34
-
35
-
36
-
 37
37 -
 38
38 -
 39
39 -
 40
40 -
 41
41 -
 42
42 -
 43
43 -
 44
44 -
 45
45 -
 46
46 -
 47
47 -
48
-
49
-
50
-
51
-
52
-
53
-
54
-
55
-
56
-
57
-
58
-
59
-
60
-
61
-
62
-
63
-
64
-
65
-
66
-
67
-
68
-
69
-
70
-
71
-
72
-
73
-
74
-
75
-
76
-
77
-
78
-
79
-
80
-
81
-
82
-
83
-
84
-
85
-
86
-
87
-
88
-
89
-
90
-
91
-
92
-
93
-
94
-
95
-
96
-
97
-
98
-
99
-
100
-
101
-
102
-
103
-
104
-
105
-
106
-
107
-
108
-
109
-
110
-
111
-
112
-
113
-
114
-
115
-
116
-
117
-
118
-
119
-
120
-
121
-
122
-
123
-
124
-
125
-
126
-
127
-
128
-
129
-
130
-
131
-
132
-
133
-
134
-
135
-
136
-
137
-
138
-
139
-
140
-
141
-
142
-
143
-
144
-
145
-
146
-
147
-
148
-
149
-
150
-
151
-
152
-
153
-
154
-
155
-
156
-
157
-
158
-
159
-
160
-
161
-
162
-
163
-
164
-
165
-
166
-
167
-
168
-
169
-
170
-
171
-
172
-
173
-
174
-
175
-
176
-
177
-
178
-
179
-
180
-
181
-
182
-
183
-
184
-
185
-
186
-
187
-
188
-
189
-
190
-
191
-
192
-
193
-
194
-
195
-
196
-
197
-
198
-
199
-
200
-
201
-
202
-
203
-
204
-
205
-
206
-
207
-
208
-
209
-
210
-
211
-
212
-
213
-
214
-
215
-
216
-
217
-
218
-
219
-
220
-
221
-
222
-
223
-
224
-
225
-
226
-
227
-
228
-
229
-
230
-
231
-
232
-
233
-
234
-
235
-
236
-
237
 |
 |
