Brother International PR-620 Users Manual - English - Page 83
Attaching Iron-On Stabilizer Backing to Fabric - clamping hoops
 |
View all Brother International PR-620 manuals
Add to My Manuals
Save this manual to your list of manuals |
Page 83 highlights
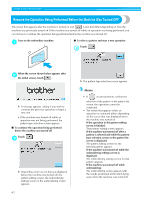
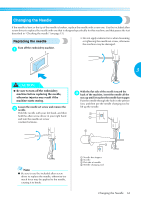
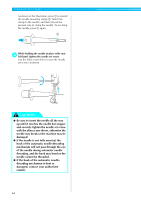
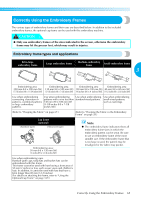
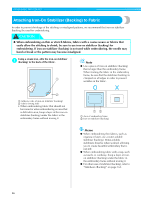
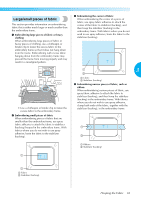
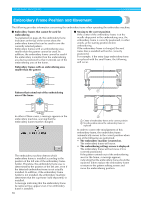
OTHER BASIC PROCEDURES Attaching Iron-On Stabilizer (Backing) to Fabric In order to prevent shrinkage of the stitching or misaligned patterns, we recommend that iron-on stabilizer (backing) be used for embroidering. CAUTION ● When embroidering on thin or stretch fabrics, fabrics with a coarse weave or fabrics that easily allow the stitching to shrink, be sure to use iron-on stabilizer (backing) for embroidering. If iron-on stabilizer (backing) is not used while embroidering, the needle may bend or break or the pattern may become misaligned. Using a steam iron, affix the iron-on stabilizer 1 (backing) to the back of the fabric. 1 Note ● Use a piece of iron-on stabilizer (backing) that is larger than the embroidery frame. When framing the fabric in the embroidery frame, be sure that the stabilizer (backing) is clamped on all edges in order to prevent wrinkles in the fabric. 2 1 Adhesive side of iron-on stabilizer (backing) 2 Fabric (wrong side) • When embroidering fabric that should not be ironed or when embroidering an area that is difficult to iron, hoop a layer of the iron-on stabilizer (backing) under the fabric in the embroidery frame without ironing it. 12 1 Area of embroidery frame 2 Iron-on stabilizer (backing) Memo ● When embroidering thin fabrics, such as organza or lawn, use a water-soluble stabilizer (backing). Water-soluble stabilizers dissolve when washed, allowing you to create beautiful embroidery that is not stiff. ● When embroidering fabric with a nap, such as towels or corduroy, hoop a layer of ironon stabilizer (backing) under the fabric in the embroidery frame without ironing it. ● For other uses of stabilizer (backing), refer to "Stabilizers (Backing)" on page 165. 66
-
 1
1 -
2
-
3
-
4
-
5
-
6
-
7
-
8
-
9
-
10
-
11
-
12
-
13
-
14
-
15
-
16
-
17
-
18
-
19
-
20
-
21
-
22
-
23
-
24
-
25
-
26
-
27
-
28
-
29
-
30
-
31
-
32
-
33
-
34
-
35
-
36
-
37
-
38
-
39
-
40
-
41
-
42
-
43
-
44
-
45
-
46
-
47
-
48
-
49
-
50
-
51
-
52
-
53
-
54
-
55
-
56
-
57
-
58
-
59
-
60
-
61
-
62
-
63
-
64
-
65
-
66
-
67
-
68
-
69
-
70
-
71
-
72
-
73
-
74
-
75
-
76
-
77
-
 78
78 -
 79
79 -
 80
80 -
 81
81 -
 82
82 -
 83
83 -
 84
84 -
 85
85 -
 86
86 -
 87
87 -
 88
88 -
89
-
90
-
91
-
92
-
93
-
94
-
95
-
96
-
97
-
98
-
99
-
100
-
101
-
102
-
103
-
104
-
105
-
106
-
107
-
108
-
109
-
110
-
111
-
112
-
113
-
114
-
115
-
116
-
117
-
118
-
119
-
120
-
121
-
122
-
123
-
124
-
125
-
126
-
127
-
128
-
129
-
130
-
131
-
132
-
133
-
134
-
135
-
136
-
137
-
138
-
139
-
140
-
141
-
142
-
143
-
144
-
145
-
146
-
147
-
148
-
149
-
150
-
151
-
152
-
153
-
154
-
155
-
156
-
157
-
158
-
159
-
160
-
161
-
162
-
163
-
164
-
165
-
166
-
167
-
168
-
169
-
170
-
171
-
172
-
173
-
174
-
175
-
176
-
177
-
178
-
179
-
180
-
181
-
182
-
183
-
184
-
185
-
186
-
187
-
188
-
189
-
190
-
191
-
192
-
193
-
194
-
195
-
196
-
197
-
198
-
199
-
200
-
201
-
202
-
203
-
204
-
205
-
206
-
207
-
208
-
209
-
210
-
211
-
212
-
213
-
214
-
215
-
216
-
217
-
218
-
219
-
220
-
221
-
222
-
223
-
224
-
225
-
226
-
227
-
228
-
229
-
230
-
231
-
232
-
233
-
234
-
235
-
236
-
237
 |
 |
