Brother International PR-620 Users Manual - English - Page 75
When You Have a Question, This May Help
 |
View all Brother International PR-620 manuals
Add to My Manuals
Save this manual to your list of manuals |
Page 75 highlights
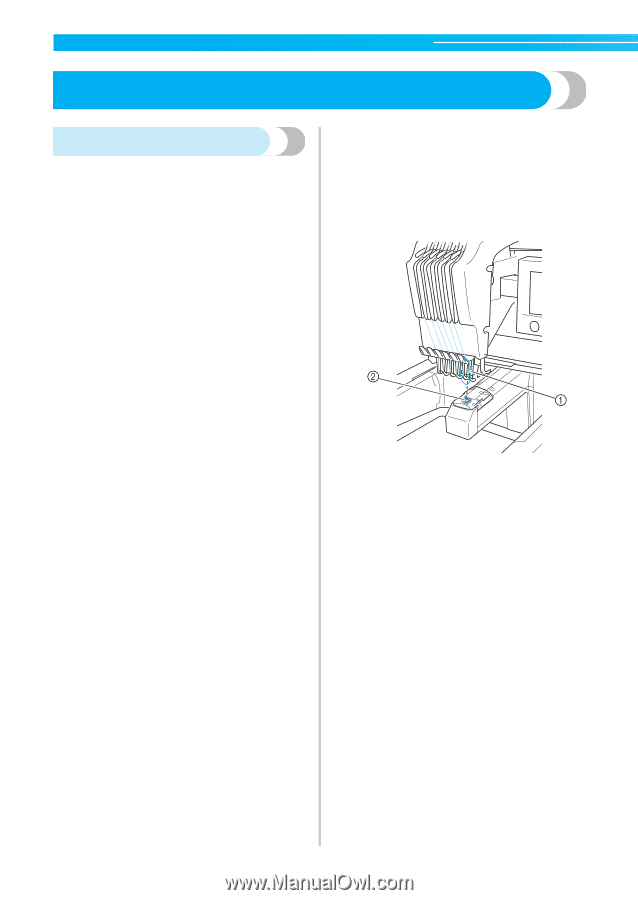
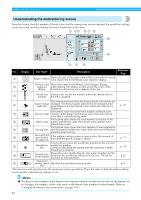
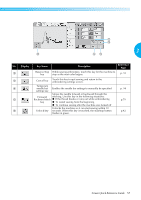
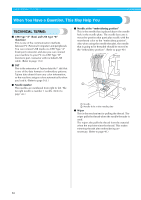
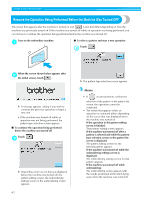
EMBROIDERING TUTORIAL When You Have a Question, This May Help You TECHNICAL TERMS: ■ USB Type "A" (host) and USB Type "B" (function) This is one of the communication methods between PC (Personal Computer) and peripherals. You can connect USB media via USB Type "A" (host) port connector and also you can connect your machine to your PC via USB Type "B" (function) port connector with included USB cable. (Refer to page 114.) ■ DST This is the extension of Tajima data file (*.dst) that is one of the data formats of embroidery patterns. Tajima data doesn't have any color information, so the machine assigns colors automatically when you load it. (Refer to page 163.) ■ Needle number The needles are numbered from right to left. The far right needle is number 1 needle. (Refer to page viii.) ■ Needle at the "embroidering position" This is the needle that is placed above the needle hole in the needle plate. The needle bar case is moved to position that particular needle with the next thread color to the "embroidery position". Also when using the needle threader, the needle that is going to be threaded should be moved to the "embroidery position". (Refer to page 40.) 1 Needle 2 Needle hole in the needle plate ■ Wiper This is the mechanism for pulling the thread. The wiper pulls the thread when the needle threader is used. The wiper also pulls the thread from the material when the machine trims the thread. This makes trimming threads after embroidering unnecessary. (Refer to page 40.) 58
-
 1
1 -
2
-
3
-
4
-
5
-
6
-
7
-
8
-
9
-
10
-
11
-
12
-
13
-
14
-
15
-
16
-
17
-
18
-
19
-
20
-
21
-
22
-
23
-
24
-
25
-
26
-
27
-
28
-
29
-
30
-
31
-
32
-
33
-
34
-
35
-
36
-
37
-
38
-
39
-
40
-
41
-
42
-
43
-
44
-
45
-
46
-
47
-
48
-
49
-
50
-
51
-
52
-
53
-
54
-
55
-
56
-
57
-
58
-
59
-
60
-
61
-
62
-
63
-
64
-
65
-
66
-
67
-
68
-
69
-
 70
70 -
 71
71 -
 72
72 -
 73
73 -
 74
74 -
 75
75 -
 76
76 -
 77
77 -
 78
78 -
 79
79 -
 80
80 -
81
-
82
-
83
-
84
-
85
-
86
-
87
-
88
-
89
-
90
-
91
-
92
-
93
-
94
-
95
-
96
-
97
-
98
-
99
-
100
-
101
-
102
-
103
-
104
-
105
-
106
-
107
-
108
-
109
-
110
-
111
-
112
-
113
-
114
-
115
-
116
-
117
-
118
-
119
-
120
-
121
-
122
-
123
-
124
-
125
-
126
-
127
-
128
-
129
-
130
-
131
-
132
-
133
-
134
-
135
-
136
-
137
-
138
-
139
-
140
-
141
-
142
-
143
-
144
-
145
-
146
-
147
-
148
-
149
-
150
-
151
-
152
-
153
-
154
-
155
-
156
-
157
-
158
-
159
-
160
-
161
-
162
-
163
-
164
-
165
-
166
-
167
-
168
-
169
-
170
-
171
-
172
-
173
-
174
-
175
-
176
-
177
-
178
-
179
-
180
-
181
-
182
-
183
-
184
-
185
-
186
-
187
-
188
-
189
-
190
-
191
-
192
-
193
-
194
-
195
-
196
-
197
-
198
-
199
-
200
-
201
-
202
-
203
-
204
-
205
-
206
-
207
-
208
-
209
-
210
-
211
-
212
-
213
-
214
-
215
-
216
-
217
-
218
-
219
-
220
-
221
-
222
-
223
-
224
-
225
-
226
-
227
-
228
-
229
-
230
-
231
-
232
-
233
-
234
-
235
-
236
-
237
 |
 |