HP Officejet 5500 HP Officejet 5500 series All-in-One - (English) Reference Gu - Page 13
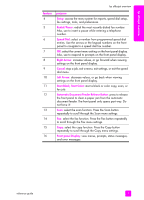
Setup, Redial/Pause, Speed Dial, Right Arrow, Cancel, Left Arrow, Start Black, Start Color, - paper jam
 |
View all HP Officejet 5500 manuals
Add to My Manuals
Save this manual to your list of manuals |
Page 13 highlights
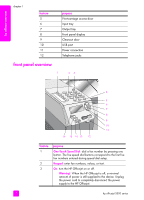
hp officejet overview hp officejet overview feature 4 5 6 7 8 9 10 11 12 13 14 15 16 purpose Setup: access the menu system for reports, speed dial setup, fax settings, tools, and preferences. Redial/Pause: redial the most recently dialed fax number. Also, use to insert a pause while entering a telephone number. Speed Dial: select a number from programmed speed dial entries. Use the arrows or the keypad numbers on the front panel to navigate to a speed dial fax number. OK: select the current menu setting on the front panel display. Also, use to respond to prompts on the front panel display. Right Arrow: increase values, or go forward when viewing settings on the front panel display. Cancel: stop a job, exit a menu, exit settings, or exit the speed dial menu. Left Arrow: decrease values, or go back when viewing settings on the front panel display. Start Black, Start Color: start a black or color copy, scan, or fax job. Automatic Document Feeder Release Button: press to release the front panel to clear a paper jam from the automatic document feeder. The front panel only opens part way. Do not force it! Scan: select the scan function. Press the Scan button repeatedly to scroll through the Scan menu settings. Fax: select the fax function. Press the Fax button repeatedly to scroll through the Fax menu settings. Copy: select the copy function. Press the Copy button repeatedly to scroll through the Copy menu settings. Front panel Display: view menus, prompts, status messages, and error messages. reference guide 3
-
 1
1 -
2
-
3
-
4
-
5
-
6
-
7
-
 8
8 -
 9
9 -
 10
10 -
 11
11 -
 12
12 -
 13
13 -
 14
14 -
 15
15 -
 16
16 -
 17
17 -
 18
18 -
19
-
20
-
21
-
22
-
23
-
24
-
25
-
26
-
27
-
28
-
29
-
30
-
31
-
32
-
33
-
34
-
35
-
36
-
37
-
38
-
39
-
40
-
41
-
42
-
43
-
44
-
45
-
46
-
47
-
48
-
49
-
50
-
51
-
52
-
53
-
54
-
55
-
56
-
57
-
58
-
59
-
60
-
61
-
62
-
63
-
64
-
65
-
66
-
67
-
68
-
69
-
70
-
71
-
72
-
73
-
74
-
75
-
76
-
77
-
78
-
79
-
80
-
81
-
82
-
83
-
84
-
85
-
86
-
87
-
88
-
89
-
90
-
91
-
92
-
93
-
94
-
95
-
96
-
97
-
98
-
99
-
100
-
101
-
102
-
103
-
104
-
105
-
106
-
107
-
108
-
109
-
110
-
111
-
112
-
113
-
114
-
115
-
116
-
117
-
118
-
119
-
120
-
121
-
122
-
123
-
124
-
125
-
126
-
127
-
128
-
129
-
130
-
131
-
132
-
133
-
134
-
135
-
136
-
137
-
138
-
139
-
140
 |
 |