HP Officejet 5500 HP Officejet 5500 series All-in-One - (English) Reference Gu - Page 34
copy a 4 by 6 inch (10 by 15 cm) photo onto a full-size
 |
View all HP Officejet 5500 manuals
Add to My Manuals
Save this manual to your list of manuals |
Page 34 highlights
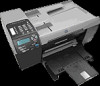
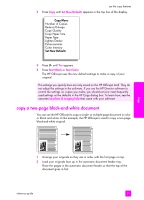
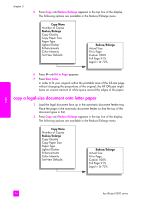
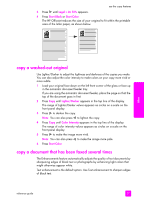
chapter 3 3 Press or use the keypad to enter the number of copies, up to the maximum. (The maximum number of copies varies by model.) Tip: If you hold down either of the arrow buttons, the number of copies changes by increments of 5 to make it easier to set a large number of copies. 4 Press Start Black or Start Color. If you are copying a stack of originals in the automatic document feeder, the HP Officejet makes multiple copies of a single page before copying the next page. You will need to sort and staple the copies yourself. In this example, the HP Officejet makes six copies of the original 4 by 6 inch (10 by 15 cm) photo. copy copy a 4 by 6 inch (10 by 15 cm) photo onto a full-size page Use Fit to Page when you want to automatically enlarge or reduce your original to fill the printable area of the paper size loaded in the input tray. In this example, Fit to Page is used to enlarge a small photo to fit within the margins of a full-size page, as shown below. You can also use Fit to Page to reduce an original to prevent unwanted cropping of text or images around the margins, or reduce or enlarge an original to create a borderless 4 by 6 inch (10 by 15 cm) photo. Tip: Make sure that the glass is clean and the original has been placed on the left front corner of the glass. You cannot use the automatic document feeder with the Fit to Page option. 1 Load your original photo face down on the left front corner of the glass. Position the photo on the glass so the long edge of the photo is along the front edge of the glass. 24 hp officejet 5500 series
-
 1
1 -
2
-
3
-
4
-
5
-
6
-
7
-
8
-
9
-
10
-
11
-
12
-
13
-
14
-
15
-
16
-
17
-
18
-
19
-
20
-
21
-
22
-
23
-
24
-
25
-
26
-
27
-
28
-
 29
29 -
 30
30 -
 31
31 -
 32
32 -
 33
33 -
 34
34 -
 35
35 -
 36
36 -
 37
37 -
 38
38 -
 39
39 -
40
-
41
-
42
-
43
-
44
-
45
-
46
-
47
-
48
-
49
-
50
-
51
-
52
-
53
-
54
-
55
-
56
-
57
-
58
-
59
-
60
-
61
-
62
-
63
-
64
-
65
-
66
-
67
-
68
-
69
-
70
-
71
-
72
-
73
-
74
-
75
-
76
-
77
-
78
-
79
-
80
-
81
-
82
-
83
-
84
-
85
-
86
-
87
-
88
-
89
-
90
-
91
-
92
-
93
-
94
-
95
-
96
-
97
-
98
-
99
-
100
-
101
-
102
-
103
-
104
-
105
-
106
-
107
-
108
-
109
-
110
-
111
-
112
-
113
-
114
-
115
-
116
-
117
-
118
-
119
-
120
-
121
-
122
-
123
-
124
-
125
-
126
-
127
-
128
-
129
-
130
-
131
-
132
-
133
-
134
-
135
-
136
-
137
-
138
-
139
-
140
 |
 |