HP Photosmart C6200 User Manual - Page 113
Hardware setup troubleshooting, Troubleshooting common setup issues
 |
View all HP Photosmart C6200 manuals
Add to My Manuals
Save this manual to your list of manuals |
Page 113 highlights
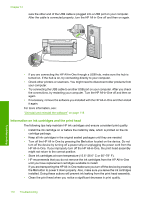
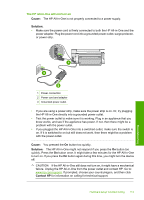
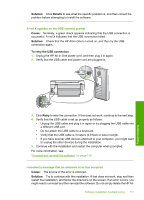
Chapter 14 3. Gently pull the paper out of the rollers. CAUTION: If the paper tears when you are removing it from the rollers, check the rollers and wheels for torn pieces of paper that might be remaining inside the device. If you do not remove all the pieces of paper from the HP All-in-One, more paper jams are likely to occur. 4. If the paper jam is cleared, proceed to step 5. If the paper jam is not cleared, do the following: a. Open the Two-sided printing accessory by pulling the tabs up. b. Remove any paper from inside the accessory. c. Close the Two-sided printing accessory by pressing the tabs down until they lock into place. 5. Replace the Two-sided printing accessory. Gently push the accessory forward until it snaps into place. 6. Turn on the HP All-in-One, and then press OK to continue the current job. Hardware setup troubleshooting This section contains hardware troubleshooting information for the HP All-in-One. Many issues are caused when the HP All-in-One is connected to the computer using a USB cable before the HP All-in-One software is installed on the computer. If you connected the HP All-in-One to your computer before the software installation screen prompts you to do so, you must follow these steps: Troubleshooting common setup issues 1. Disconnect the USB cable from the computer. 2. Uninstall the software (if you have already installed it). 3. Restart your computer. 4. Turn off the HP All-in-One, wait one minute, then restart it. 5. Reinstall the HP All-in-One software. CAUTION: Do not connect the USB cable to the computer until prompted by the software installation screen. This section contains the following topics: • The HP All-in-One will not turn on • I connected the USB cable, but I am having problems using the HP All-in-One with my computer • The display shows the wrong language • The wrong measurements are showing in menus on the display • I received a message on the display that the printer alignment failed • The HP All-in-One does not print • I received a message on the display about a paper jam or a blocked print head assembly 112 Troubleshooting Troubleshooting
-
 1
1 -
2
-
3
-
4
-
5
-
6
-
7
-
8
-
9
-
10
-
11
-
12
-
13
-
14
-
15
-
16
-
17
-
18
-
19
-
20
-
21
-
22
-
23
-
24
-
25
-
26
-
27
-
28
-
29
-
30
-
31
-
32
-
33
-
34
-
35
-
36
-
37
-
38
-
39
-
40
-
41
-
42
-
43
-
44
-
45
-
46
-
47
-
48
-
49
-
50
-
51
-
52
-
53
-
54
-
55
-
56
-
57
-
58
-
59
-
60
-
61
-
62
-
63
-
64
-
65
-
66
-
67
-
68
-
69
-
70
-
71
-
72
-
73
-
74
-
75
-
76
-
77
-
78
-
79
-
80
-
81
-
82
-
83
-
84
-
85
-
86
-
87
-
88
-
89
-
90
-
91
-
92
-
93
-
94
-
95
-
96
-
97
-
98
-
99
-
100
-
101
-
102
-
103
-
104
-
105
-
106
-
107
-
 108
108 -
 109
109 -
 110
110 -
 111
111 -
 112
112 -
 113
113 -
 114
114 -
 115
115 -
 116
116 -
 117
117 -
 118
118 -
119
-
120
-
121
-
122
-
123
-
124
-
125
-
126
-
127
-
128
-
129
-
130
-
131
-
132
-
133
-
134
-
135
-
136
-
137
-
138
-
139
-
140
-
141
-
142
-
143
-
144
-
145
-
146
-
147
-
148
-
149
-
150
-
151
-
152
-
153
-
154
-
155
-
156
-
157
-
158
-
159
-
160
-
161
-
162
-
163
-
164
-
165
-
166
-
167
-
168
-
169
-
170
-
171
-
172
-
173
-
174
-
175
-
176
-
177
-
178
-
179
-
180
-
181
-
182
-
183
-
184
-
185
-
186
-
187
-
188
-
189
 |
 |