HP Xw5000 hp workstation xw5000 Technical Reference (309233-001 10/02) - Page 36
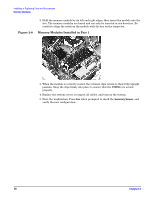
Memory Modules Installed in Pair 1, Start the workstation. Press
 |
UPC - 613326803318
View all HP Xw5000 manuals
Add to My Manuals
Save this manual to your list of manuals |
Page 36 highlights
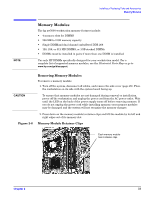
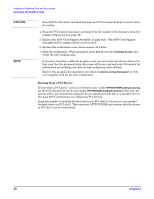
Figure 2-8 2. Hold the memory module by its left and right edges, then insert the module into the slot. The memory modules are keyed and can only be inserted in one direction. Be careful to align the notch on the module with the key on the connector. Memory Modules Installed in Pair 1 3. When the module is correctly seated, the retainer clips return to their fully upright position. Snap the clips firmly into place to ensure that the DIMMs are seated properly. 4. Replace the system covers, reconnect all cables, and turn on the system. 5. Start the workstation. Press when prompted to check the verify the new configuration. , and
-
 1
1 -
2
-
3
-
4
-
5
-
6
-
7
-
8
-
9
-
10
-
11
-
12
-
13
-
14
-
15
-
16
-
17
-
18
-
19
-
20
-
21
-
22
-
23
-
24
-
25
-
26
-
27
-
28
-
29
-
30
-
 31
31 -
 32
32 -
 33
33 -
 34
34 -
 35
35 -
 36
36 -
 37
37 -
 38
38 -
 39
39 -
 40
40 -
 41
41 -
42
-
43
-
44
-
45
-
46
-
47
-
48
-
49
-
50
-
51
-
52
-
53
-
54
-
55
-
56
-
57
-
58
-
59
-
60
-
61
-
62
-
63
-
64
-
65
-
66
-
67
-
68
-
69
-
70
-
71
-
72
-
73
-
74
-
75
-
76
-
77
-
78
-
79
-
80
-
81
-
82
-
83
-
84
-
85
-
86
-
87
-
88
-
89
-
90
-
91
-
92
-
93
-
94
-
95
-
96
-
97
-
98
-
99
-
100
-
101
-
102
-
103
-
104
-
105
-
106
-
107
-
108
-
109
-
110
-
111
-
112
-
113
-
114
-
115
-
116
-
117
-
118
 |
 |

¹º¿·½ÀÀ¾ºÁ¸³²¸ÂÃÄÀ½¶¾ºÁ¸±½²·¿¸½º´ Ŷ¶Ã¿¿³²¾Ã¿
Ó¾¼²³ÄºÓ²ÅÂþµ
ÂÆÇÈÉÊ˲±
³
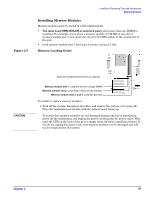
2. Hold the memory module by its left and right edges, then insert the module into the
slot. The memory modules are keyed and can only be inserted in one direction. Be
careful to align the notch on the module with the key on the connector.
Figure 2-8
Memory Modules Installed in Pair 1
3. When the module is correctly seated, the retainer clips return to their fully upright
position. Snap the clips firmly into place to ensure that the DIMMs are seated
properly.
4. Replace the system covers, reconnect all cables, and turn on the system.
5. Start the workstation. Press
âÖÎ
when prompted to check the
à×ÐÐÇËÞ²àÎËÊÊß
, and
verify the new configuration.