HP Xw5000 hp workstation xw5000 Technical Reference (309233-001 10/02) - Page 72
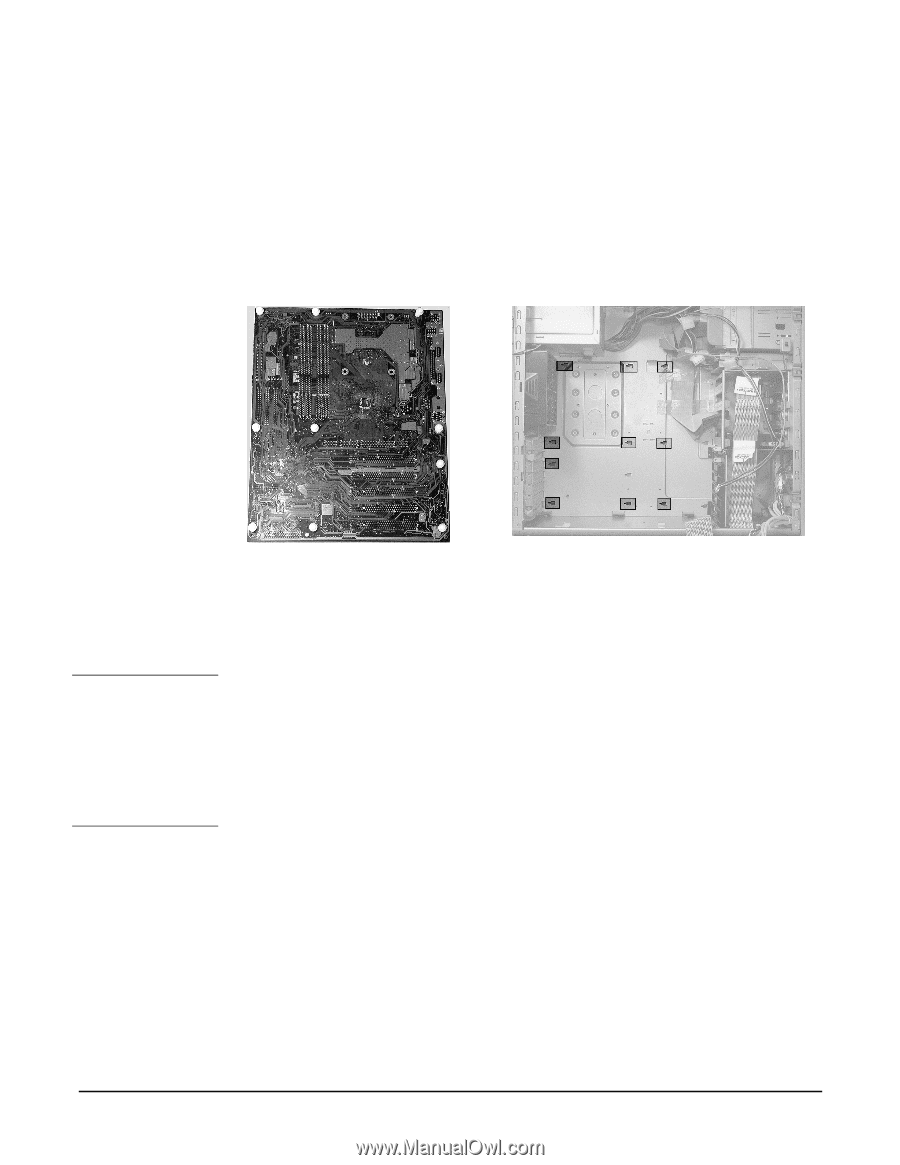
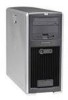
Installing the New System Board, Aligning the System Board
 |
UPC - 613326803318
View all HP Xw5000 manuals
Add to My Manuals
Save this manual to your list of manuals |
Page 72 highlights
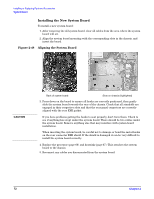
Installing the New System Board To install a new system board: 1. After removing the old system board, clear all cables from the area where the system board will sit. 2. Align the system board mounting with the corresponding slots in the chassis, and insert the board. Figure 2-48 Aligning the System Board 3. Press down on the board to ensure all hooks are correctly positioned, then gently slide the system board towards the rear of the chassis. Check that all standoffs are engaged in their respective slots and that the rear panel connectors are correctly aligned with the rear EMI gasket. If you have problems getting the hooks to seat properly, don't force them. Check to see if anything has crept under the system board. There should be two cables under the system board. Remove anything else that may interfere with system board installation. When inserting the system board, be careful not to damage or bend the metal hooks on the rear connector EMI shield. If the shield is damaged it can be very difficult to install the system board correctly. 4. Replace the processor (page 66) and heatsink (page 67). This attaches the system board to the chassis. 5. Reconnect any cables you disconnected from the system board.
-
 1
1 -
2
-
3
-
4
-
5
-
6
-
7
-
8
-
9
-
10
-
11
-
12
-
13
-
14
-
15
-
16
-
17
-
18
-
19
-
20
-
21
-
22
-
23
-
24
-
25
-
26
-
27
-
28
-
29
-
30
-
31
-
32
-
33
-
34
-
35
-
36
-
37
-
38
-
39
-
40
-
41
-
42
-
43
-
44
-
45
-
46
-
47
-
48
-
49
-
50
-
51
-
52
-
53
-
54
-
55
-
56
-
57
-
58
-
59
-
60
-
61
-
62
-
63
-
64
-
65
-
66
-
 67
67 -
 68
68 -
 69
69 -
 70
70 -
 71
71 -
 72
72 -
 73
73 -
 74
74 -
 75
75 -
 76
76 -
 77
77 -
78
-
79
-
80
-
81
-
82
-
83
-
84
-
85
-
86
-
87
-
88
-
89
-
90
-
91
-
92
-
93
-
94
-
95
-
96
-
97
-
98
-
99
-
100
-
101
-
102
-
103
-
104
-
105
-
106
-
107
-
108
-
109
-
110
-
111
-
112
-
113
-
114
-
115
-
116
-
117
-
118
 |
 |